Chapter 2 Sales
Your love gives me such a thrill,
but your love don’t pay my bills
I need money
That’s what I want
2.1 Customers
All sales involve several key ingredients, but the single most important component is the customer! Customers reach out to Good Tree for delivery services through one of several pathways: they call us, they text us, they order through a 3rd party like Weedmaps or Leafly, but primarily they order on our eCommerce website.
2.2 Processing New Customers
A “Person Account” must be created in Salesforce before a customer can place an order. However, to ensure that we properly verify all customers, we must first create an “Unverified Customer” and convert them into a “Person Account”.
When a new customer signs up online or reaches out to us via phone call or text, Salesforce will automatically create an “Unverified Customer” with only basic information like the customer’s phone number.
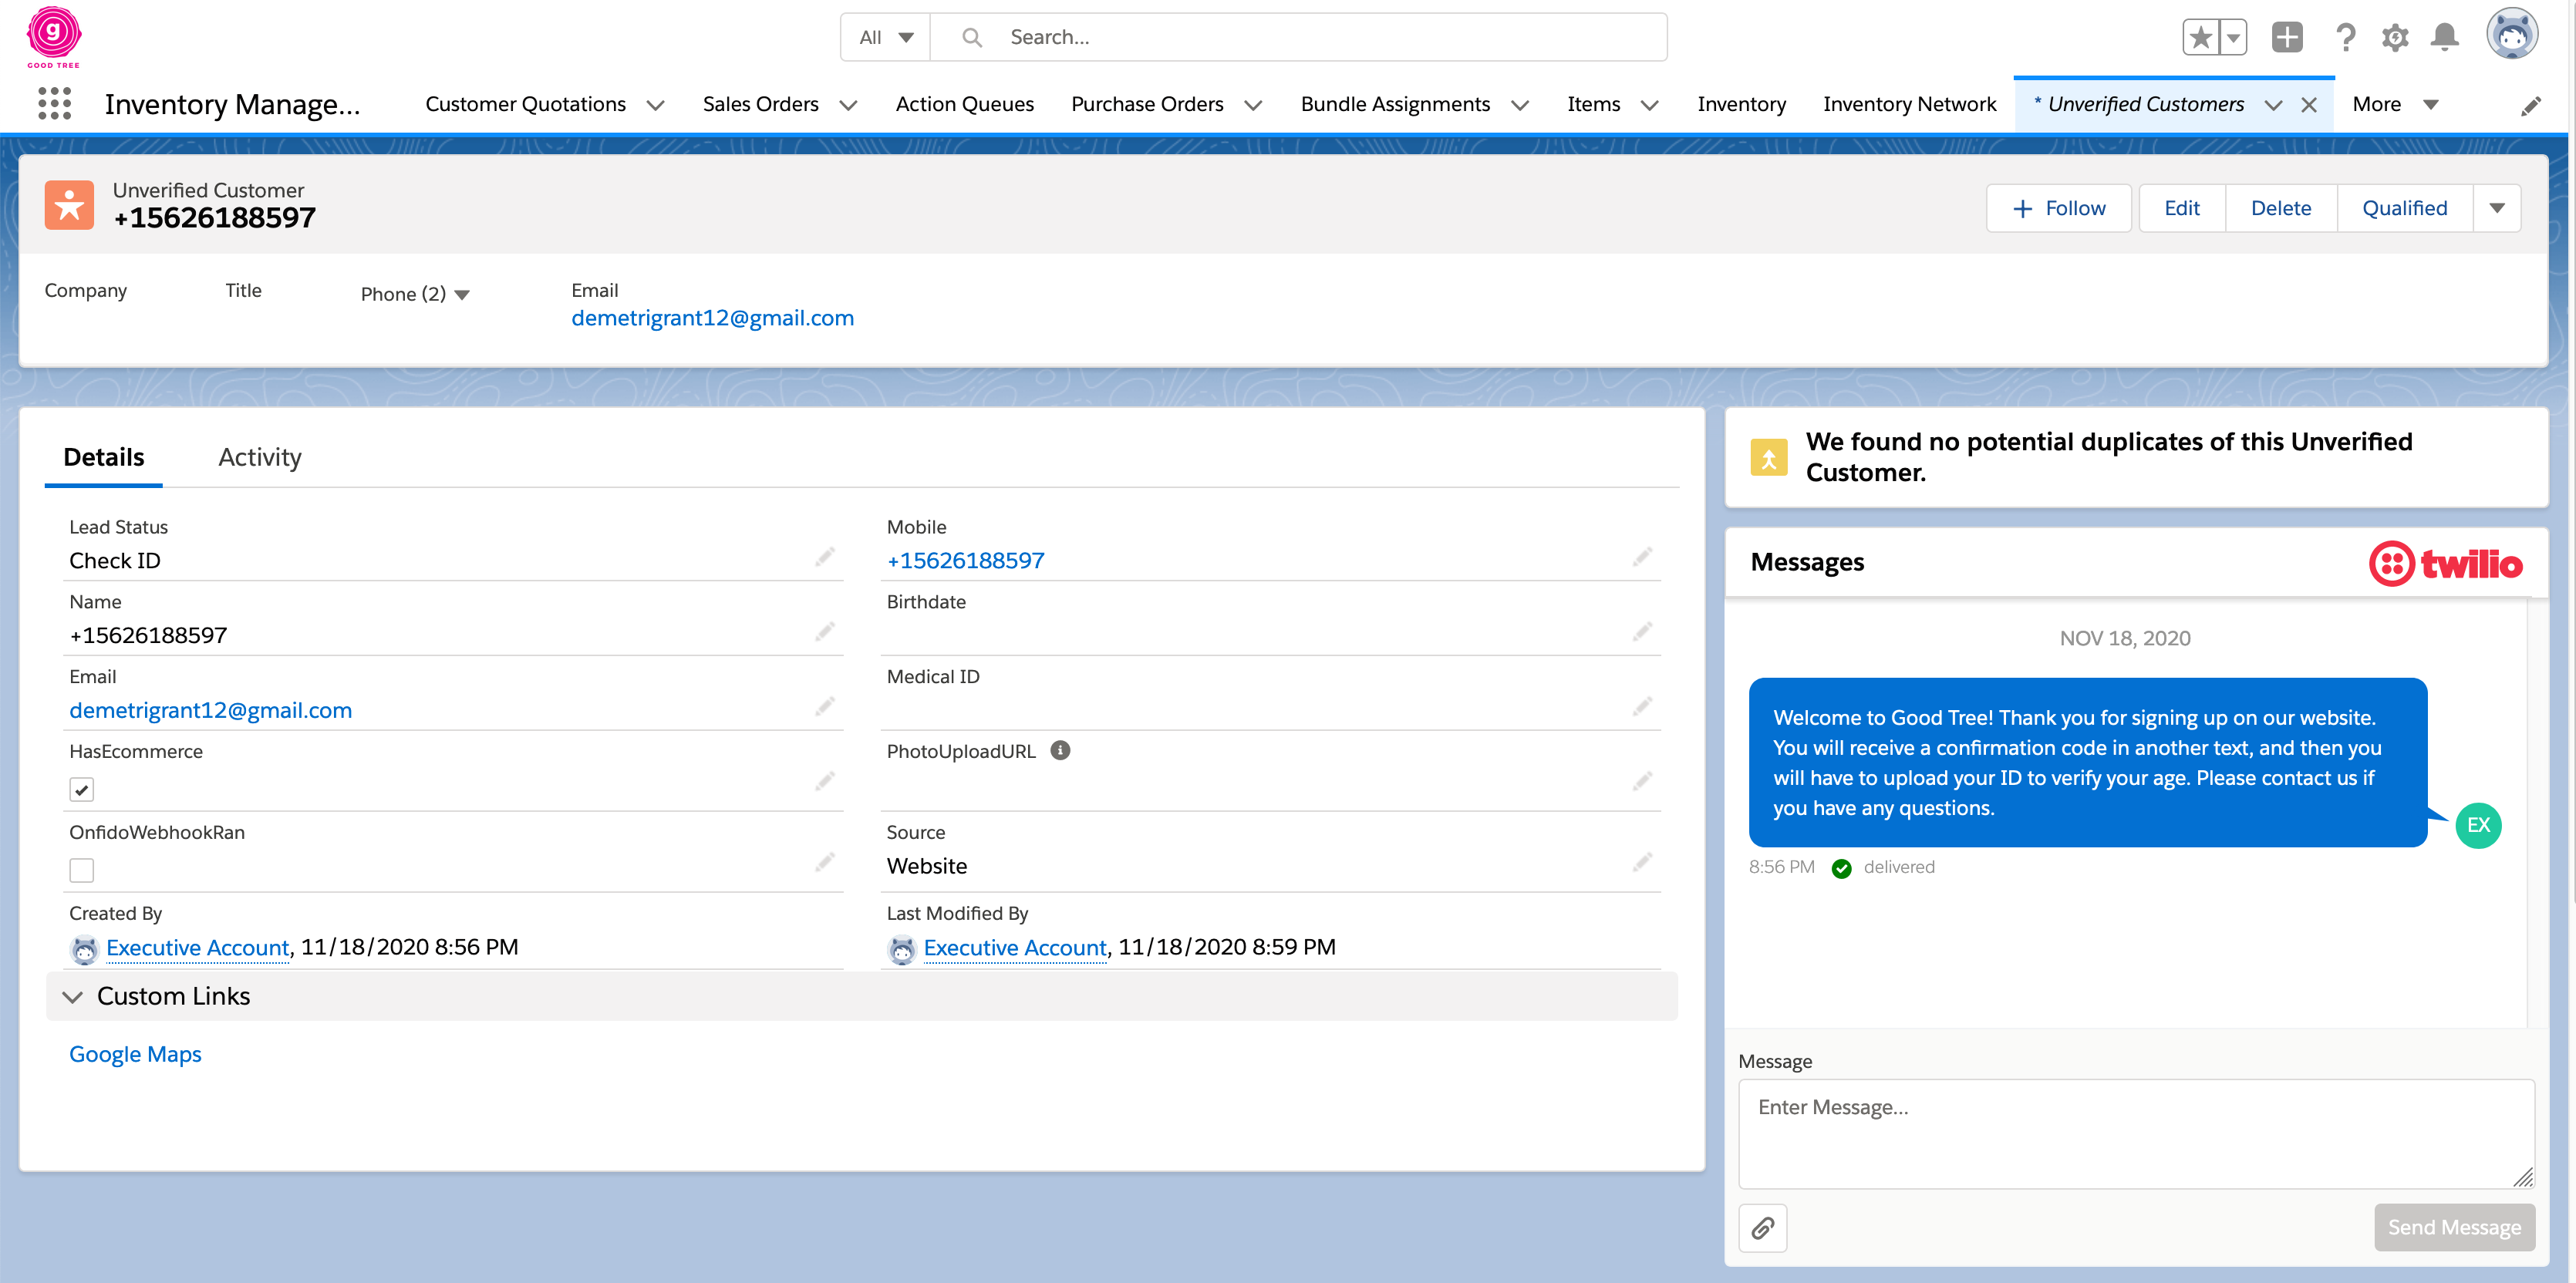
Unverified Customer
If the new customer comes via Weedmaps, or Leafly you will need to manually create the “Unverified Customer” account by going to the “Unverified Customer” tab and selecting the “New” button on the top right. (NOTE: Weedmaps will be automated in near future, and Leafly has fairly limited activity, but will be automated)
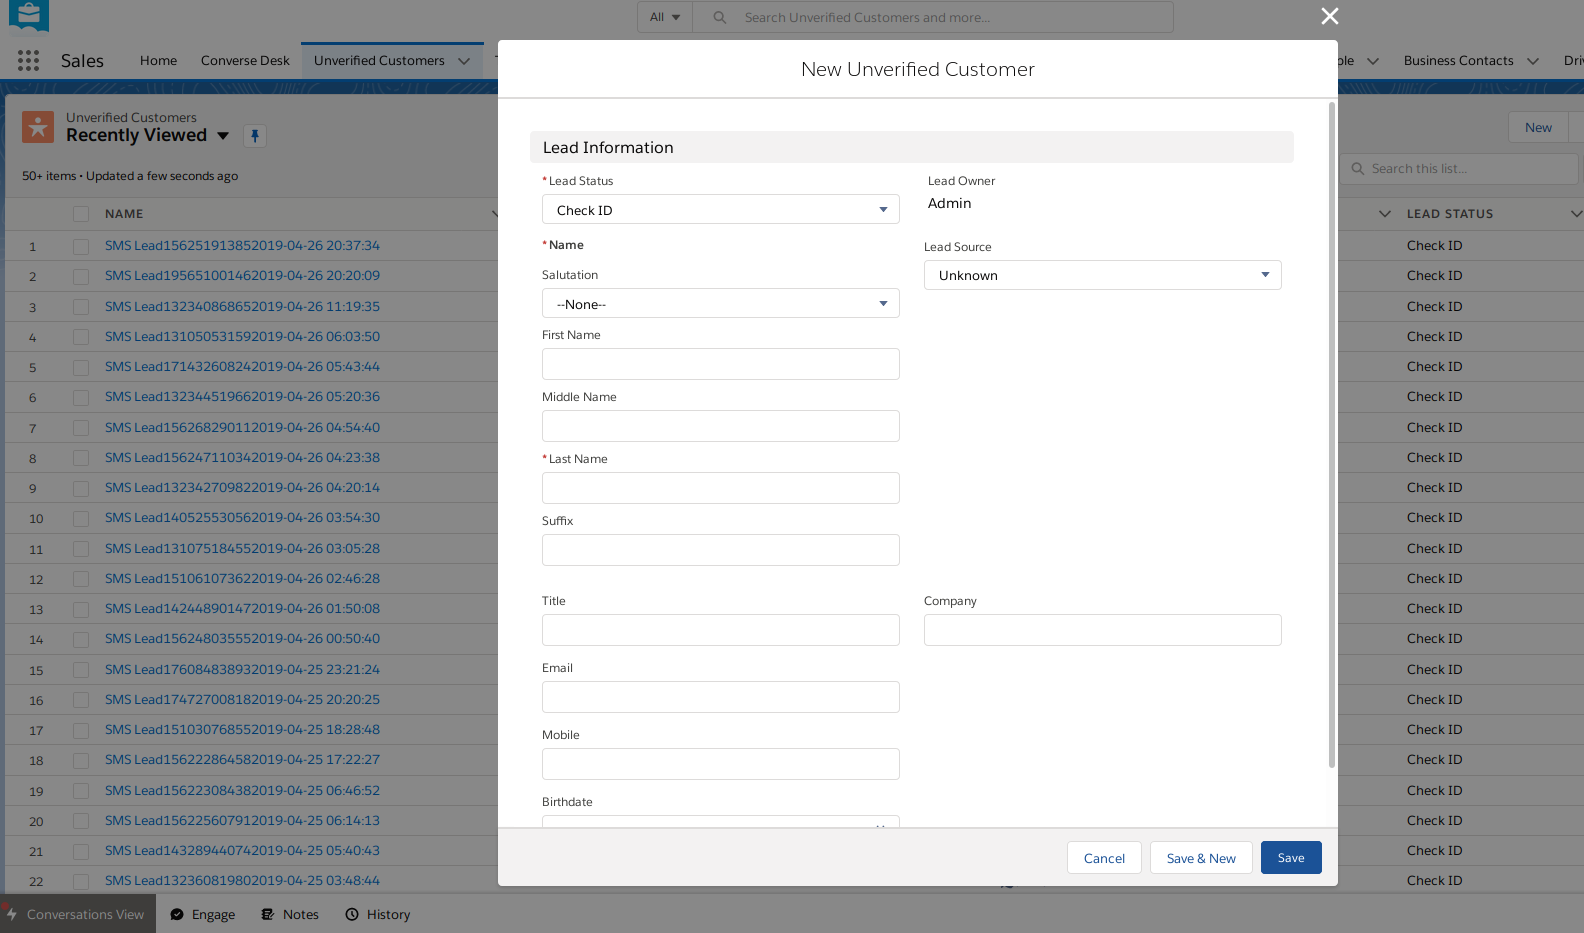
Enter Unverified Customer Manually
Here is a table with the meaning of the “Unverified Customer” fields:
| Fields | Description | Required |
|---|---|---|
| Lead Status | Two states: Check ID, or Qualified, but should always be Check ID when you start process | Yes |
| First Name | Yes | |
| Last Name | Yes | |
| Mobile | Phone Number of customer | Yes to convert |
| Birthdate | Customer’s birthdate | Yes to convert |
| Email of Customer | No | |
| Medical ID # | If customer has valid medical card, include ID # here | No unless customer is less than 21 years old |
| OnfidoWebhookRan | Checkbox indicating whether unverified customer has submitted their ID on Onfido | No |
Once you have populated all the required fields, you can convert the “Unverified Customer” to a “Person Account” by clicking on the “Qualified” button on the top right of the page.
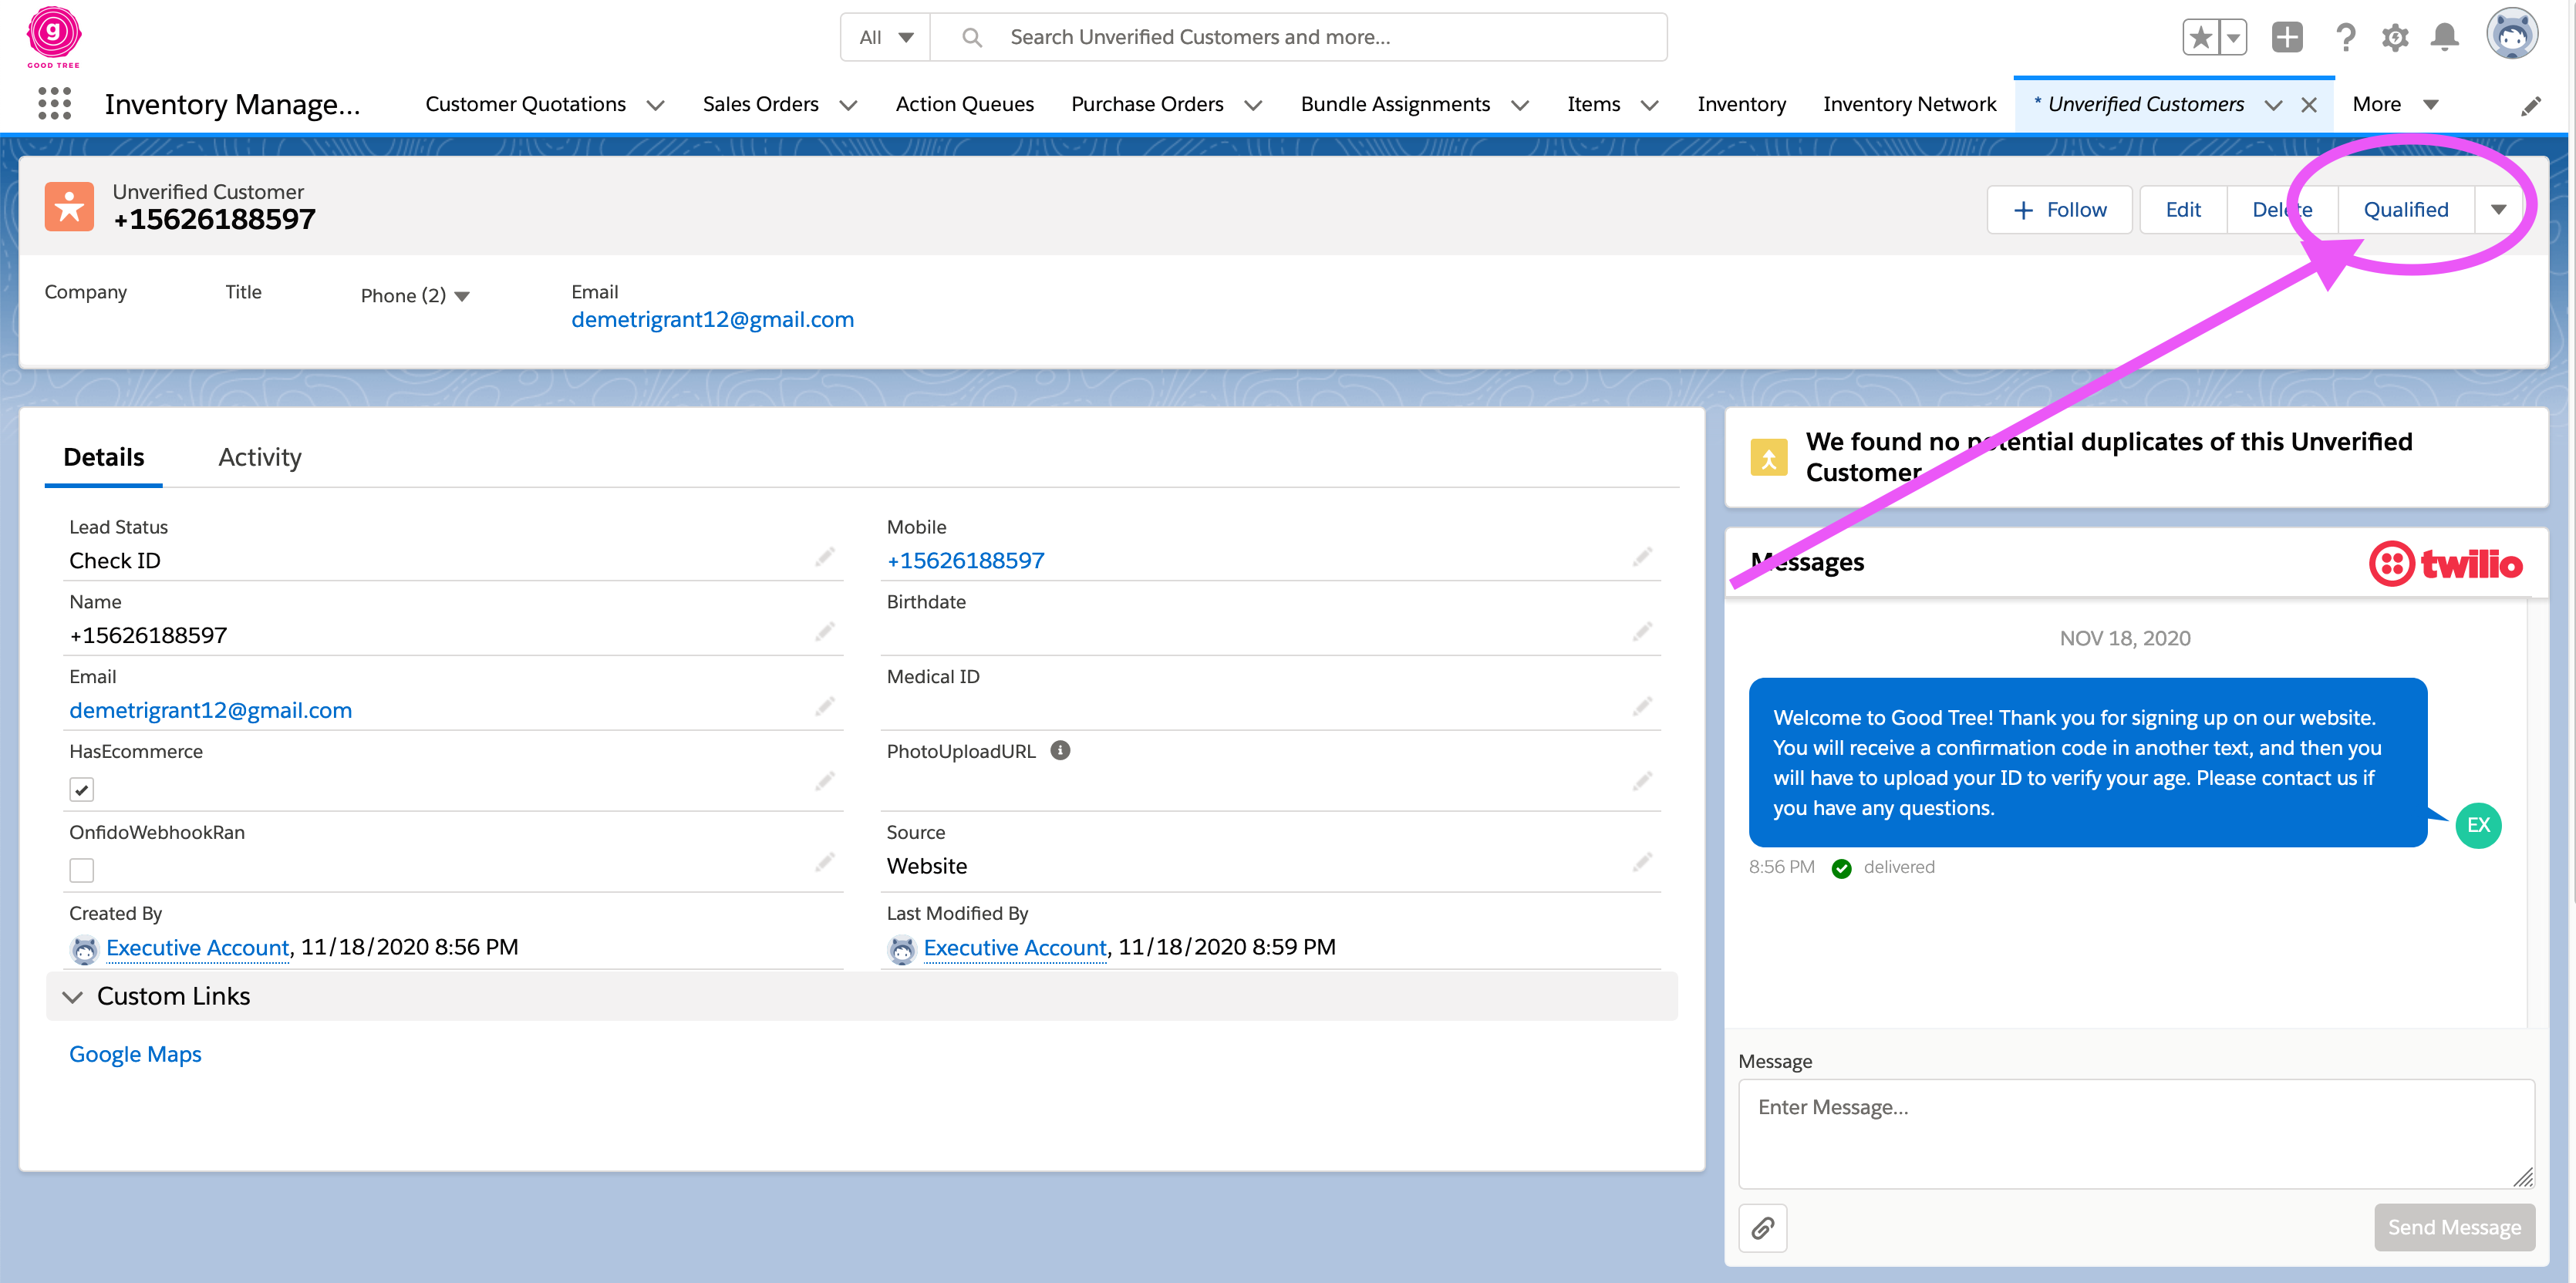
Qualified button to convert unverified customers to person accounts
If you forget to populate any of the required fields you should receive an informative error message:
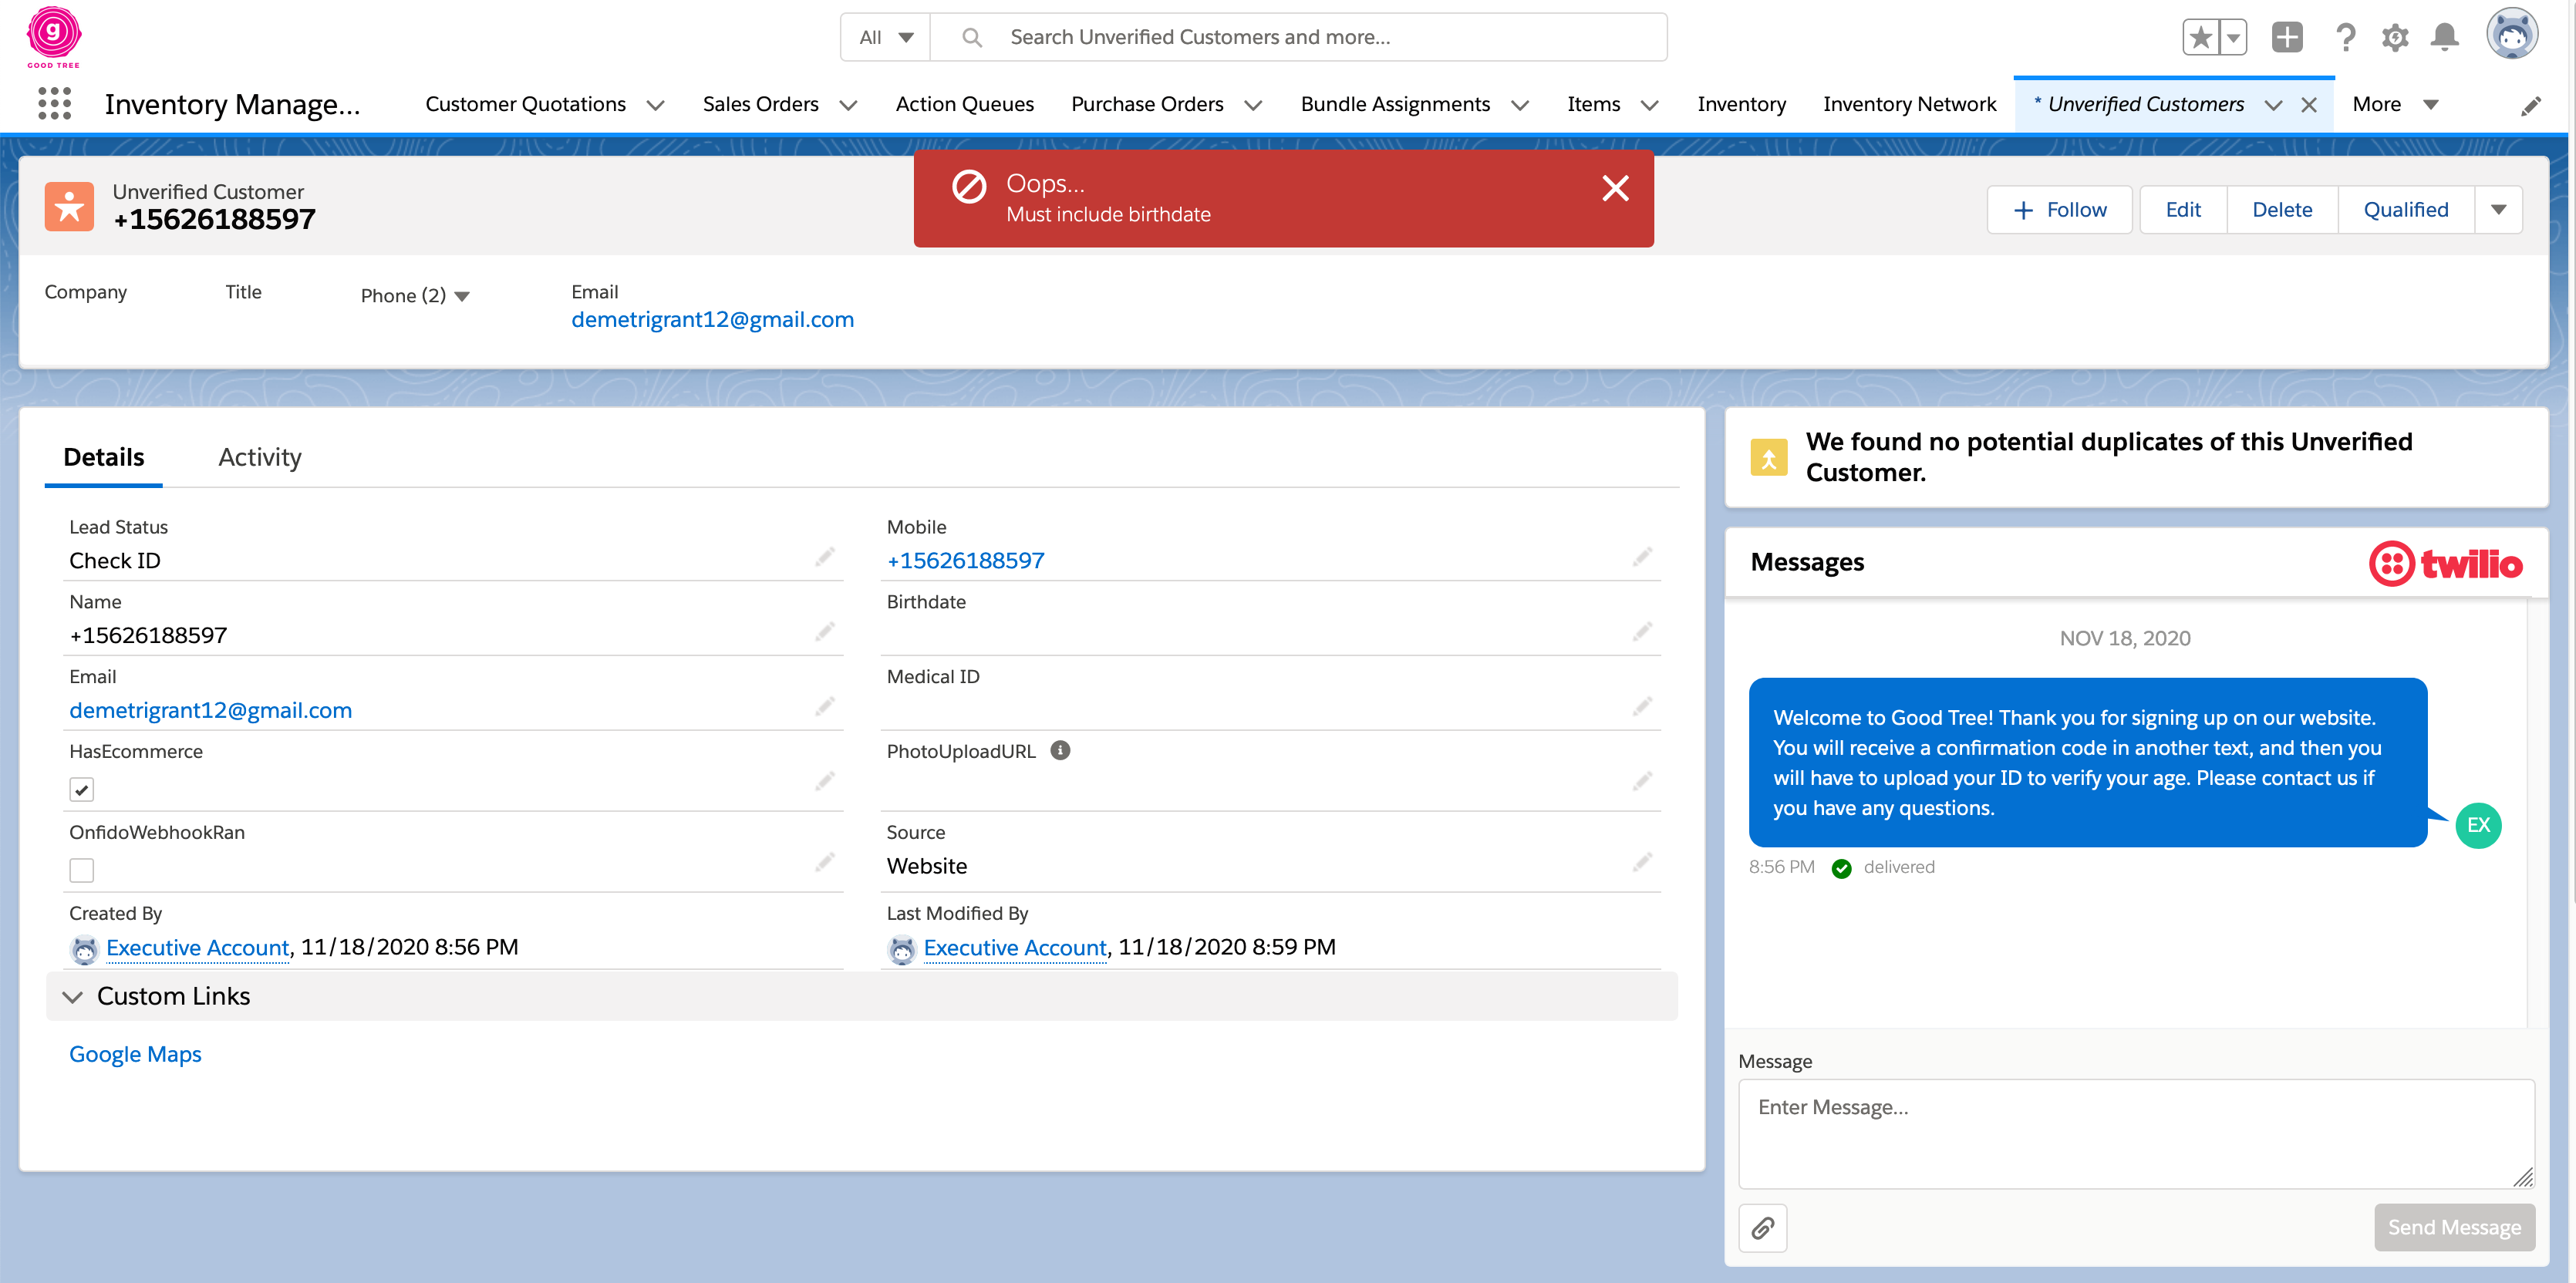
Error message after pressing Qualified without entering birthdate
2.2.1 Onfido
When customers sign up online they are sent to a service named Onfido where they submit an image of their ID or passport. If Onfido can verify that the customer is at least 21 years old the system will automatically convert the “Unverified Customer” to a “Person Account”. However a few problems can potentially arise:
- The customer might not actually submit their ID online for whatever reason so sometimes customers simply stop at this point in the signup process
- Customer may submit ID, but they aren’t actually 21
- Customer may submit ID, but Onfido can’t parse the necessary information because the image is blurry or some other reason
For the 2nd and 3rd cases customers will receive an automated text saying that they should text their ID to us for manual verification. For the 1st case customers will receive a text the following morning reminding them to complete the verification process.
It might be useful for dispatchers to be able to review Onfido results. You can view the Onfido dashboard here
PLEASE KEEP IN MIND THE CHECKBOZ AT TOP RIGHT NEEDS TO BE CHECKED!!!
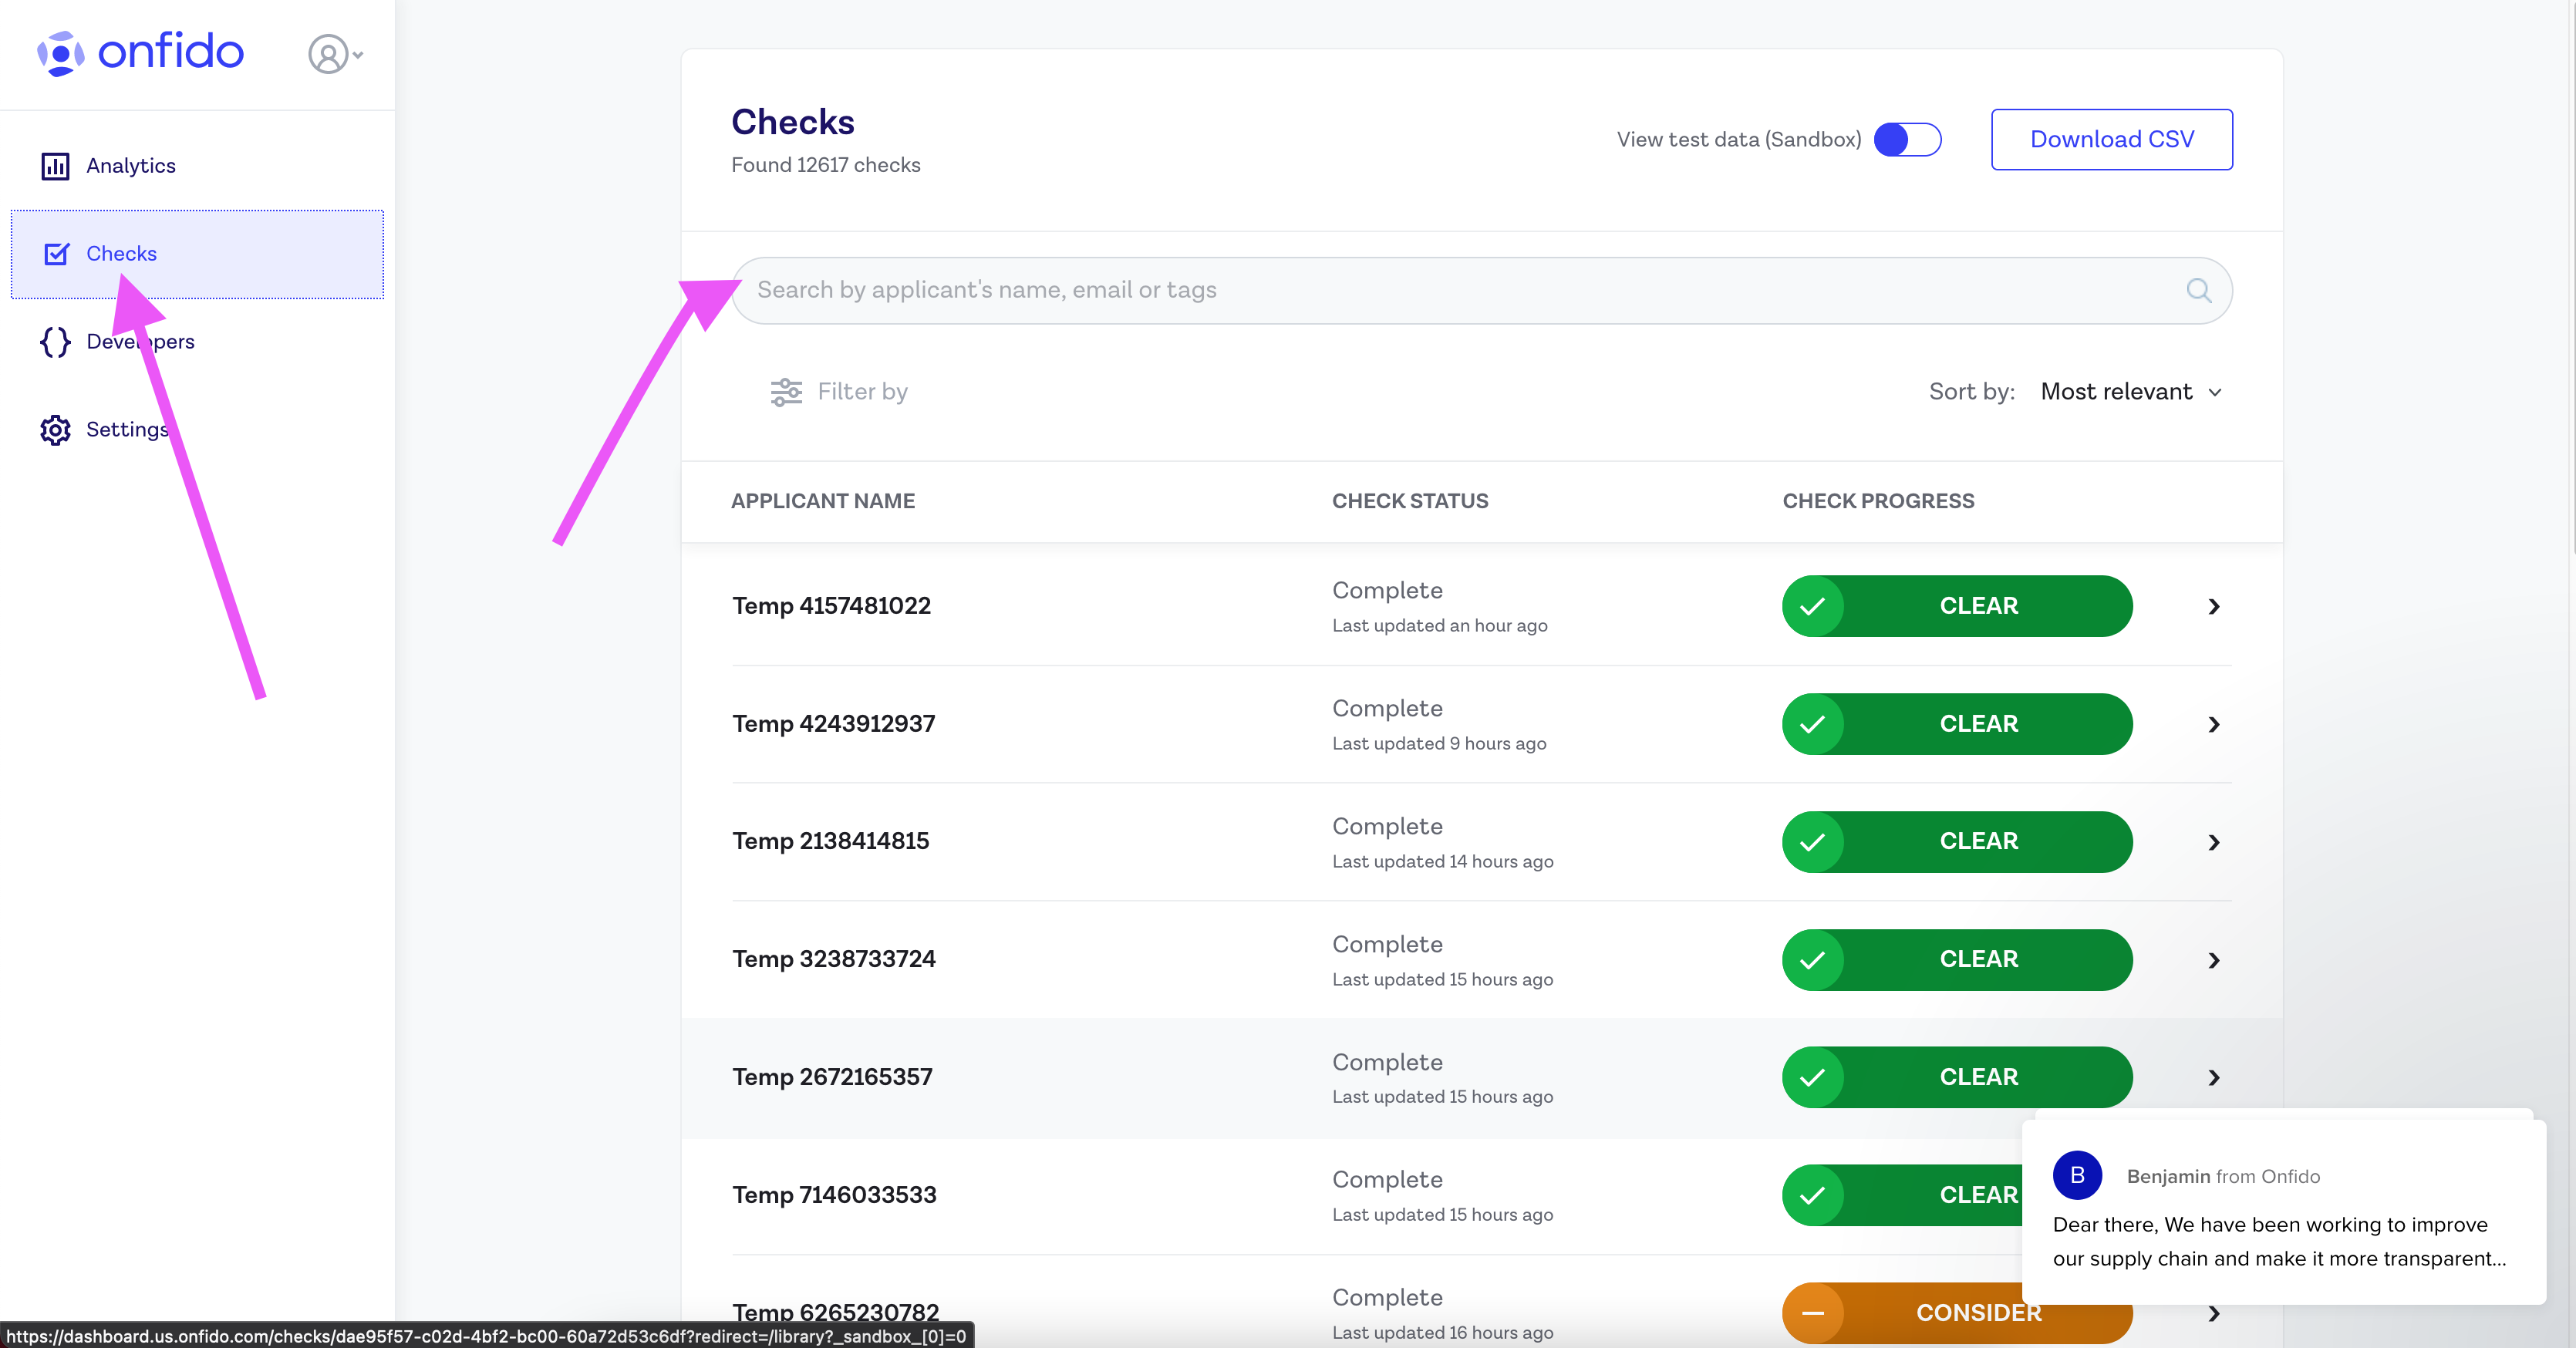 You review Onfido submissions by clicking the “Checks” tab on the left. You can then search by either phone number or by email address (but you will need to enclose the email address in quotes ie “person@email.com”). You can click on the log to review the information including the image they customer submitted)
Onfido Document
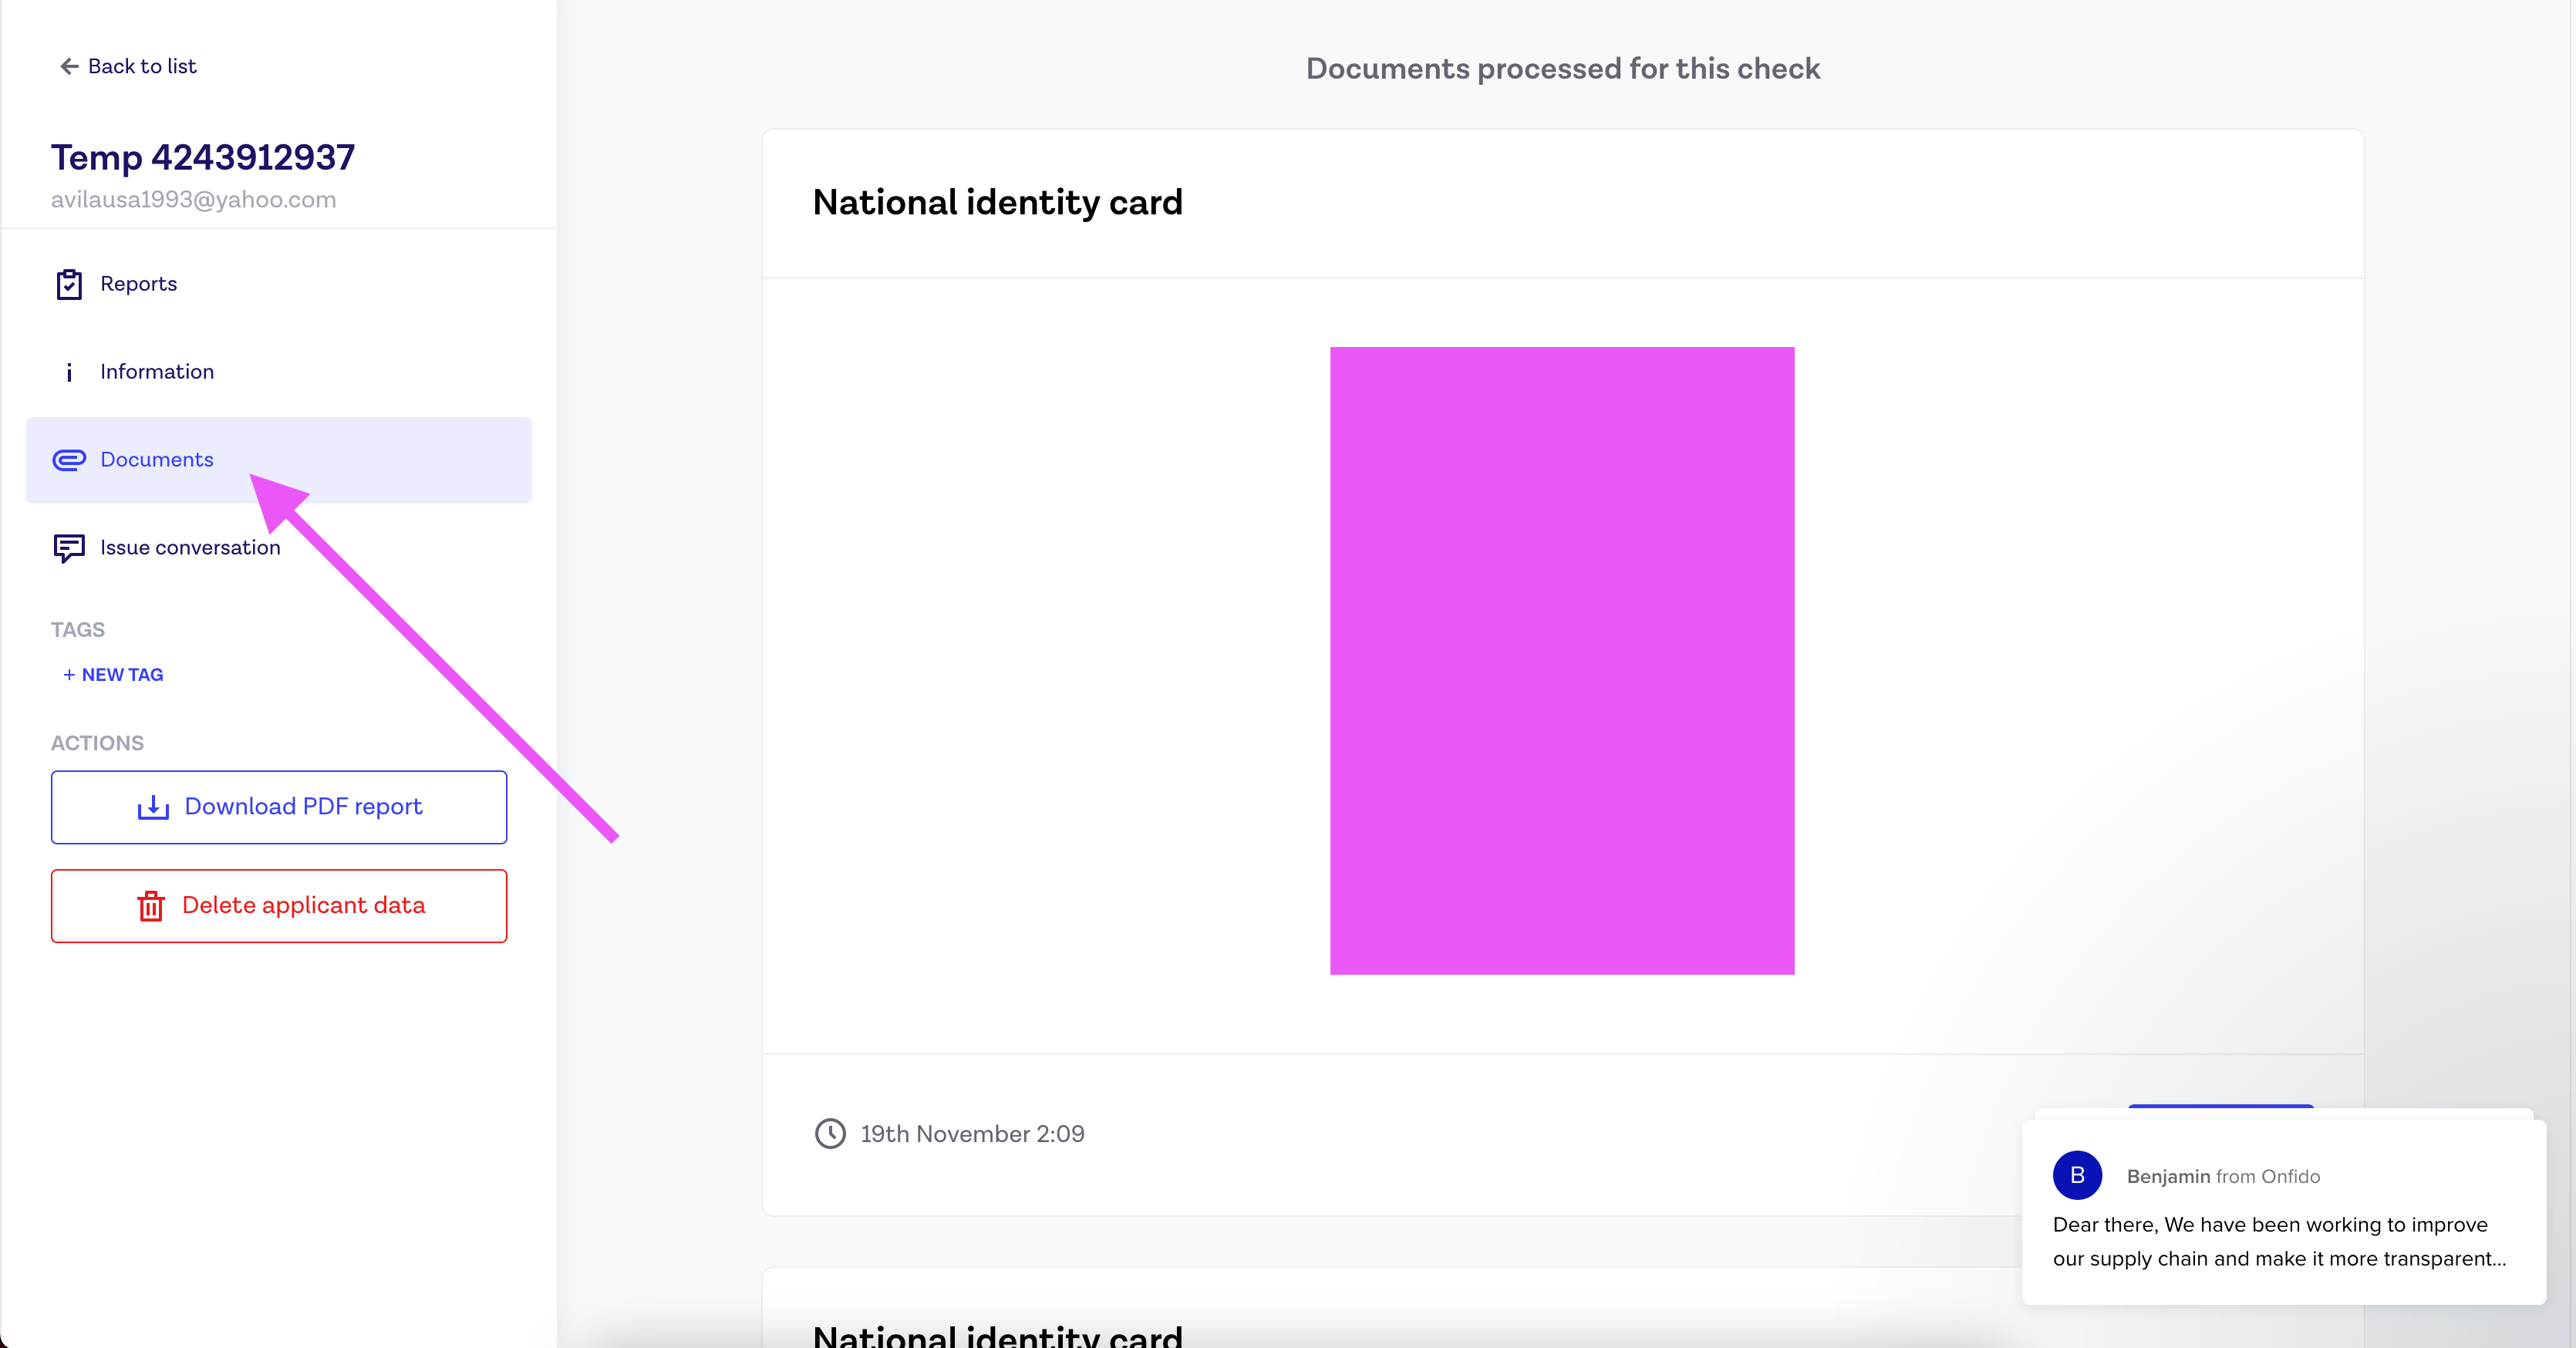
By clicking on the “Documents” tab on the Onfido log page, you can see the image the customer submitted of their ID.
2.2.1.1 SCENARIO
2.3 Processing Orders
There are two concepts that are important to understand:
Quotes
Sales Orders
2.3.1 Quotes
When customers contact Good Tree over the phone or via text, they do not always end up submitting an order. The initial process where customers communicate with dispatchers, asking questions about available products, and prices is known as the “quoting” process. The terminology is slightly better suited for other industries; if you imagine for a moment that Good Tree sold wallpaper, and customers called in saying what wallpaper they wanted for their kitchen, the quoting process would involve asking how many square feet is the customer’s kitchen and then providing a price for the appropriate amount of wallpaper for that many square feet, at which point the customer would either decide to proceed with a Sales Order or potentially seek a quote elsewhere.
This means for dispatchers, quotes are the primary object you will work with. Ultimately, the goal of every quote is to be converted into a Sales Order.
2.3.2 Sales Orders
Sales Orders may seem redundant, and in some ways they are because they hold almost all of the same information that quotes hold, but Sales Orders represent an agreed upon arrangement between Good Tree and the customer. Dispatchers may need to interact with Sales Orders if customers contact us saying they want to edit or cancel their order, but ideally if the Onfleet task is fulfilled quickly there should not be any reason for dispatchers to directly interact with Sales Orders.
Sales Orders are created when quotes are converted, or when customers submit an order online. When the Sales Order is created so is the related Onfleet task for that delivery, and when the related Onfleet task is completed the Sales Order is shipped and completed. We will go into more detail about Onfleet later.
2.3.3 Person Account
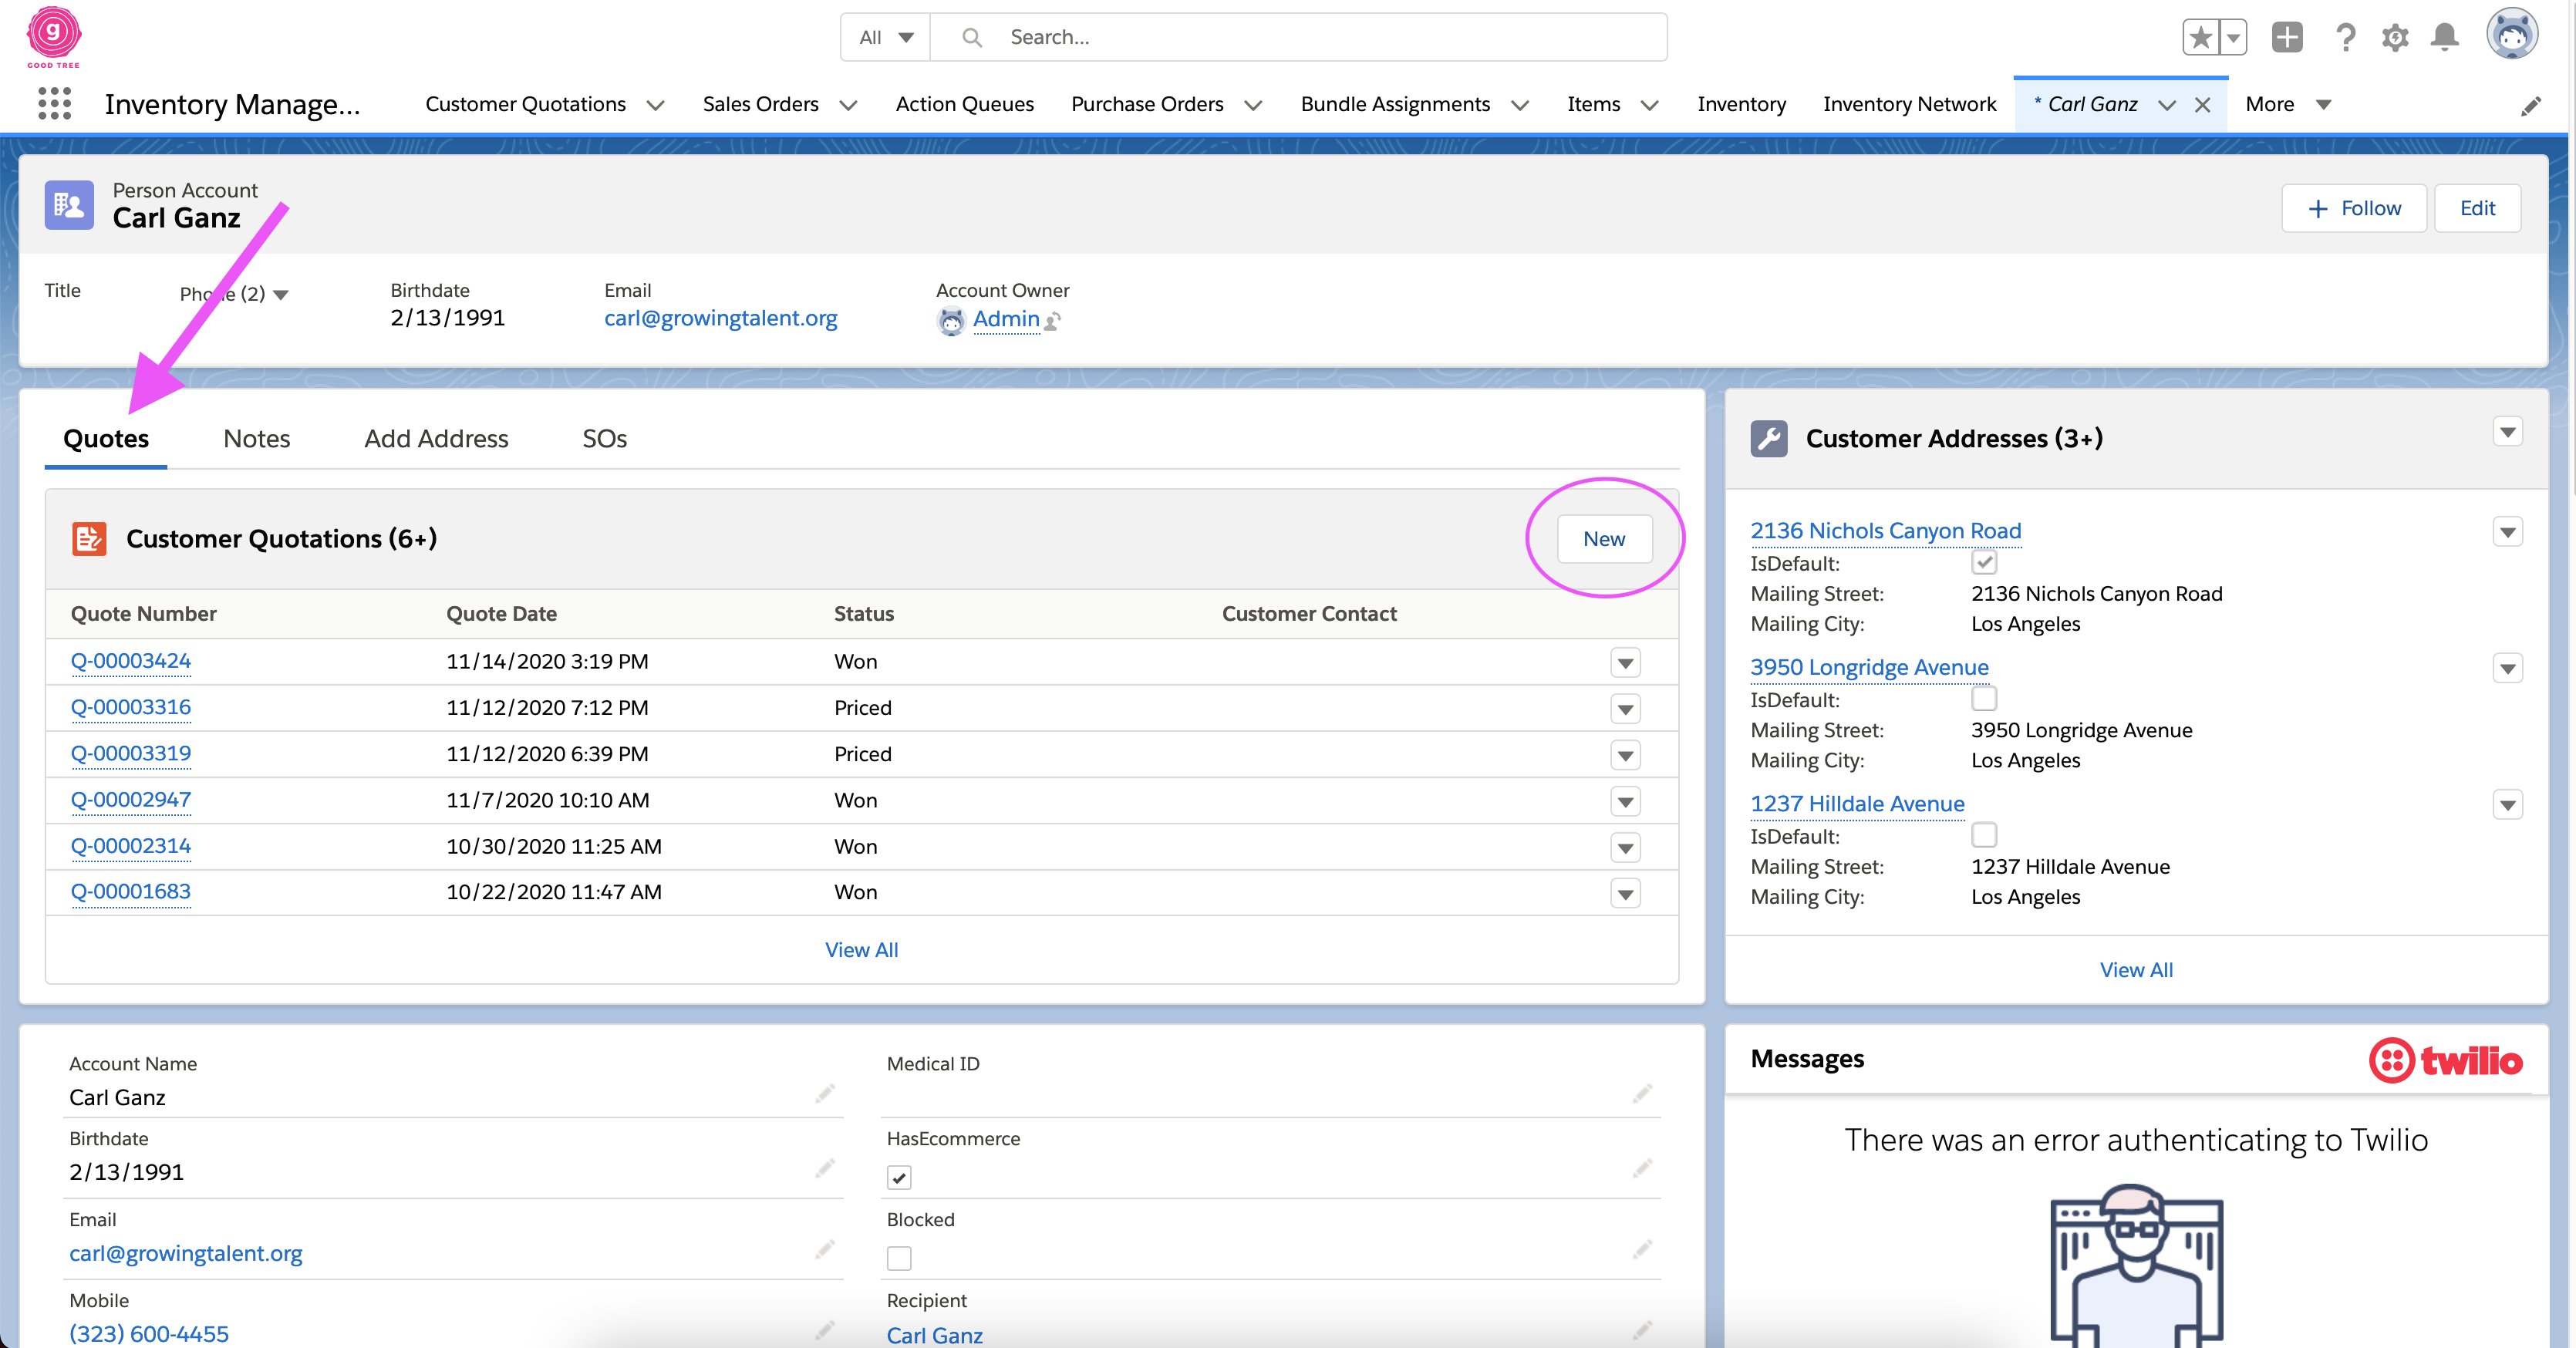
The first step of processing any order is going to that customer’s “Person Account” page. If this is a new customer without a “Person Account” page you will need to follow the steps in the previous section to add the customer to the system first.
When customers contact us via phone or text, their account will be easily accessible via Twilio Flex (which we will describe in more detail later). You can also go to Person Account pages by entering the customer’s name or phone number or email in the search bar at the top of Salesforce.

Person Account info
Here is a table with the meaning of the “Person Account” fields:
| Fields | Description | Required |
|---|---|---|
| First Name | Yes | |
| Last Name | Yes | |
| Mobile | Phone Number of customer | Yes |
| Birthdate | Customer’s birthdate | Yes |
| Email of Customer | No | |
| Medical ID | Medical Card ID # | No |
| Blocked | This field indicates whether a customer has been blocked. Defaults to False | Yes, but defaults to False |
| HasEcommerce | Checkbox indicating whether customer is signed up on our website. | No |
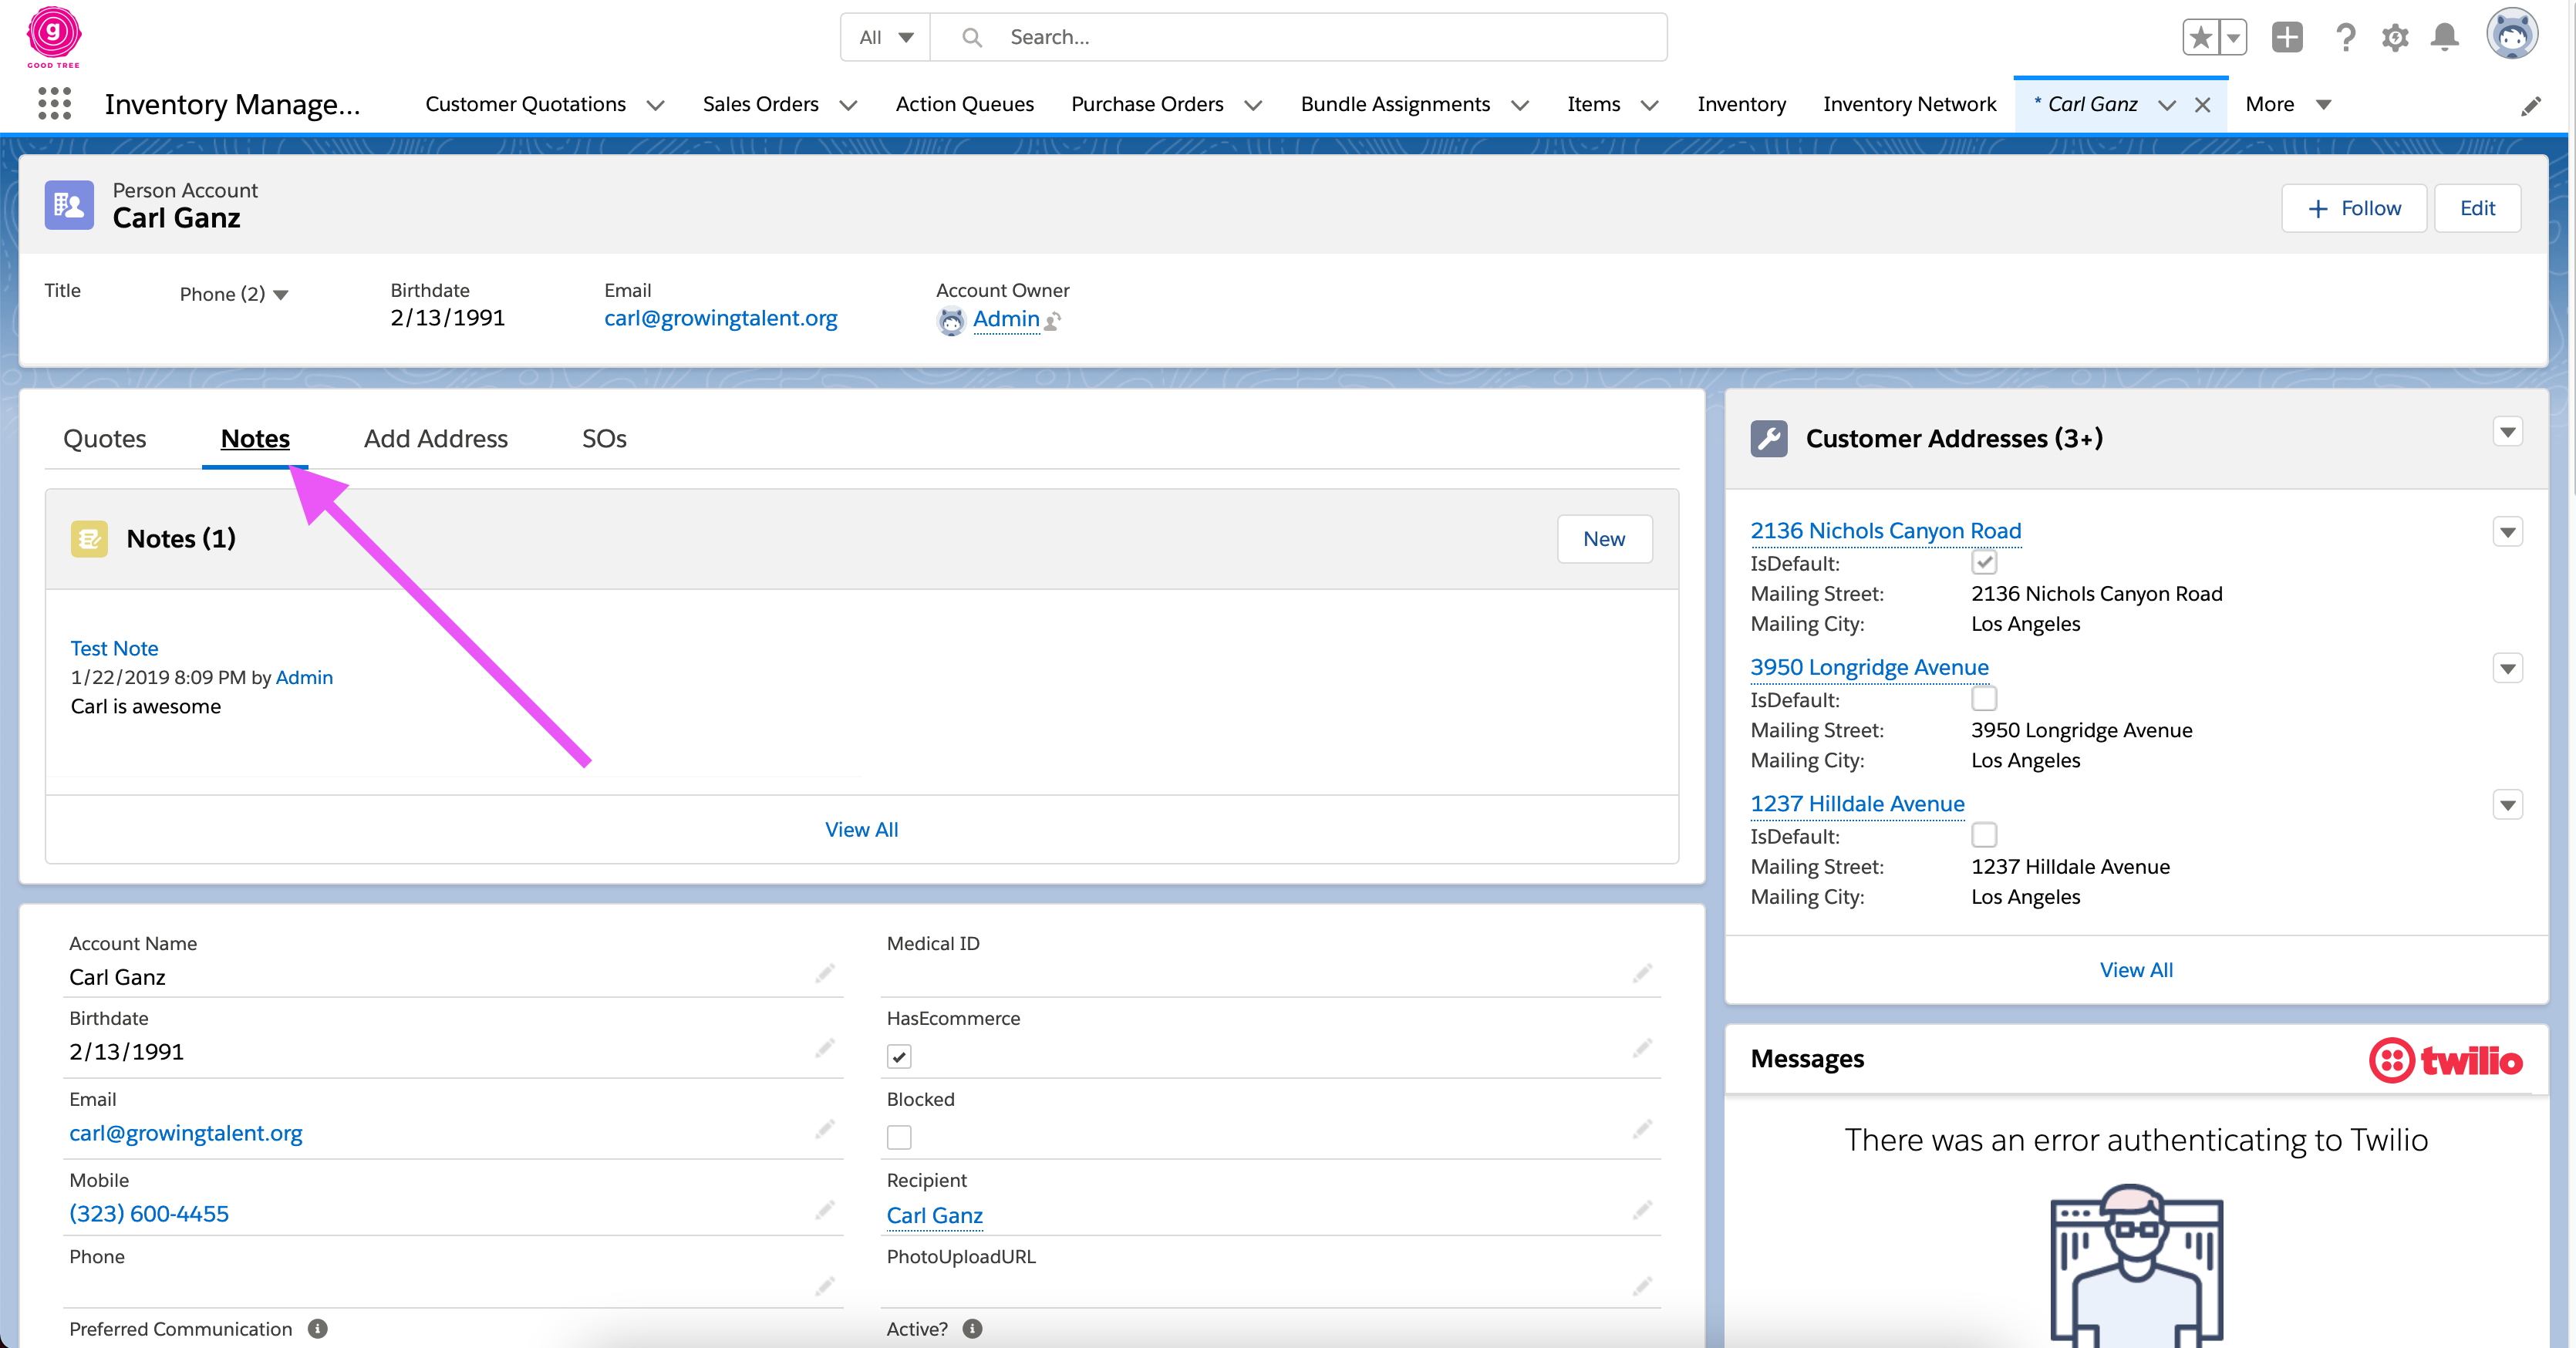 The notes tab allows dispatchers to share info about a customer like credits or other issues from past orders.
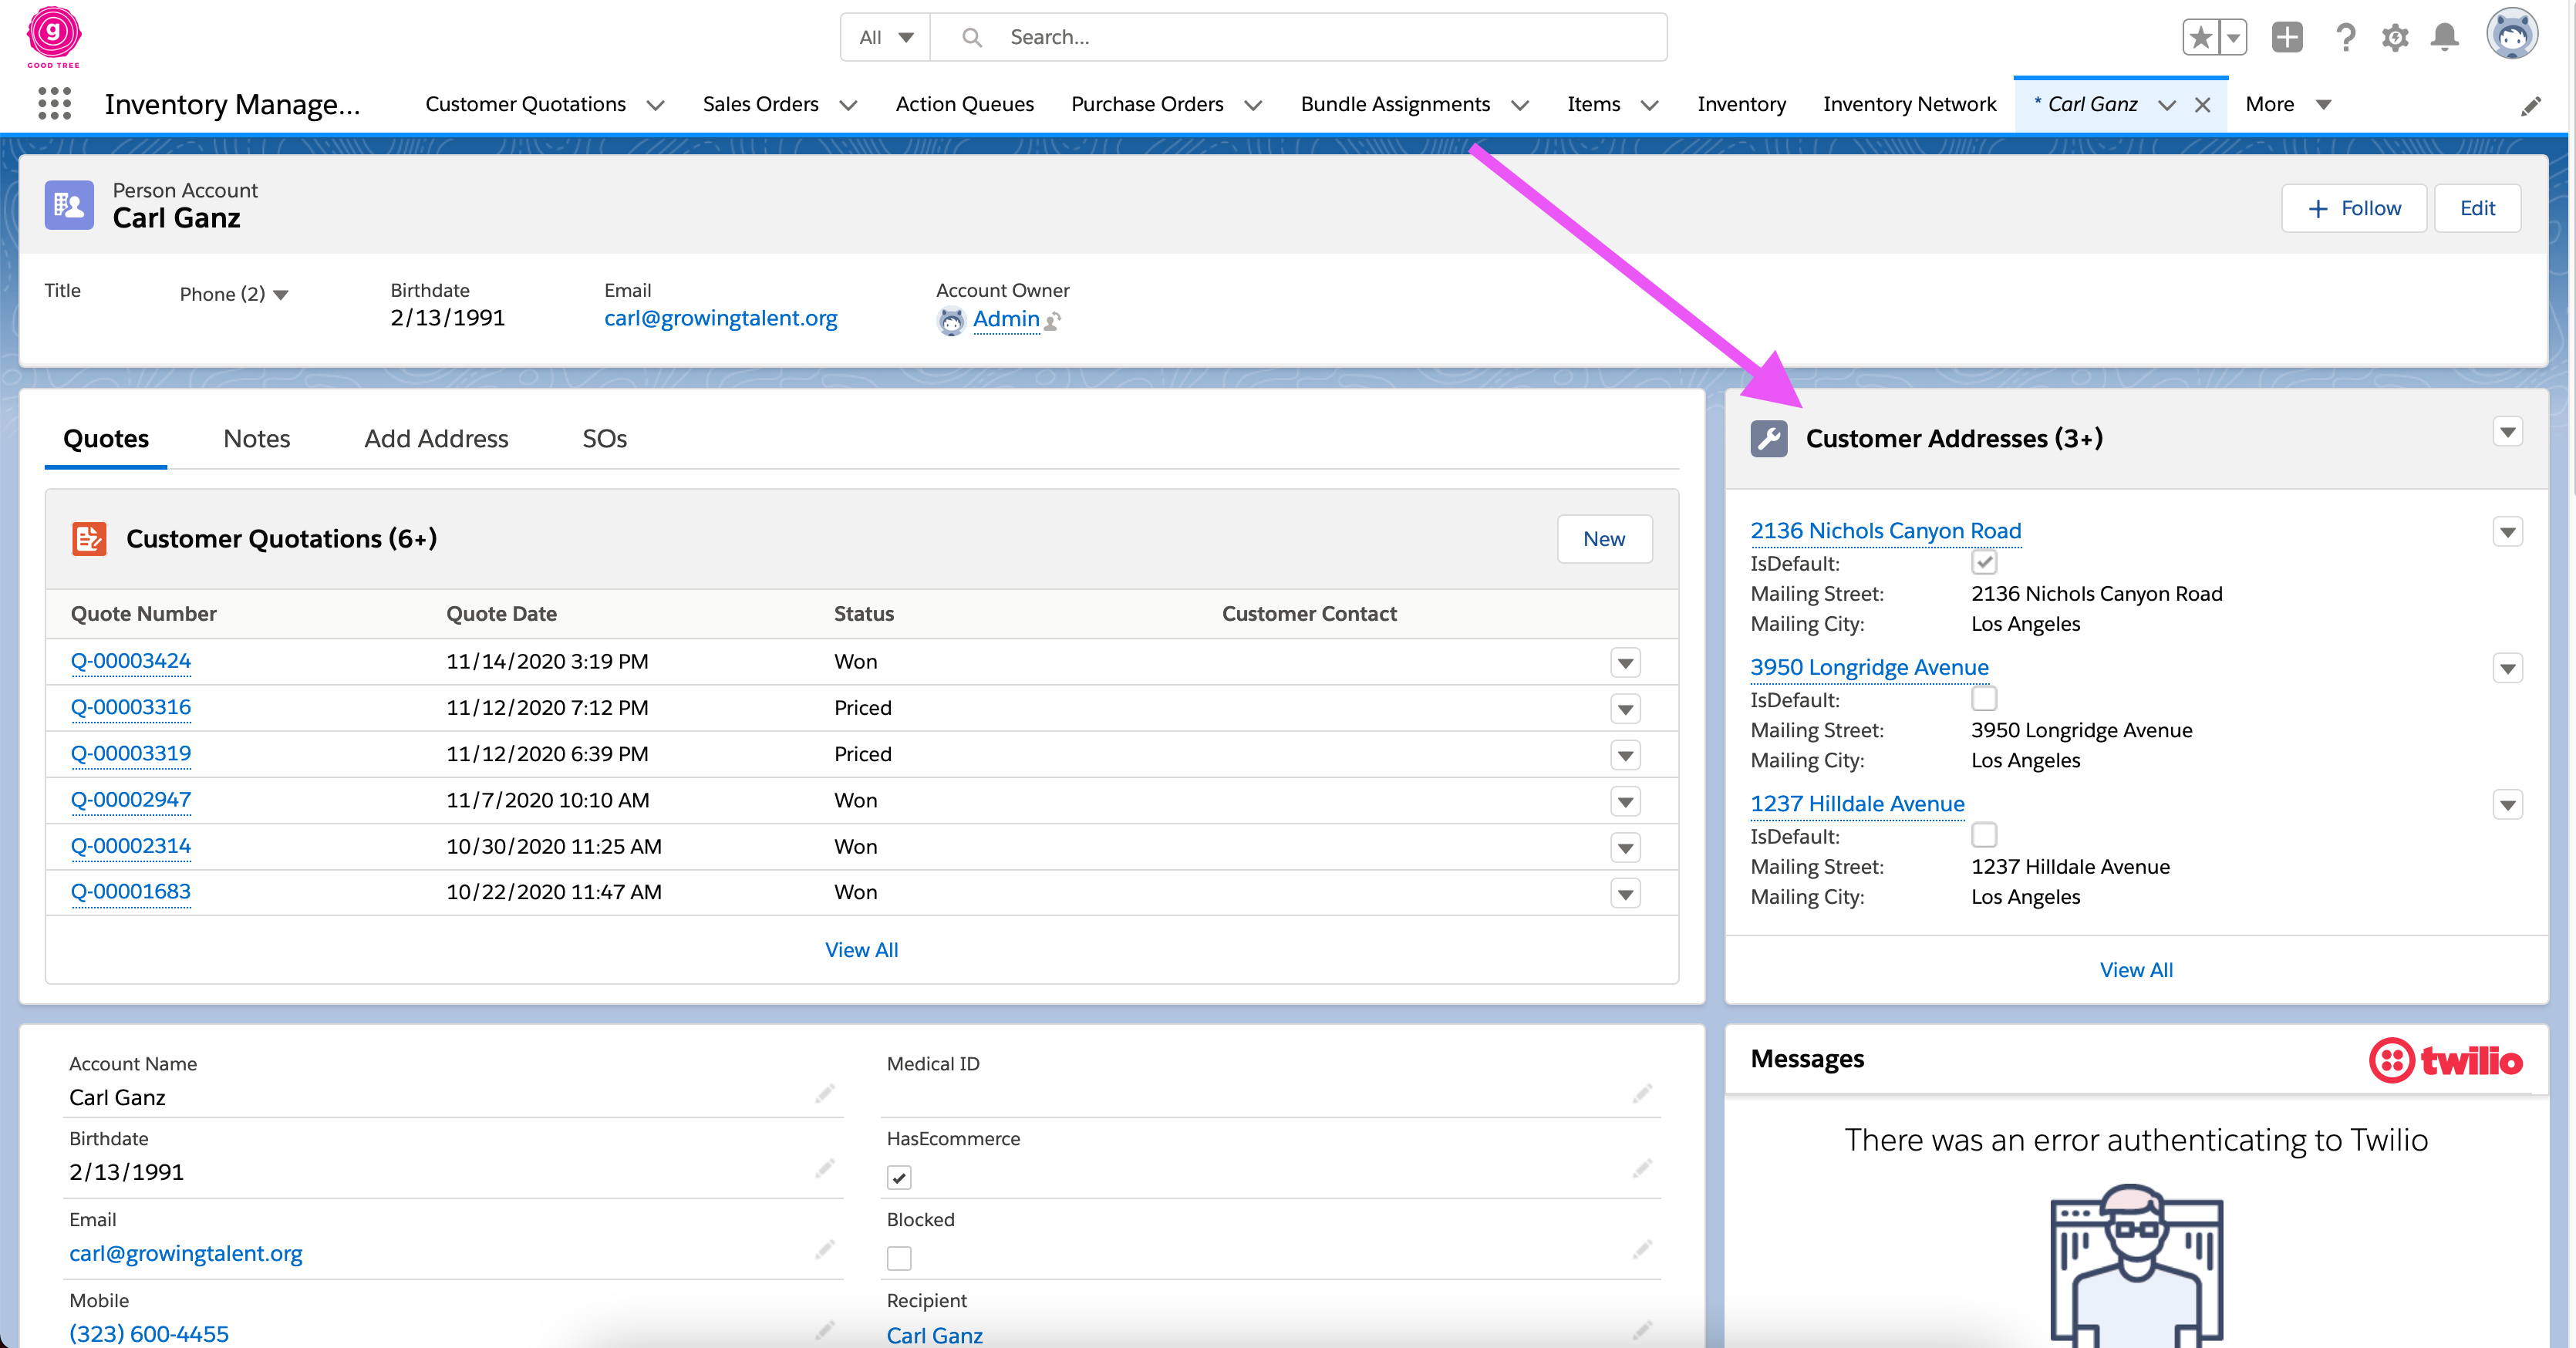
Customer Addresses
On top right of Person Account page is a related list named Customer Addresses. These are delivery locations that linked to the customer’s account either by the customer via the website or manually by a dispatcher.

Adding Addresses
Adding a new address to a customer’s account requires going to the ‘Add Address’ tab. This provides an interactive Google Map where the address location can be validated and then saved with the button on the bottom left of the map.
2.3.4 Quote
Customer Quotations
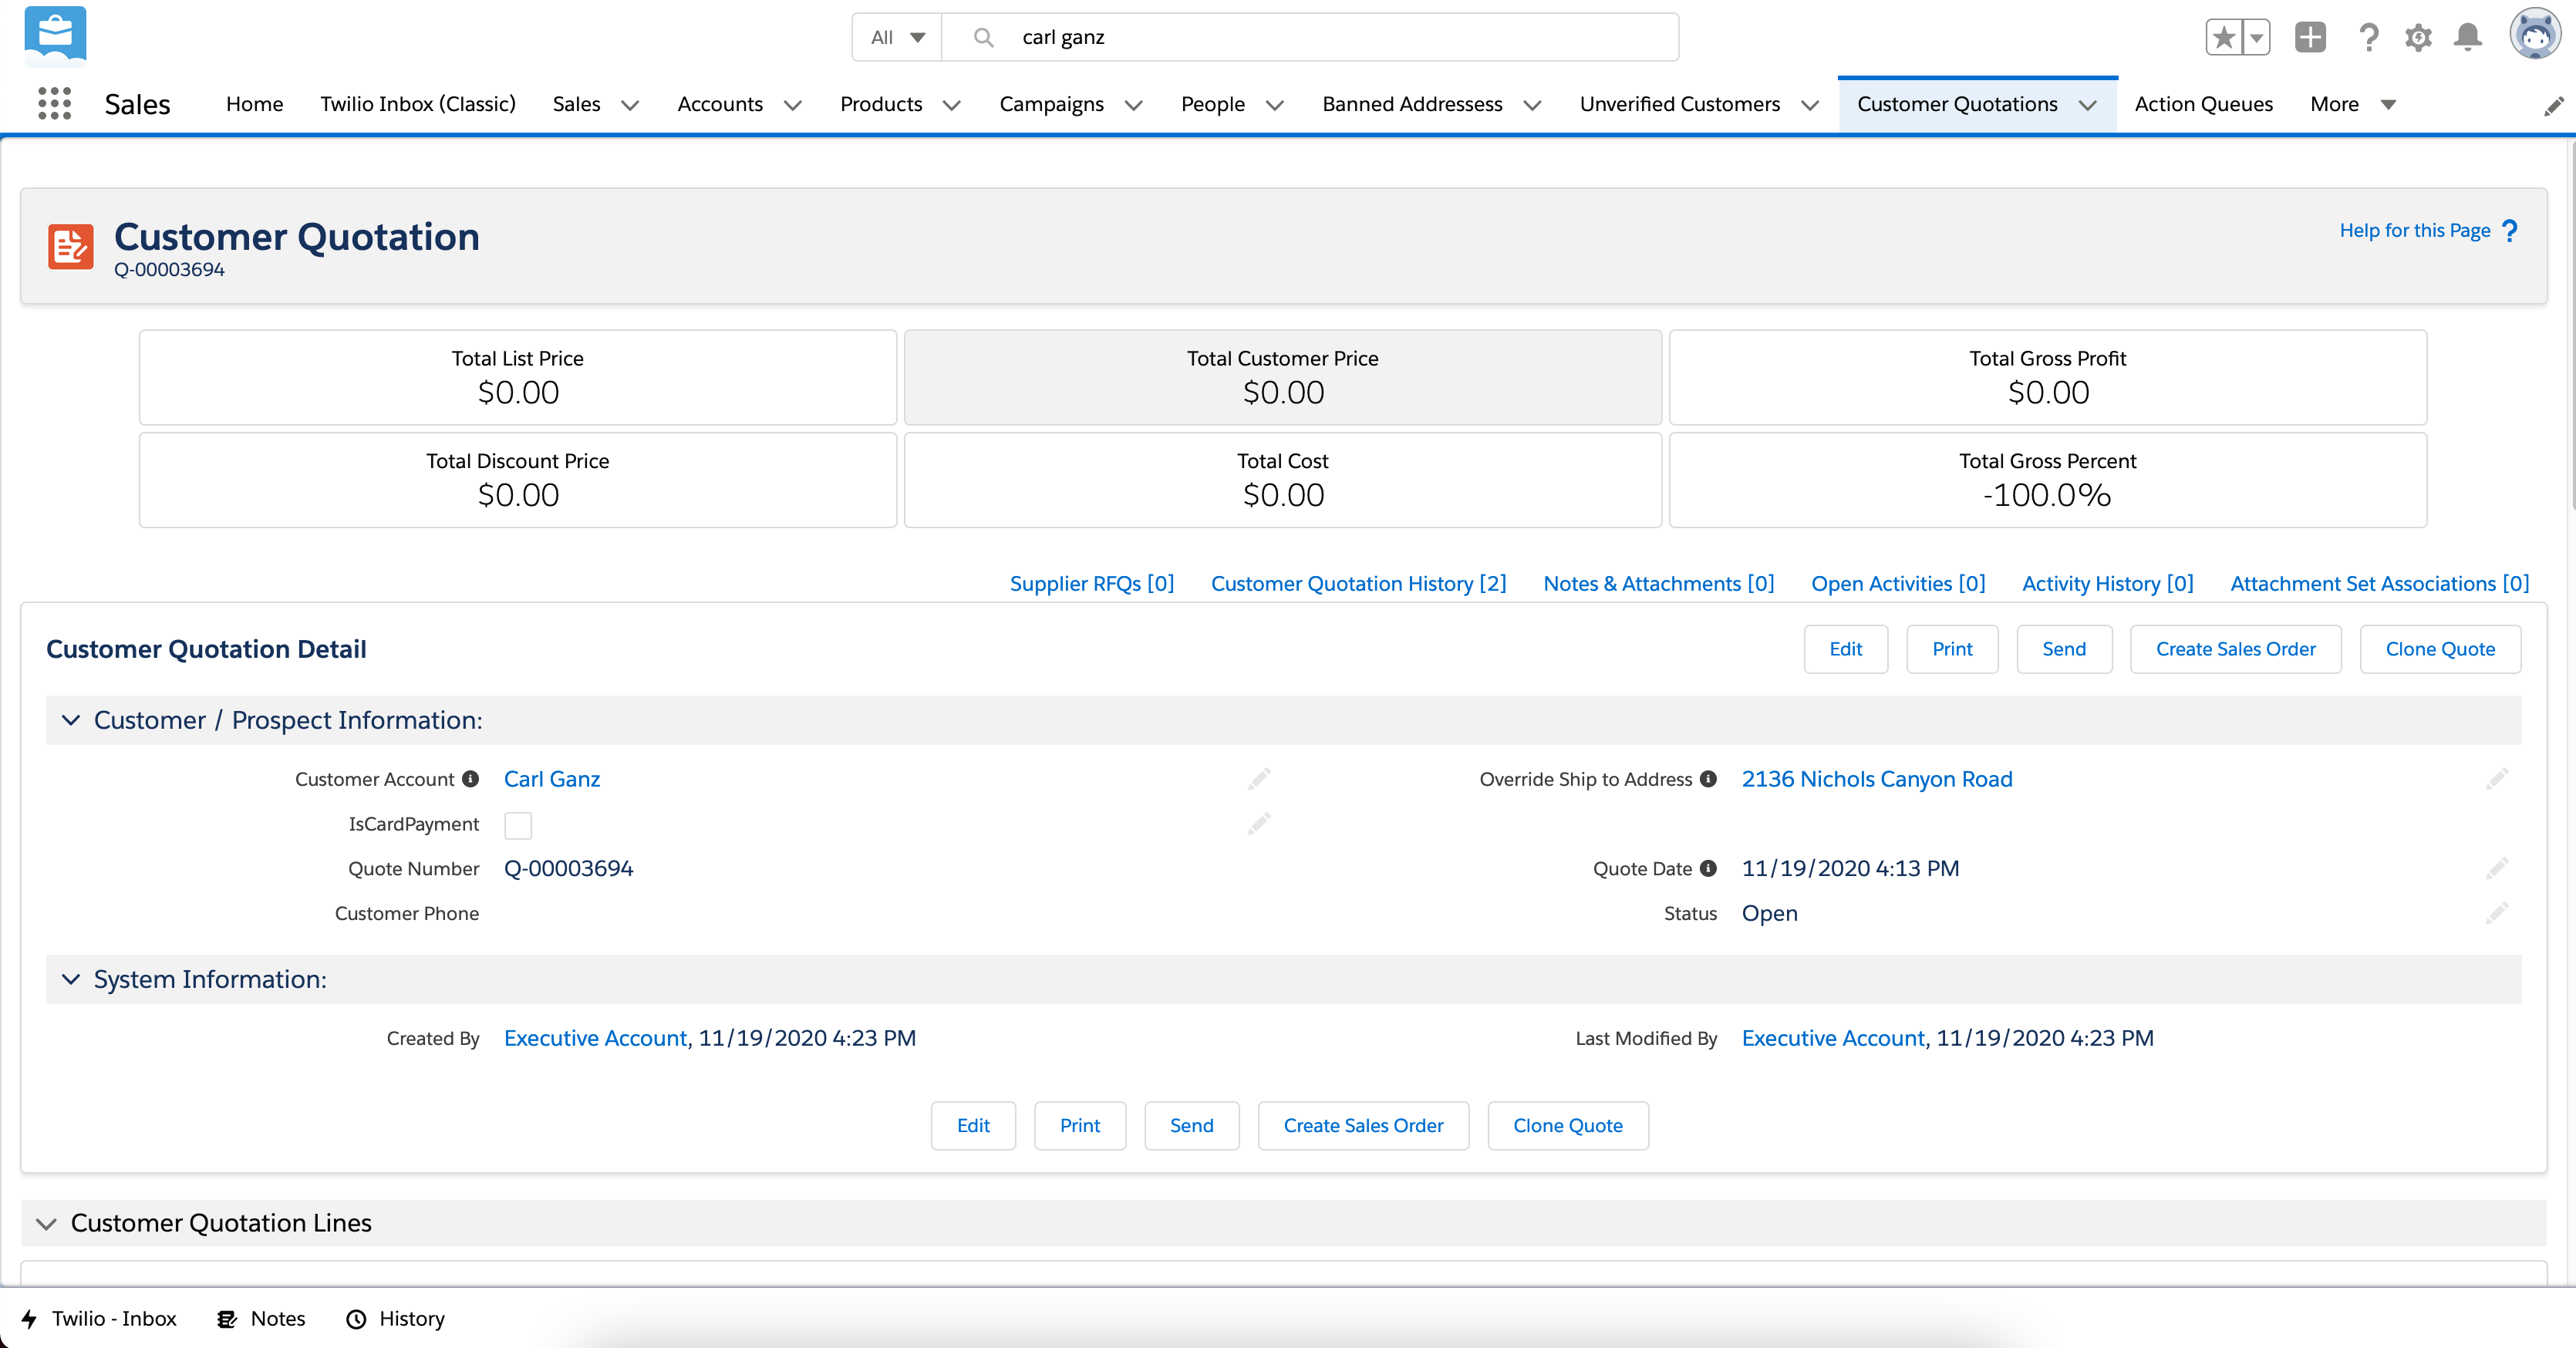
So now that we have a verified customer ie a valid “Person Account”, and we have delivery addresses for that customer we can begin the quoting process. In the main block on the customer page, the first tab is named “Quotes”. This will display the related list of existing customer quotations along with the date they were created and their current status.
| Value | Description |
|---|---|
| Open | This means a quote was created, but no items have been added to quote. |
| Priced | This means a quote was created, and items were added, but the quote was NOT converted to a Sales Order. |
| Won | This means a quote was converted to a Sales Order. |
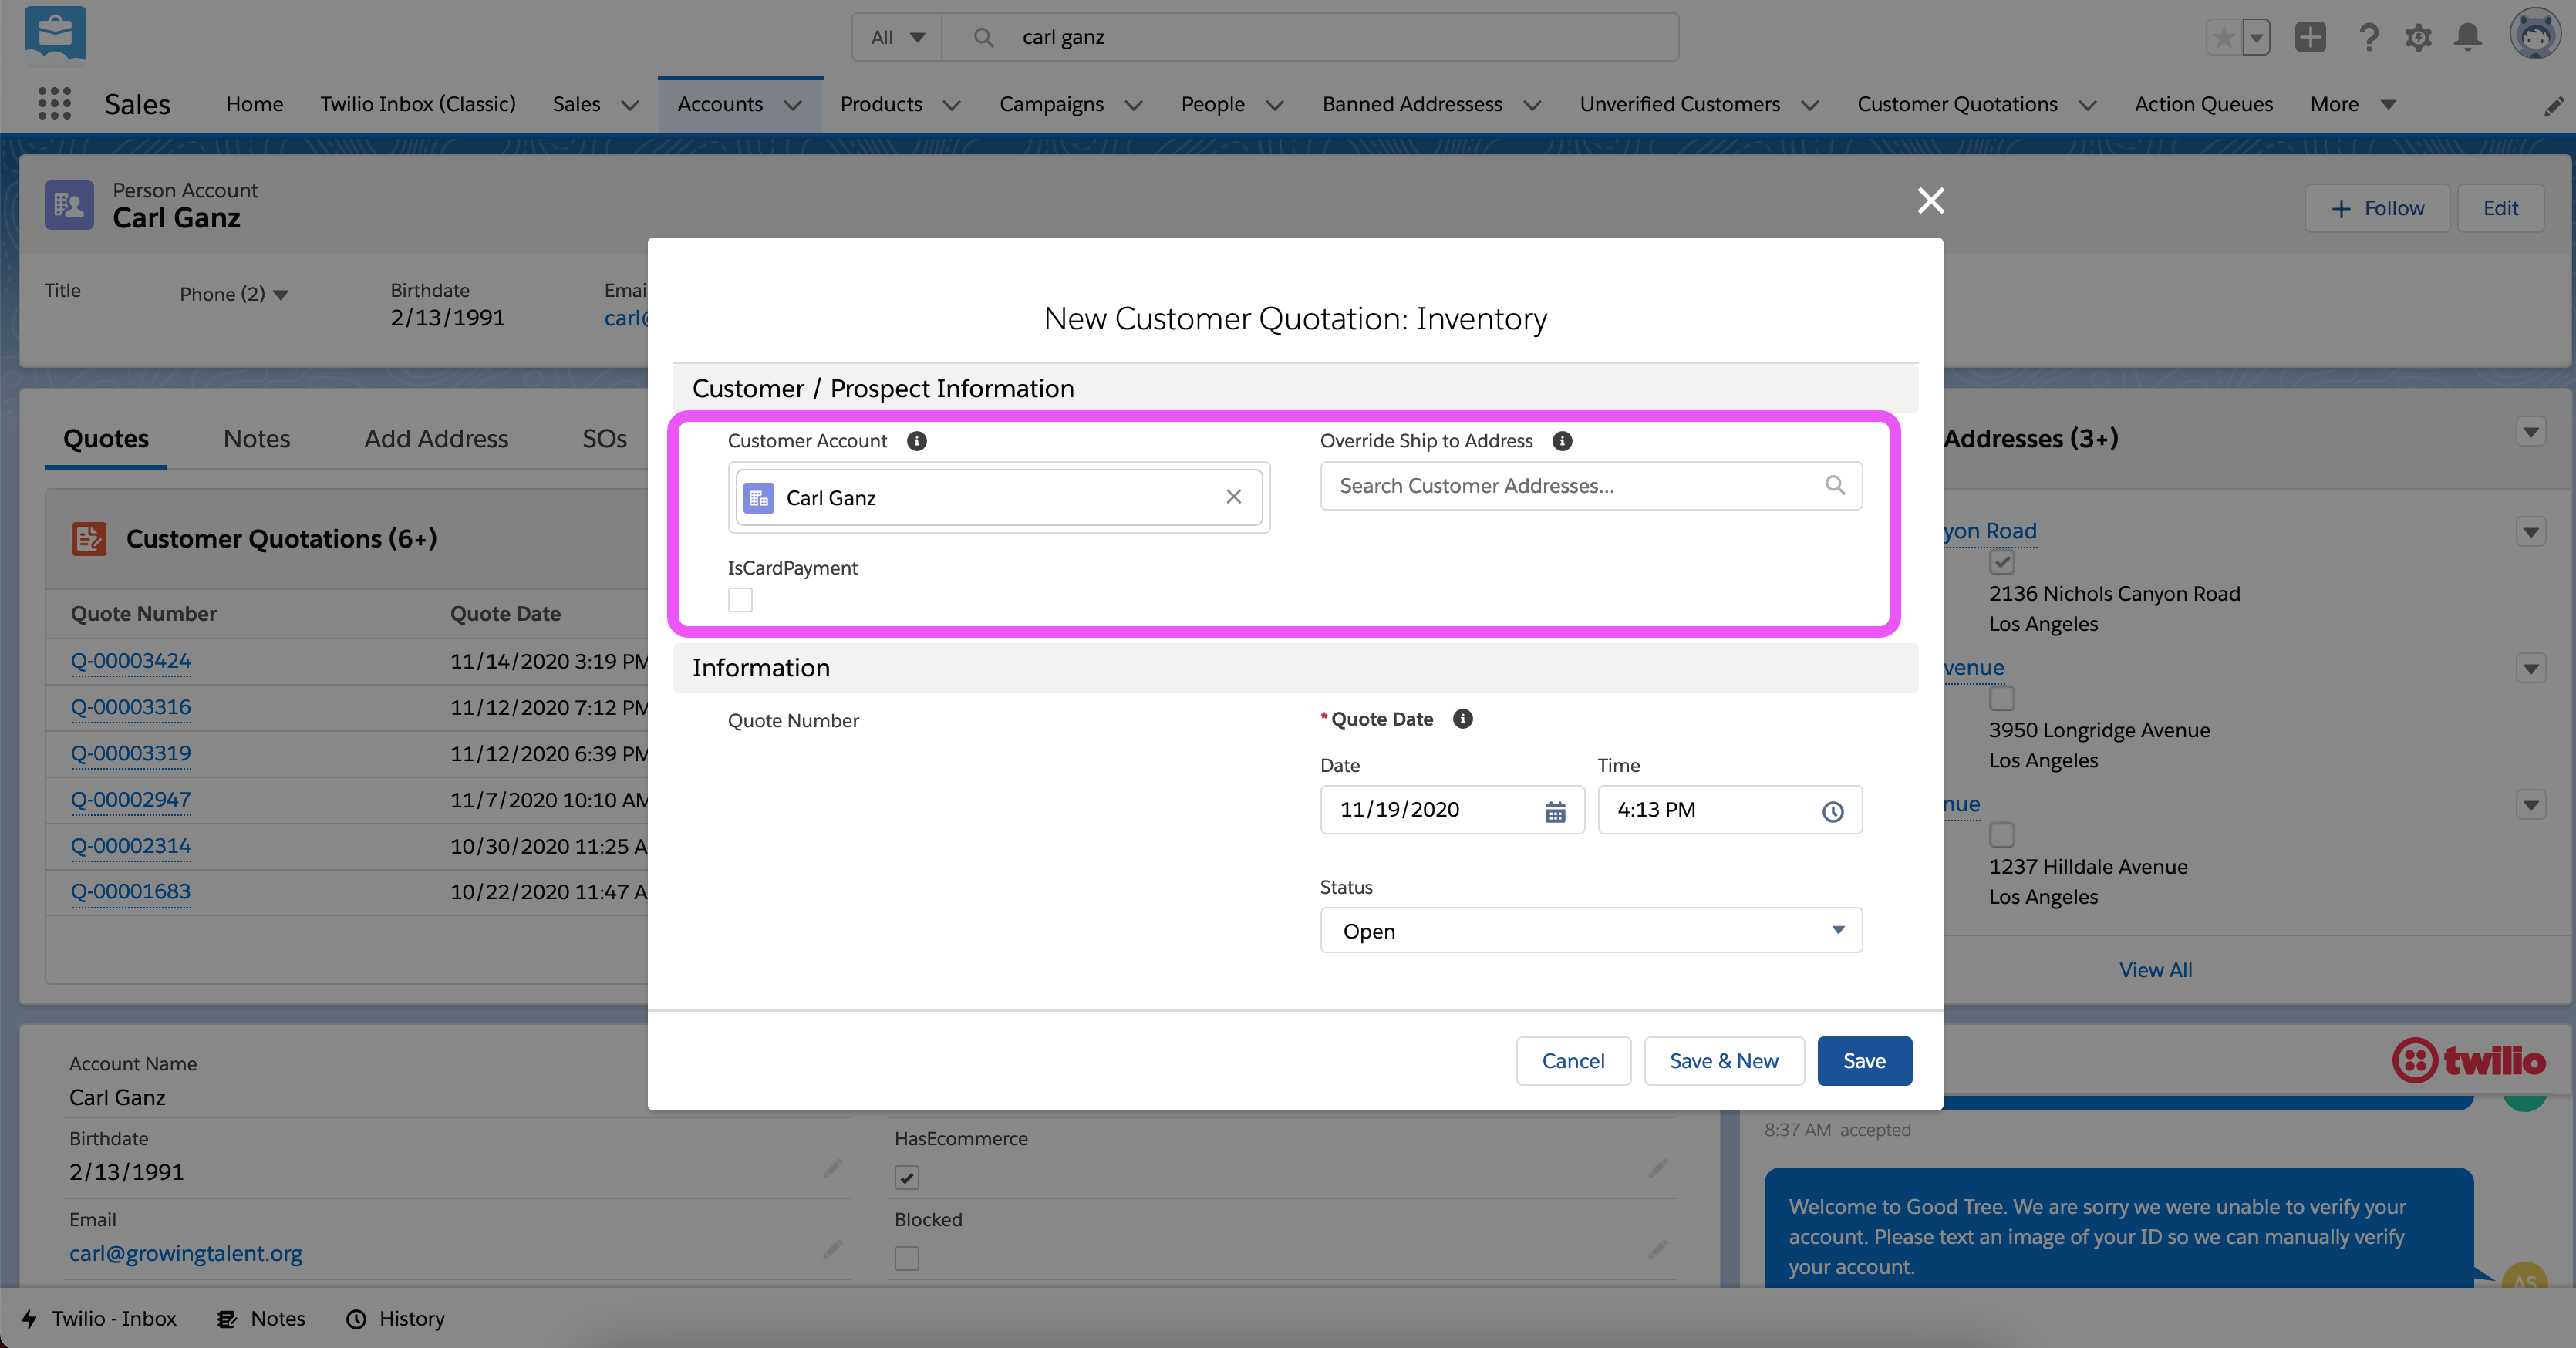 The three primary fields are the customer, the delivery address, and whether they will be paying with card. If the address is left blank it will use the customers default address, but you can override the default by entering the address name like below.
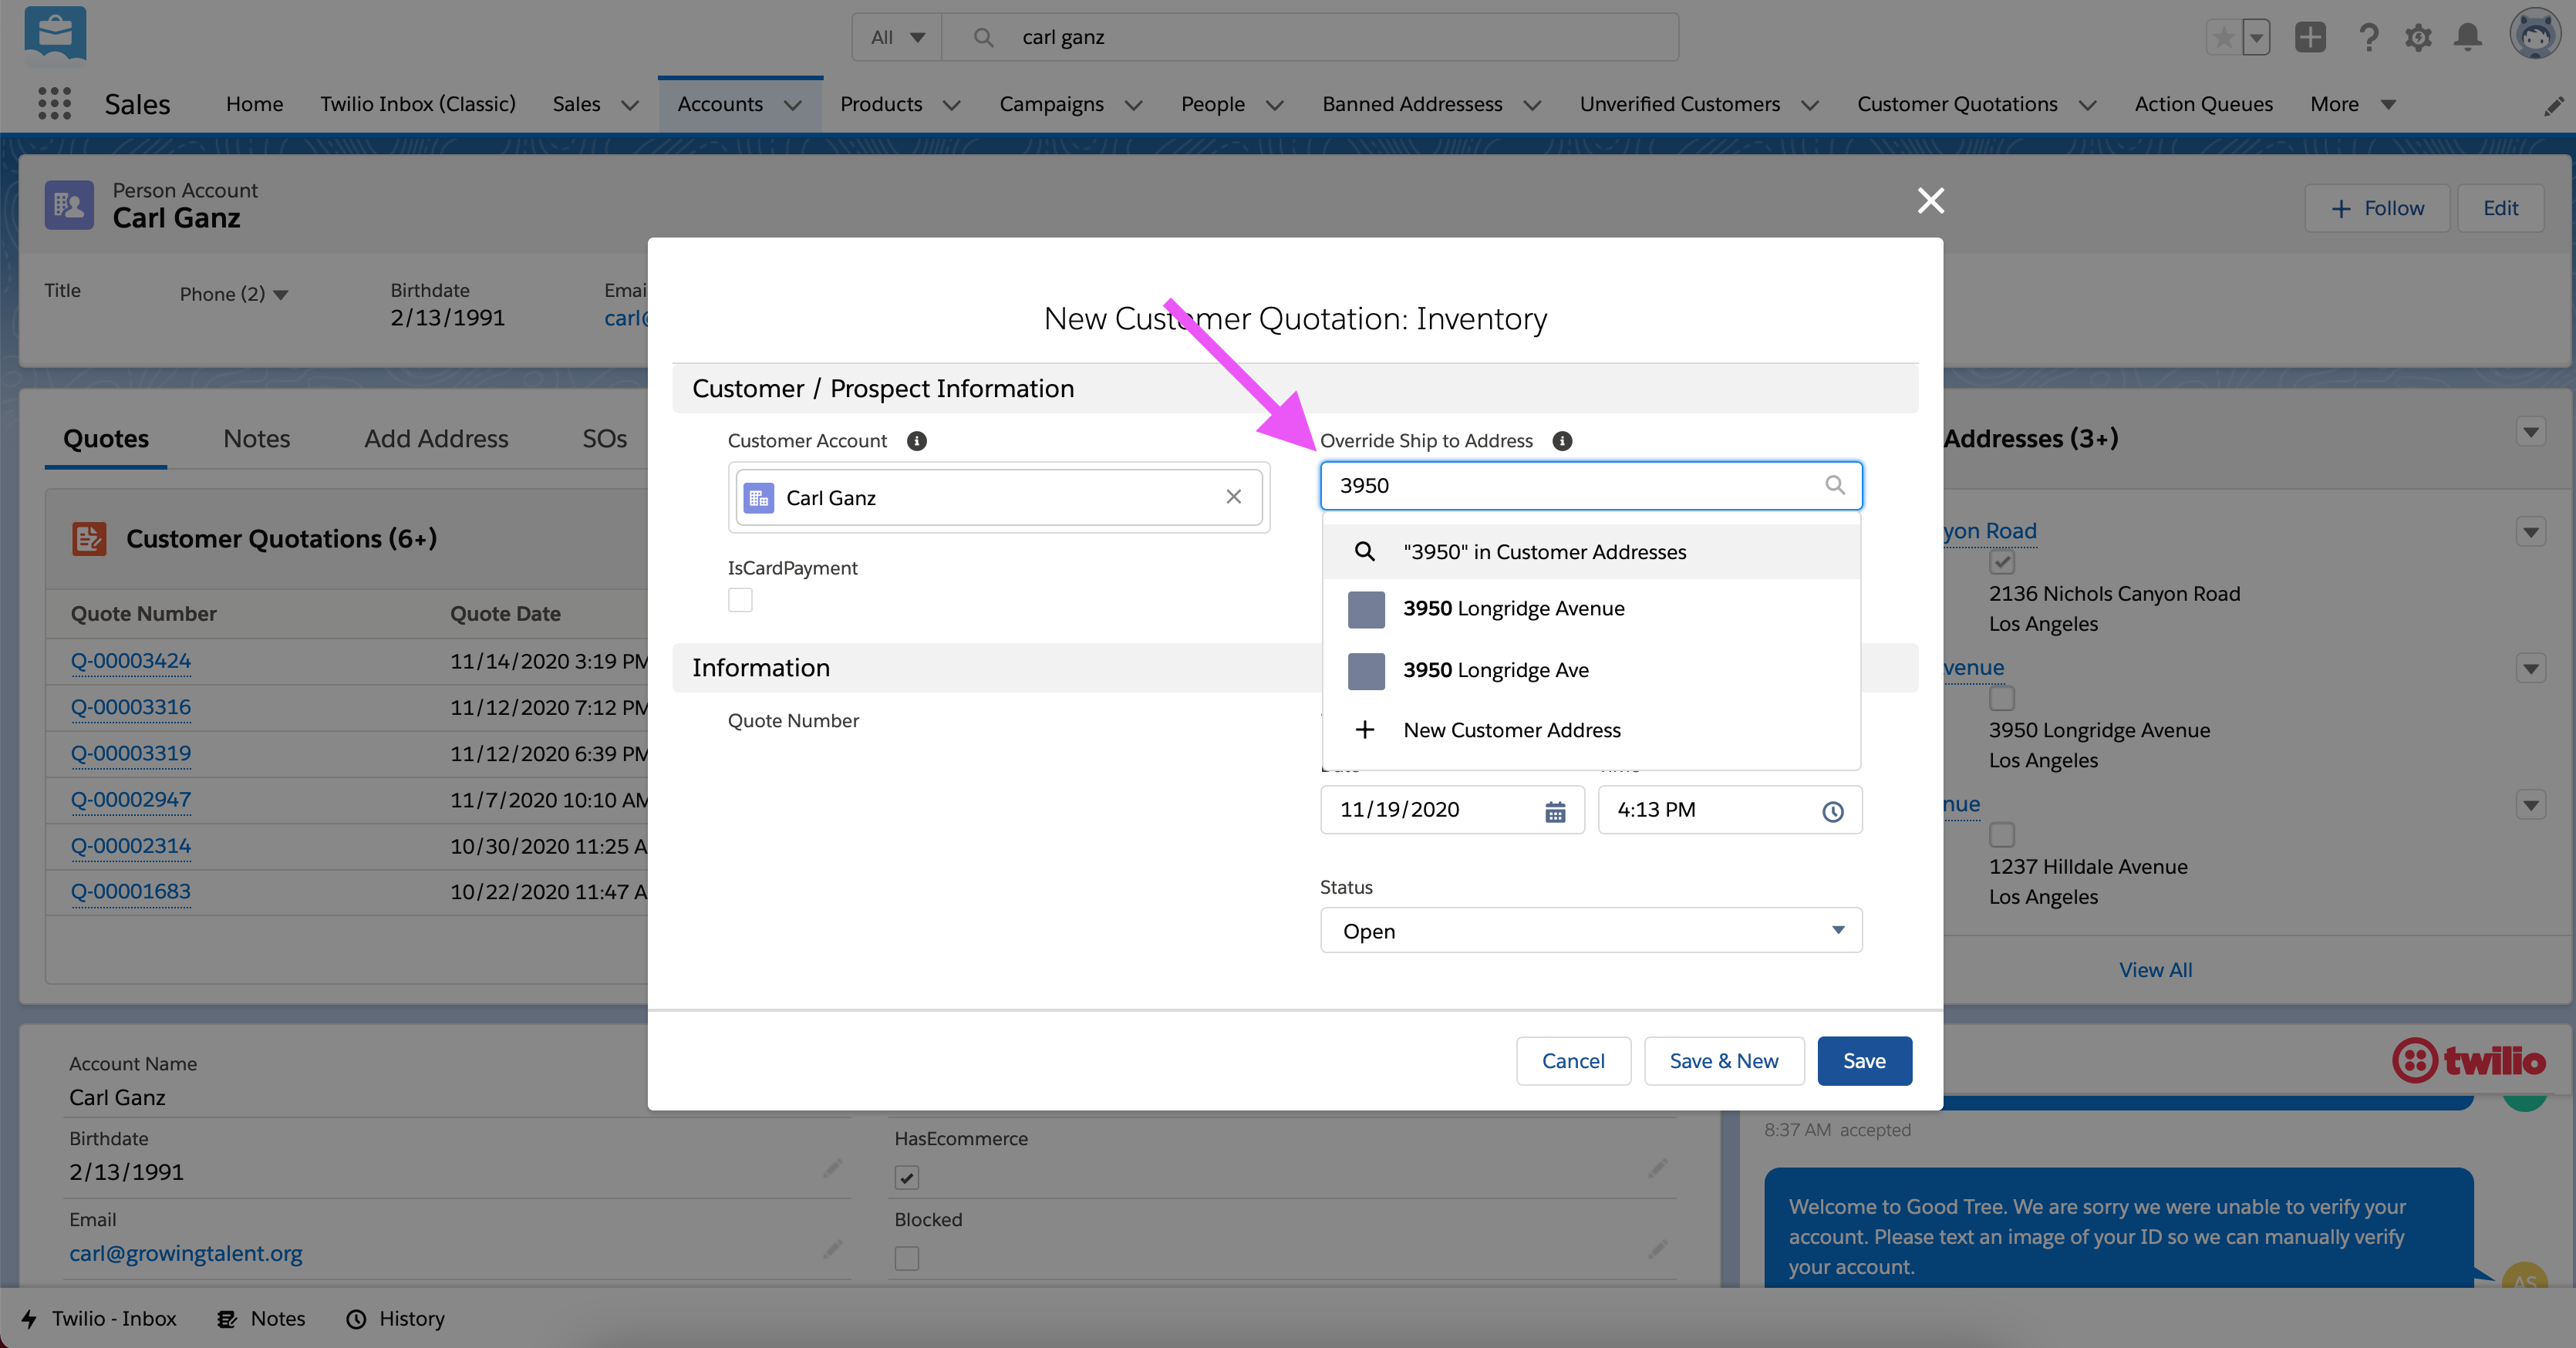
Override Delivery Address
| Field | Description | Required |
|---|---|---|
| Customer Account | This field is filled automatically and indicates which customer the quote is for. | Yes, but has default value |
| Override Ship to Address | If a customer has only one address, or has an address set to default, it will automatically use that address, but you can override by specifying the customer address by name here. | No |
| IsCardPayment | Check this box if customers will be paying with debit card, by default it is false and assumes customers will pay with cash. | Yes, but defaults to false |
New Quote
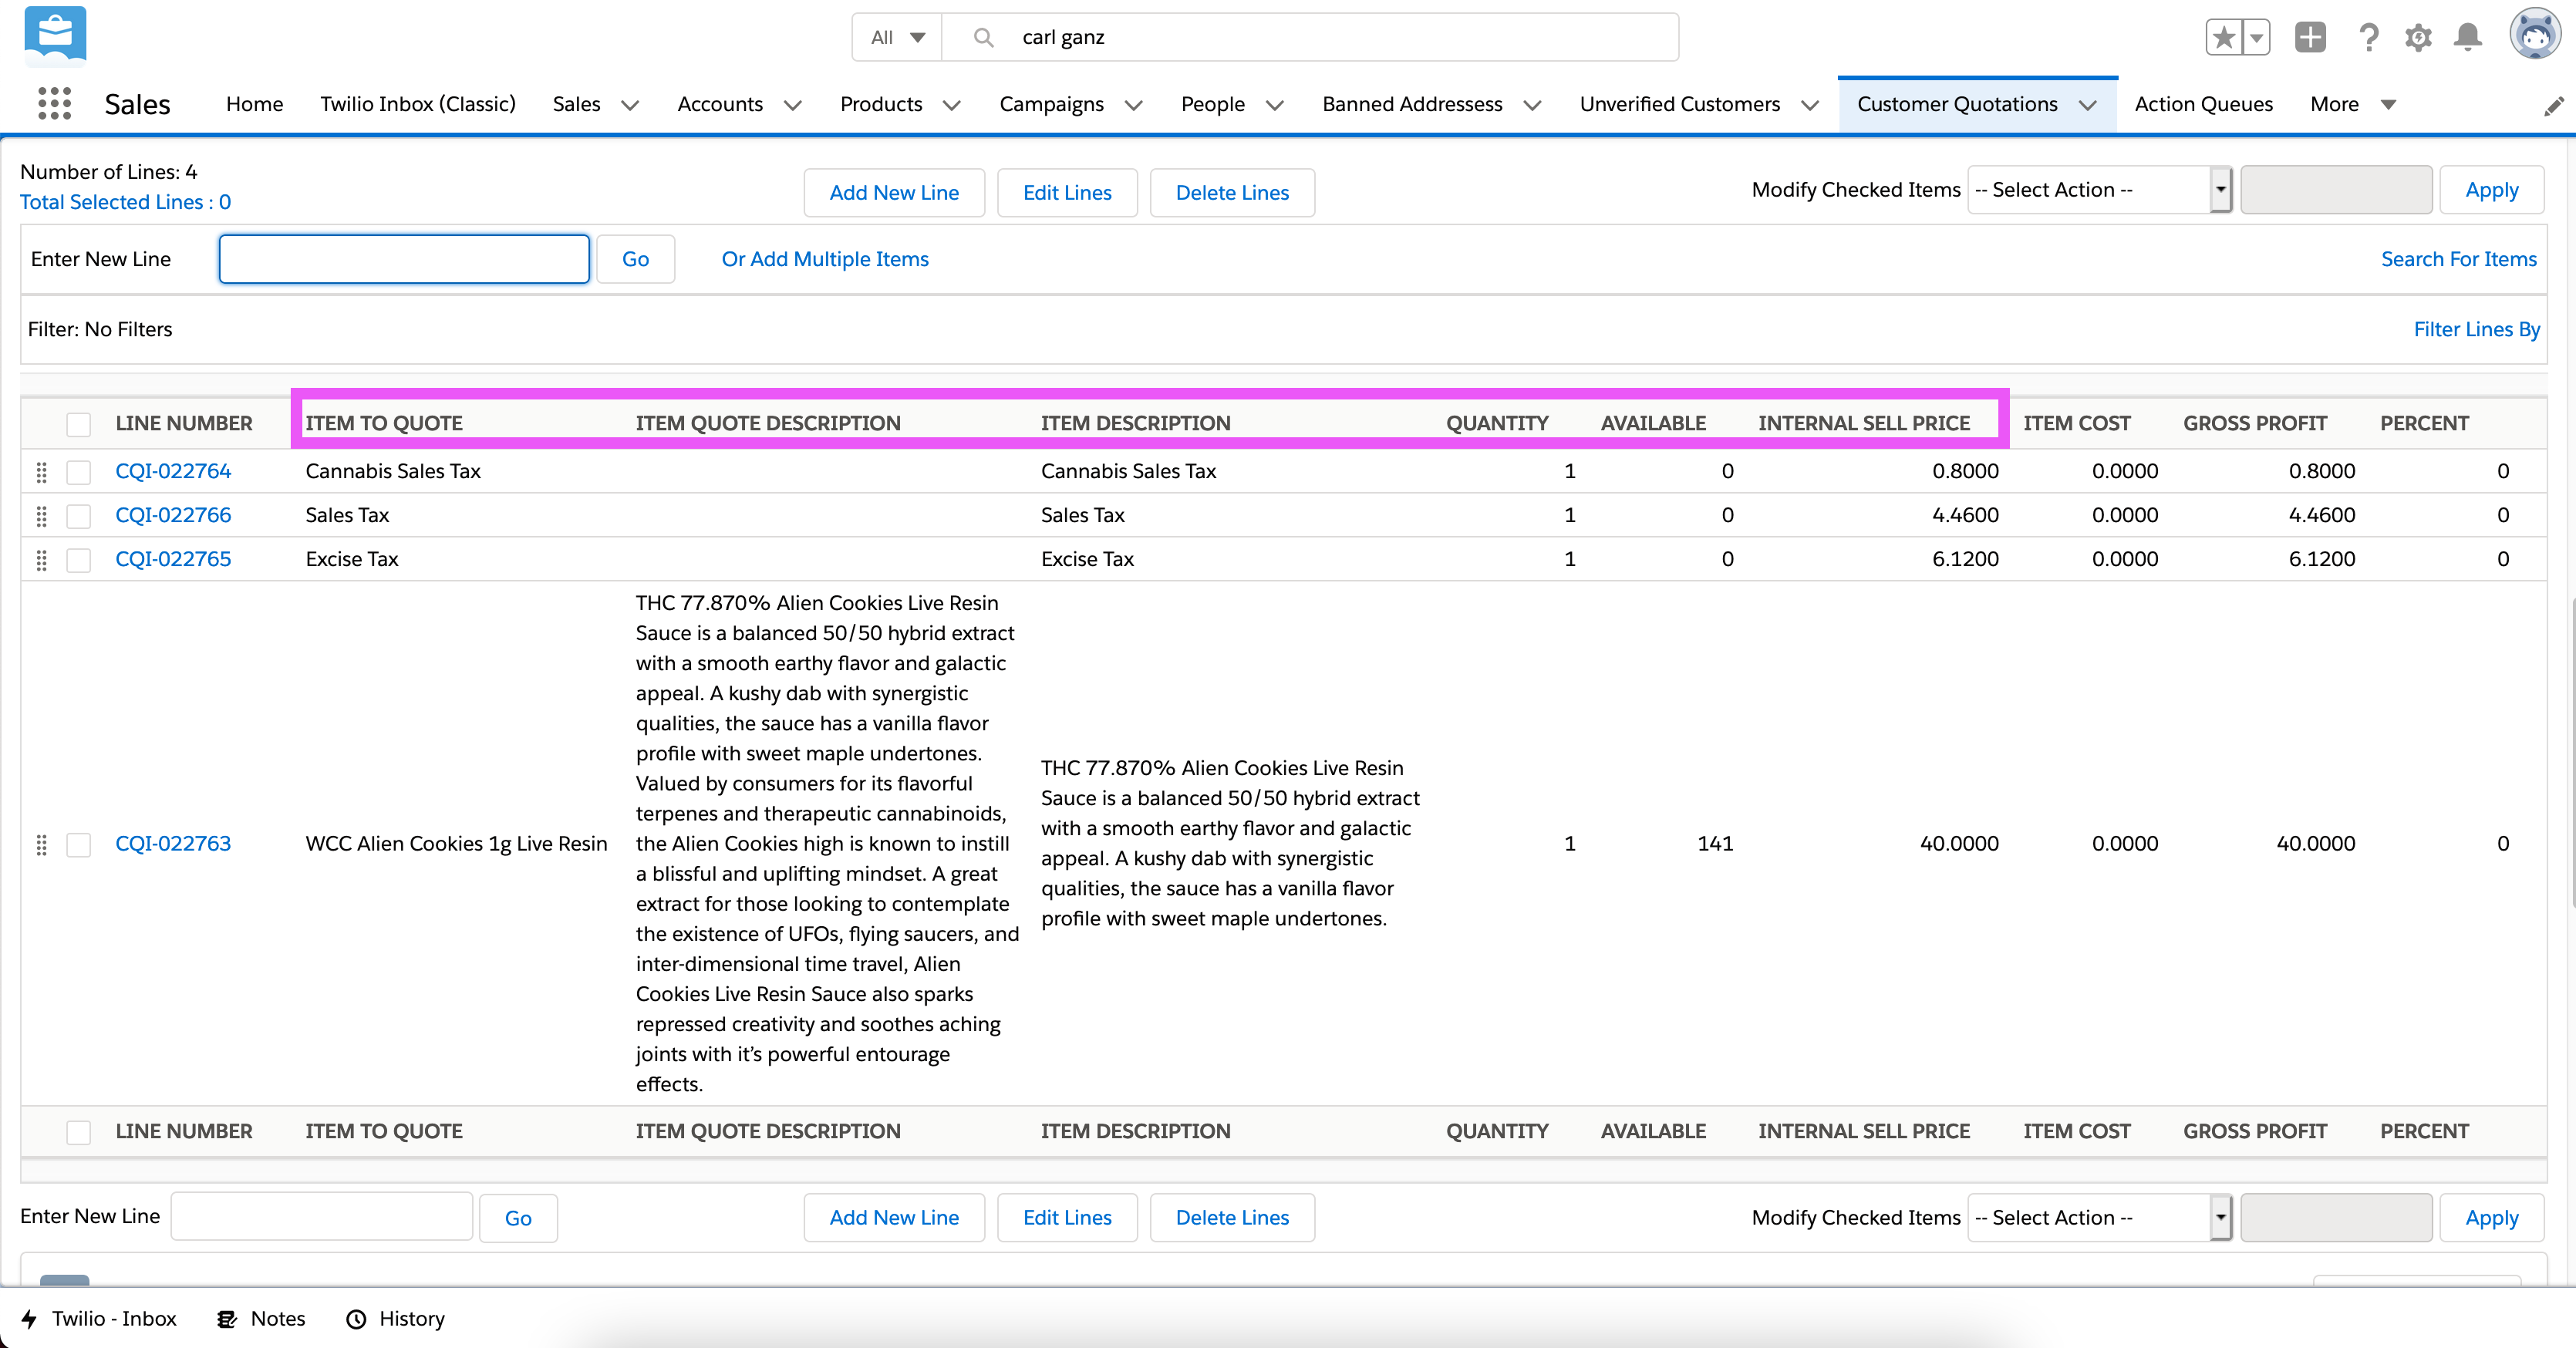
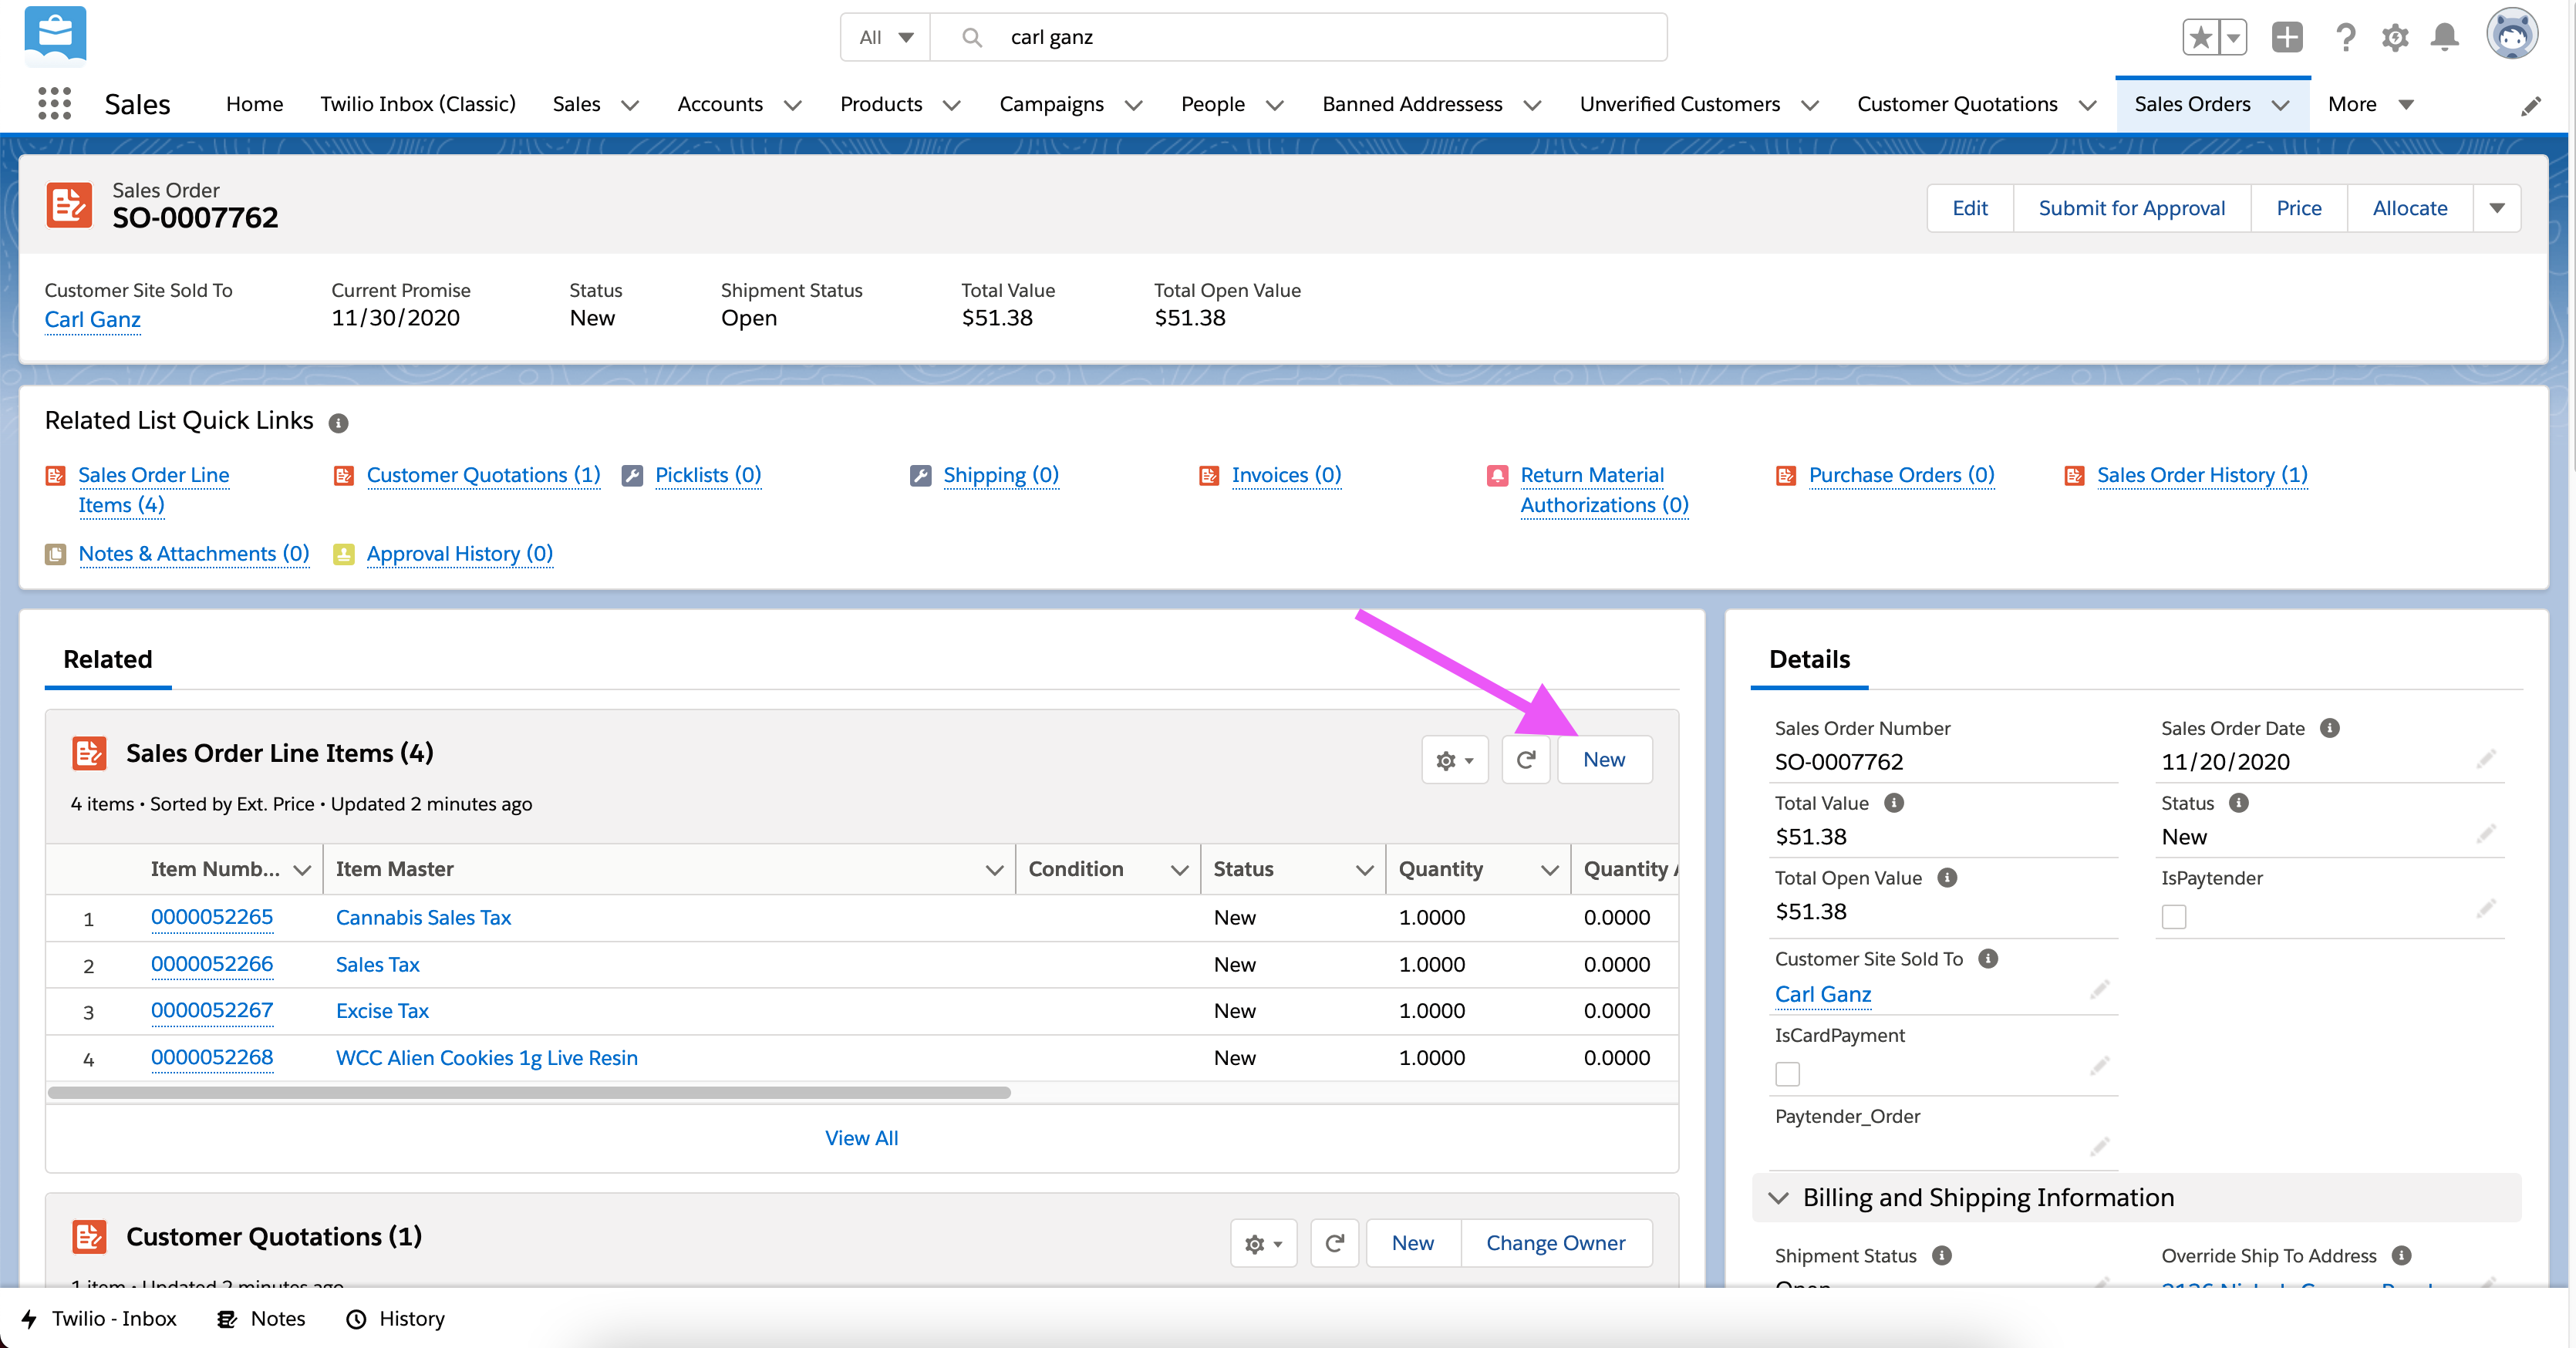
Once we have created the quote and entered the quote page we can begin adding items to the order.
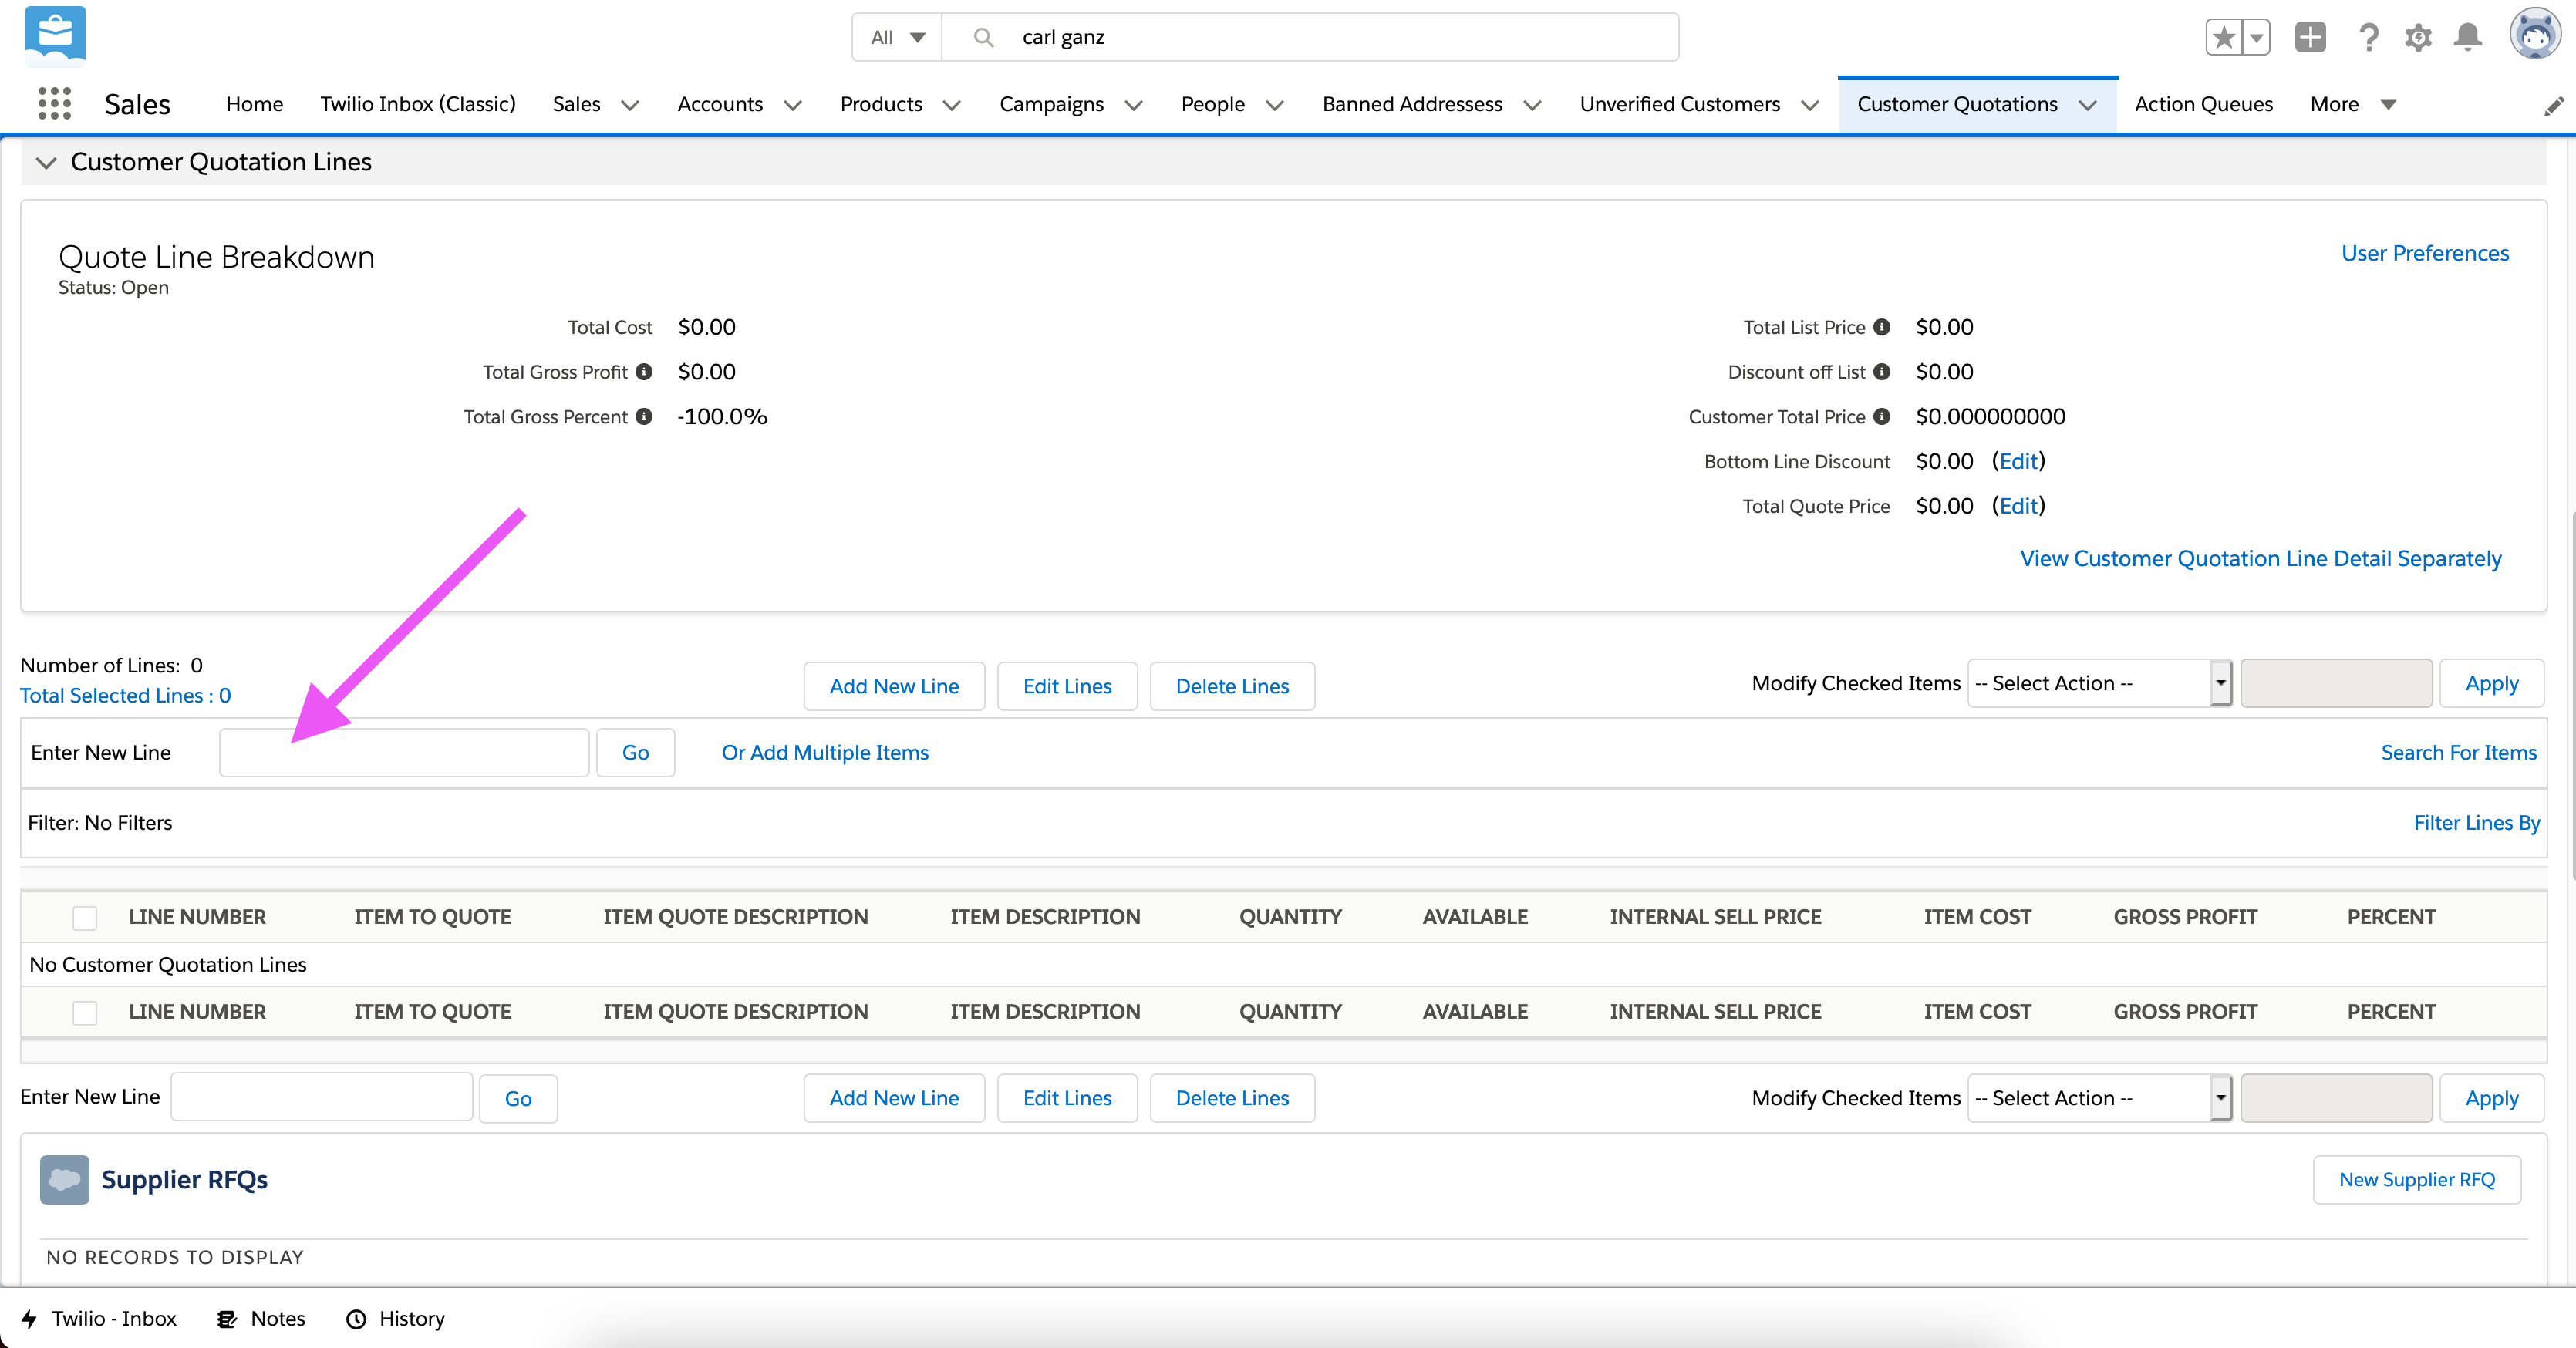
Items Table
Search for the product you would like to add in the “Enter New Line” box.
Searching for WCC A…
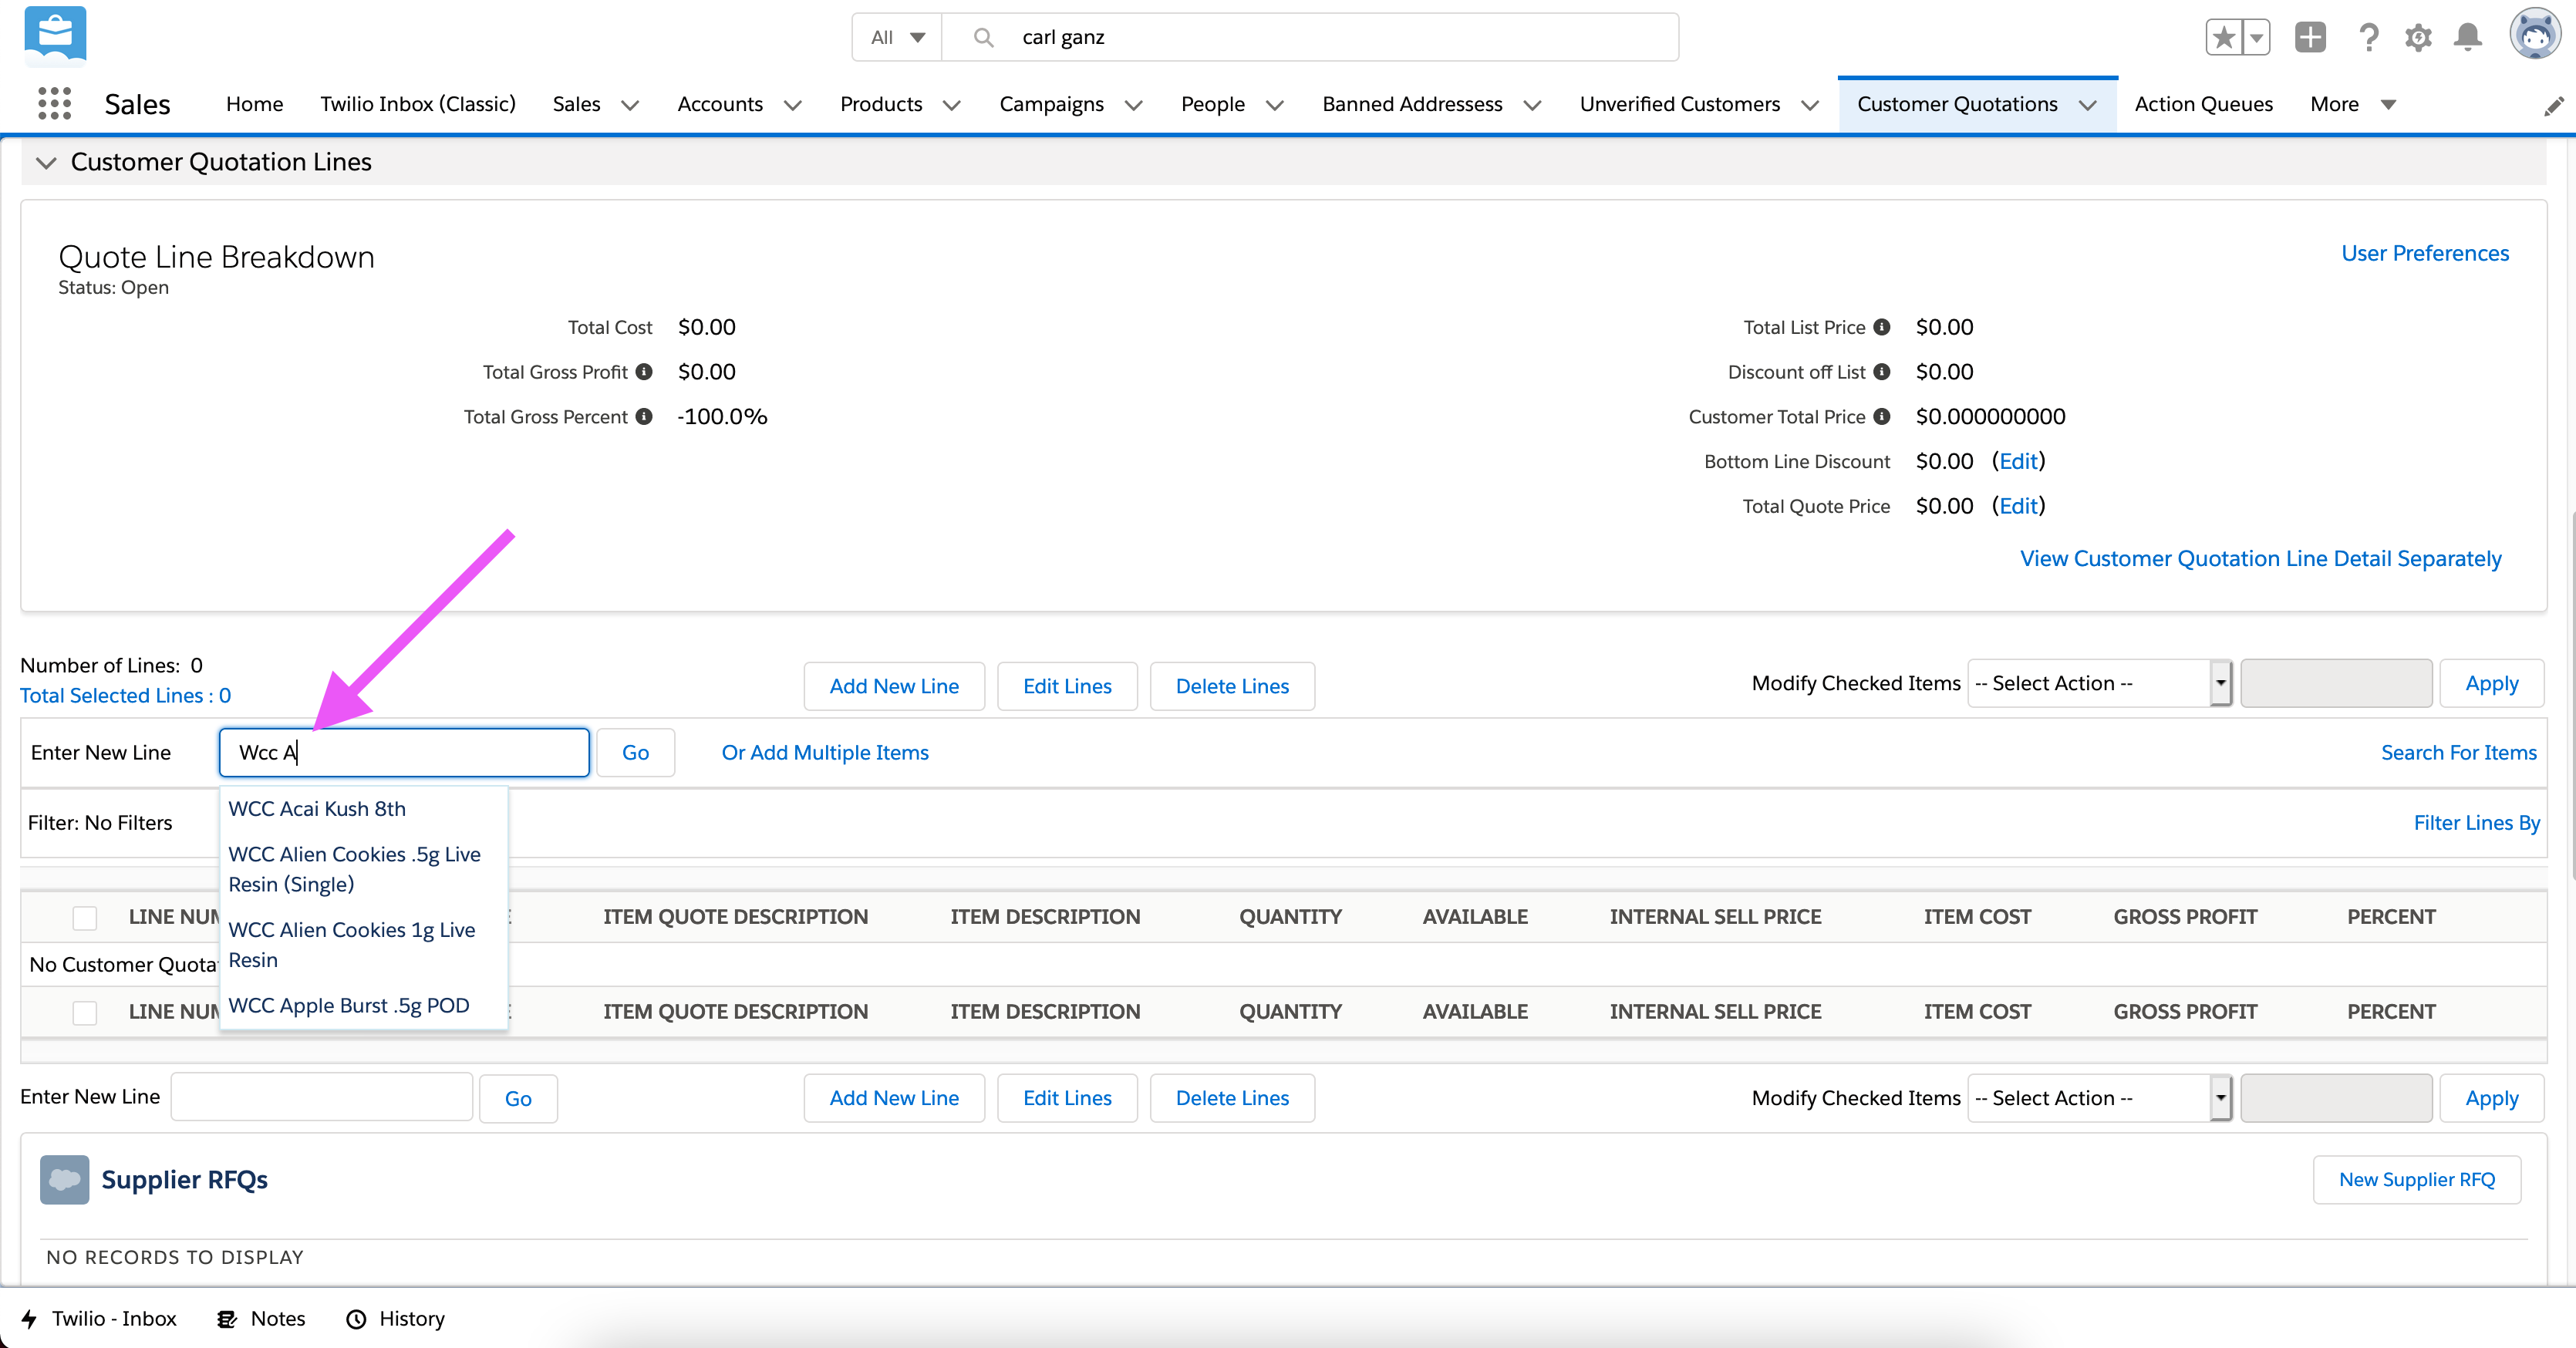
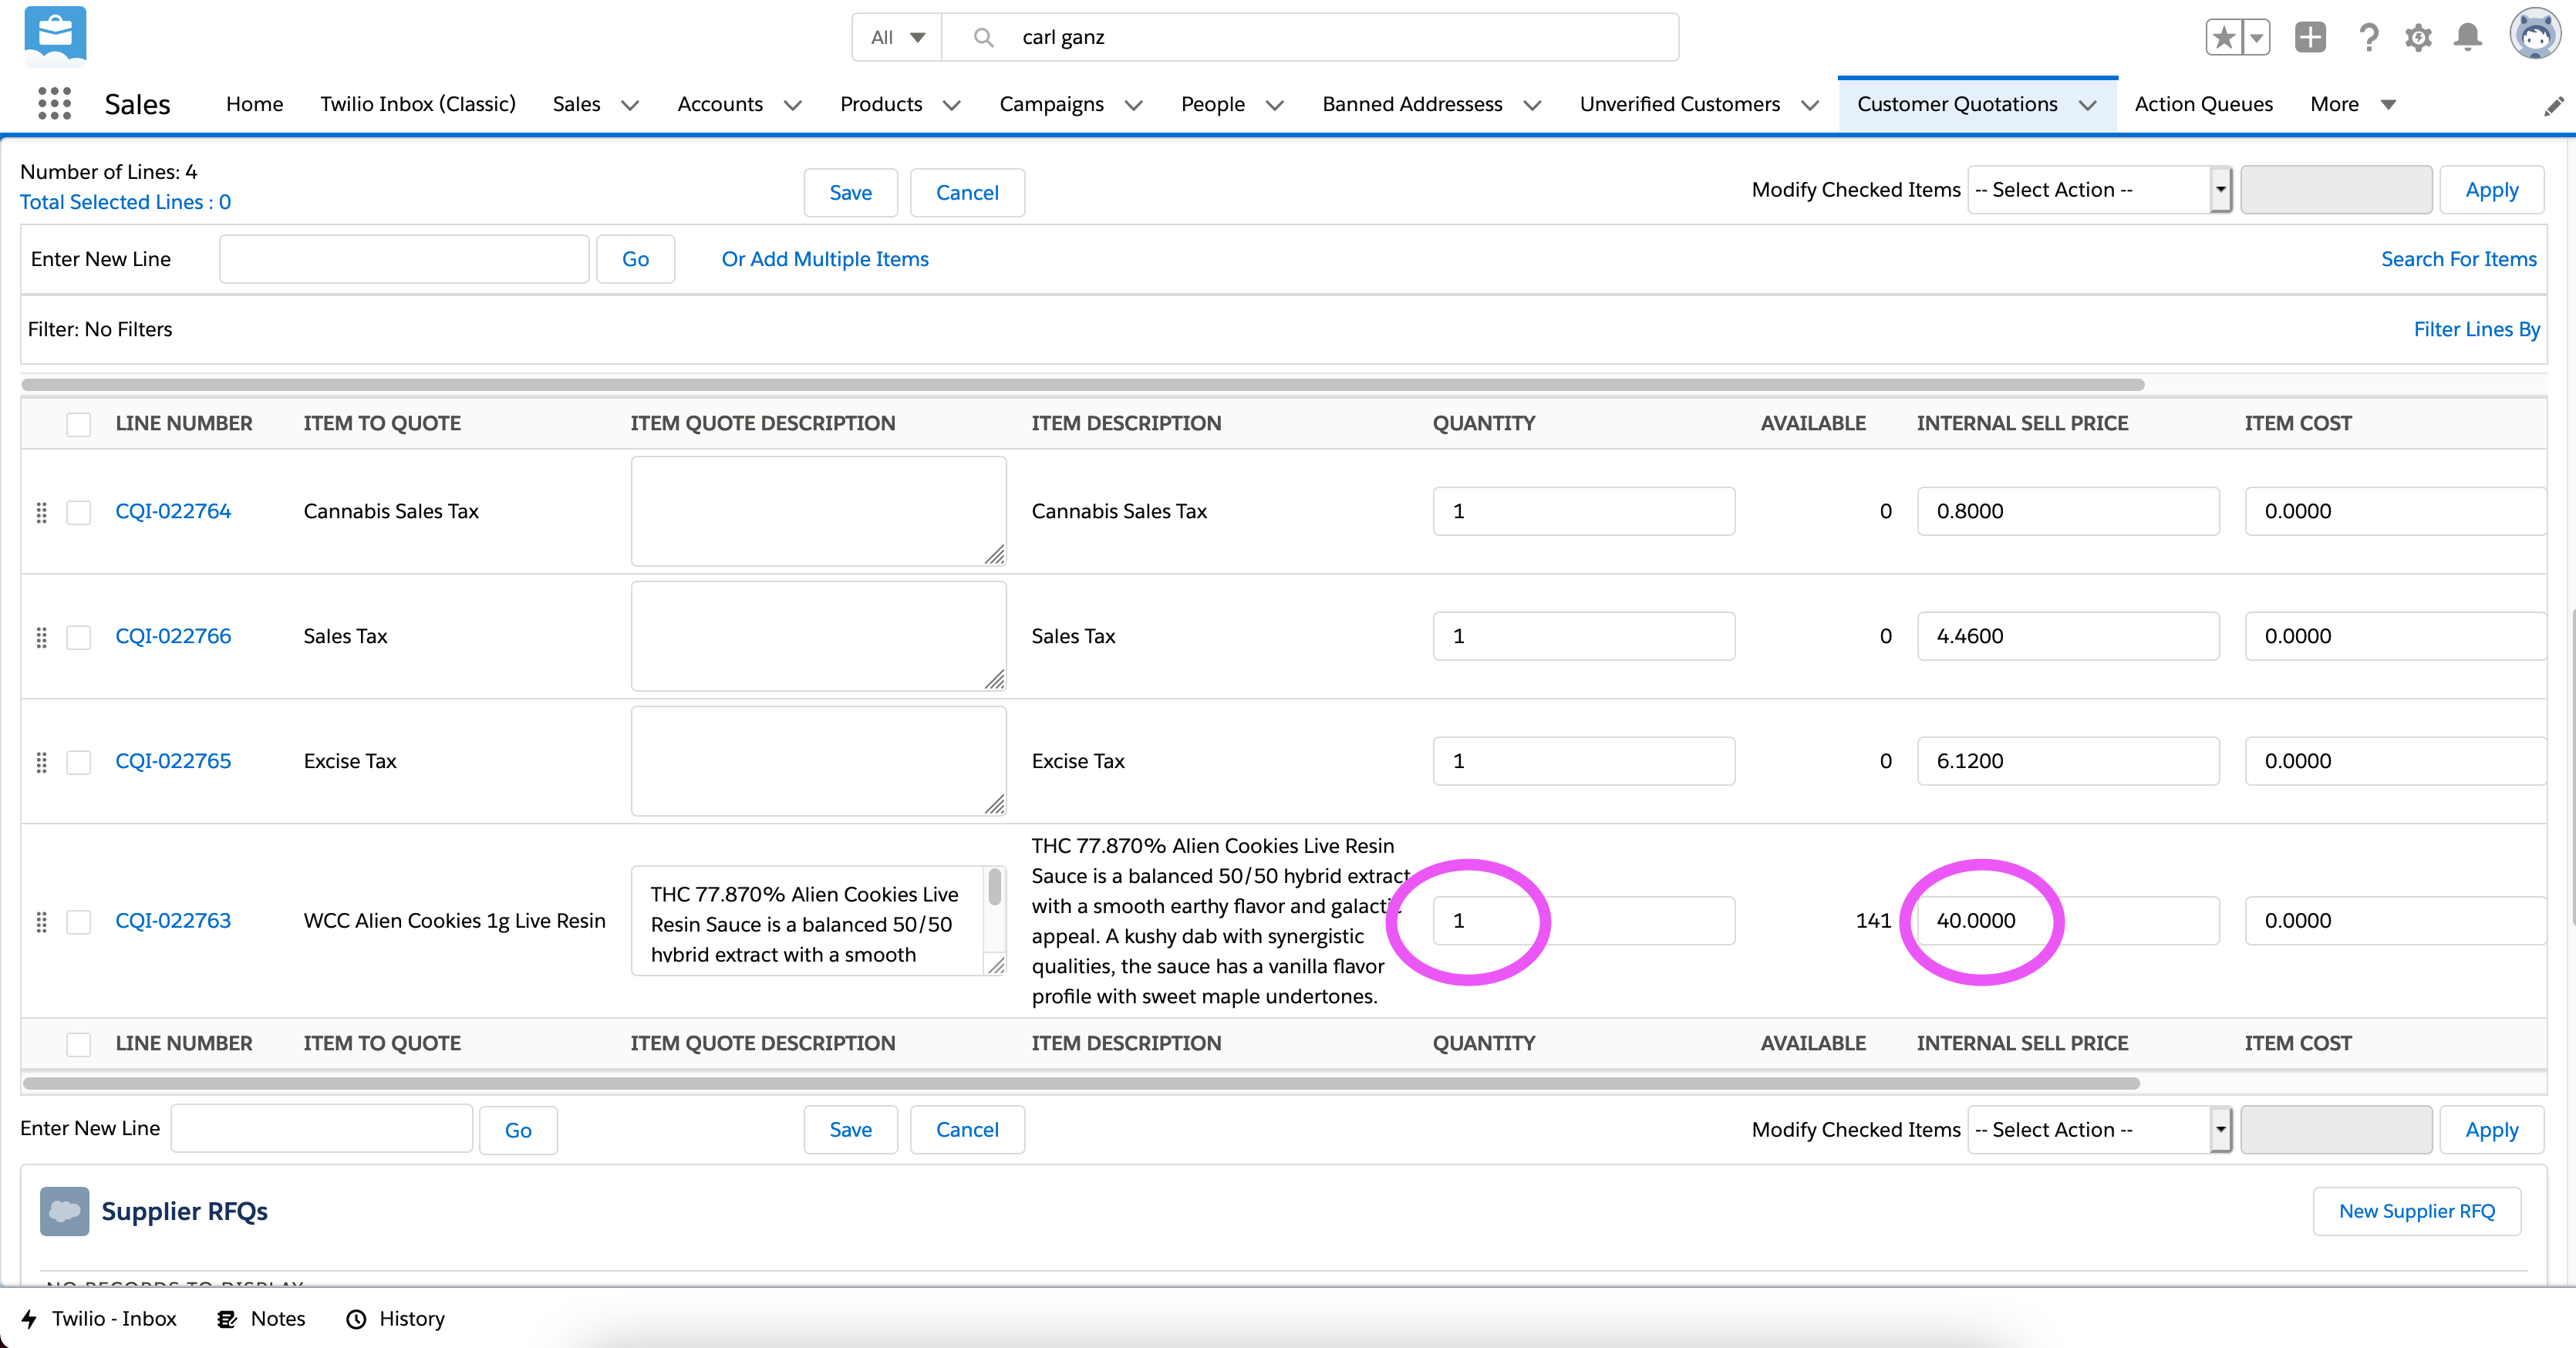
Select the item you want to add and then wait a moment for a popup to appear that let’s you enter important info like the quantity.
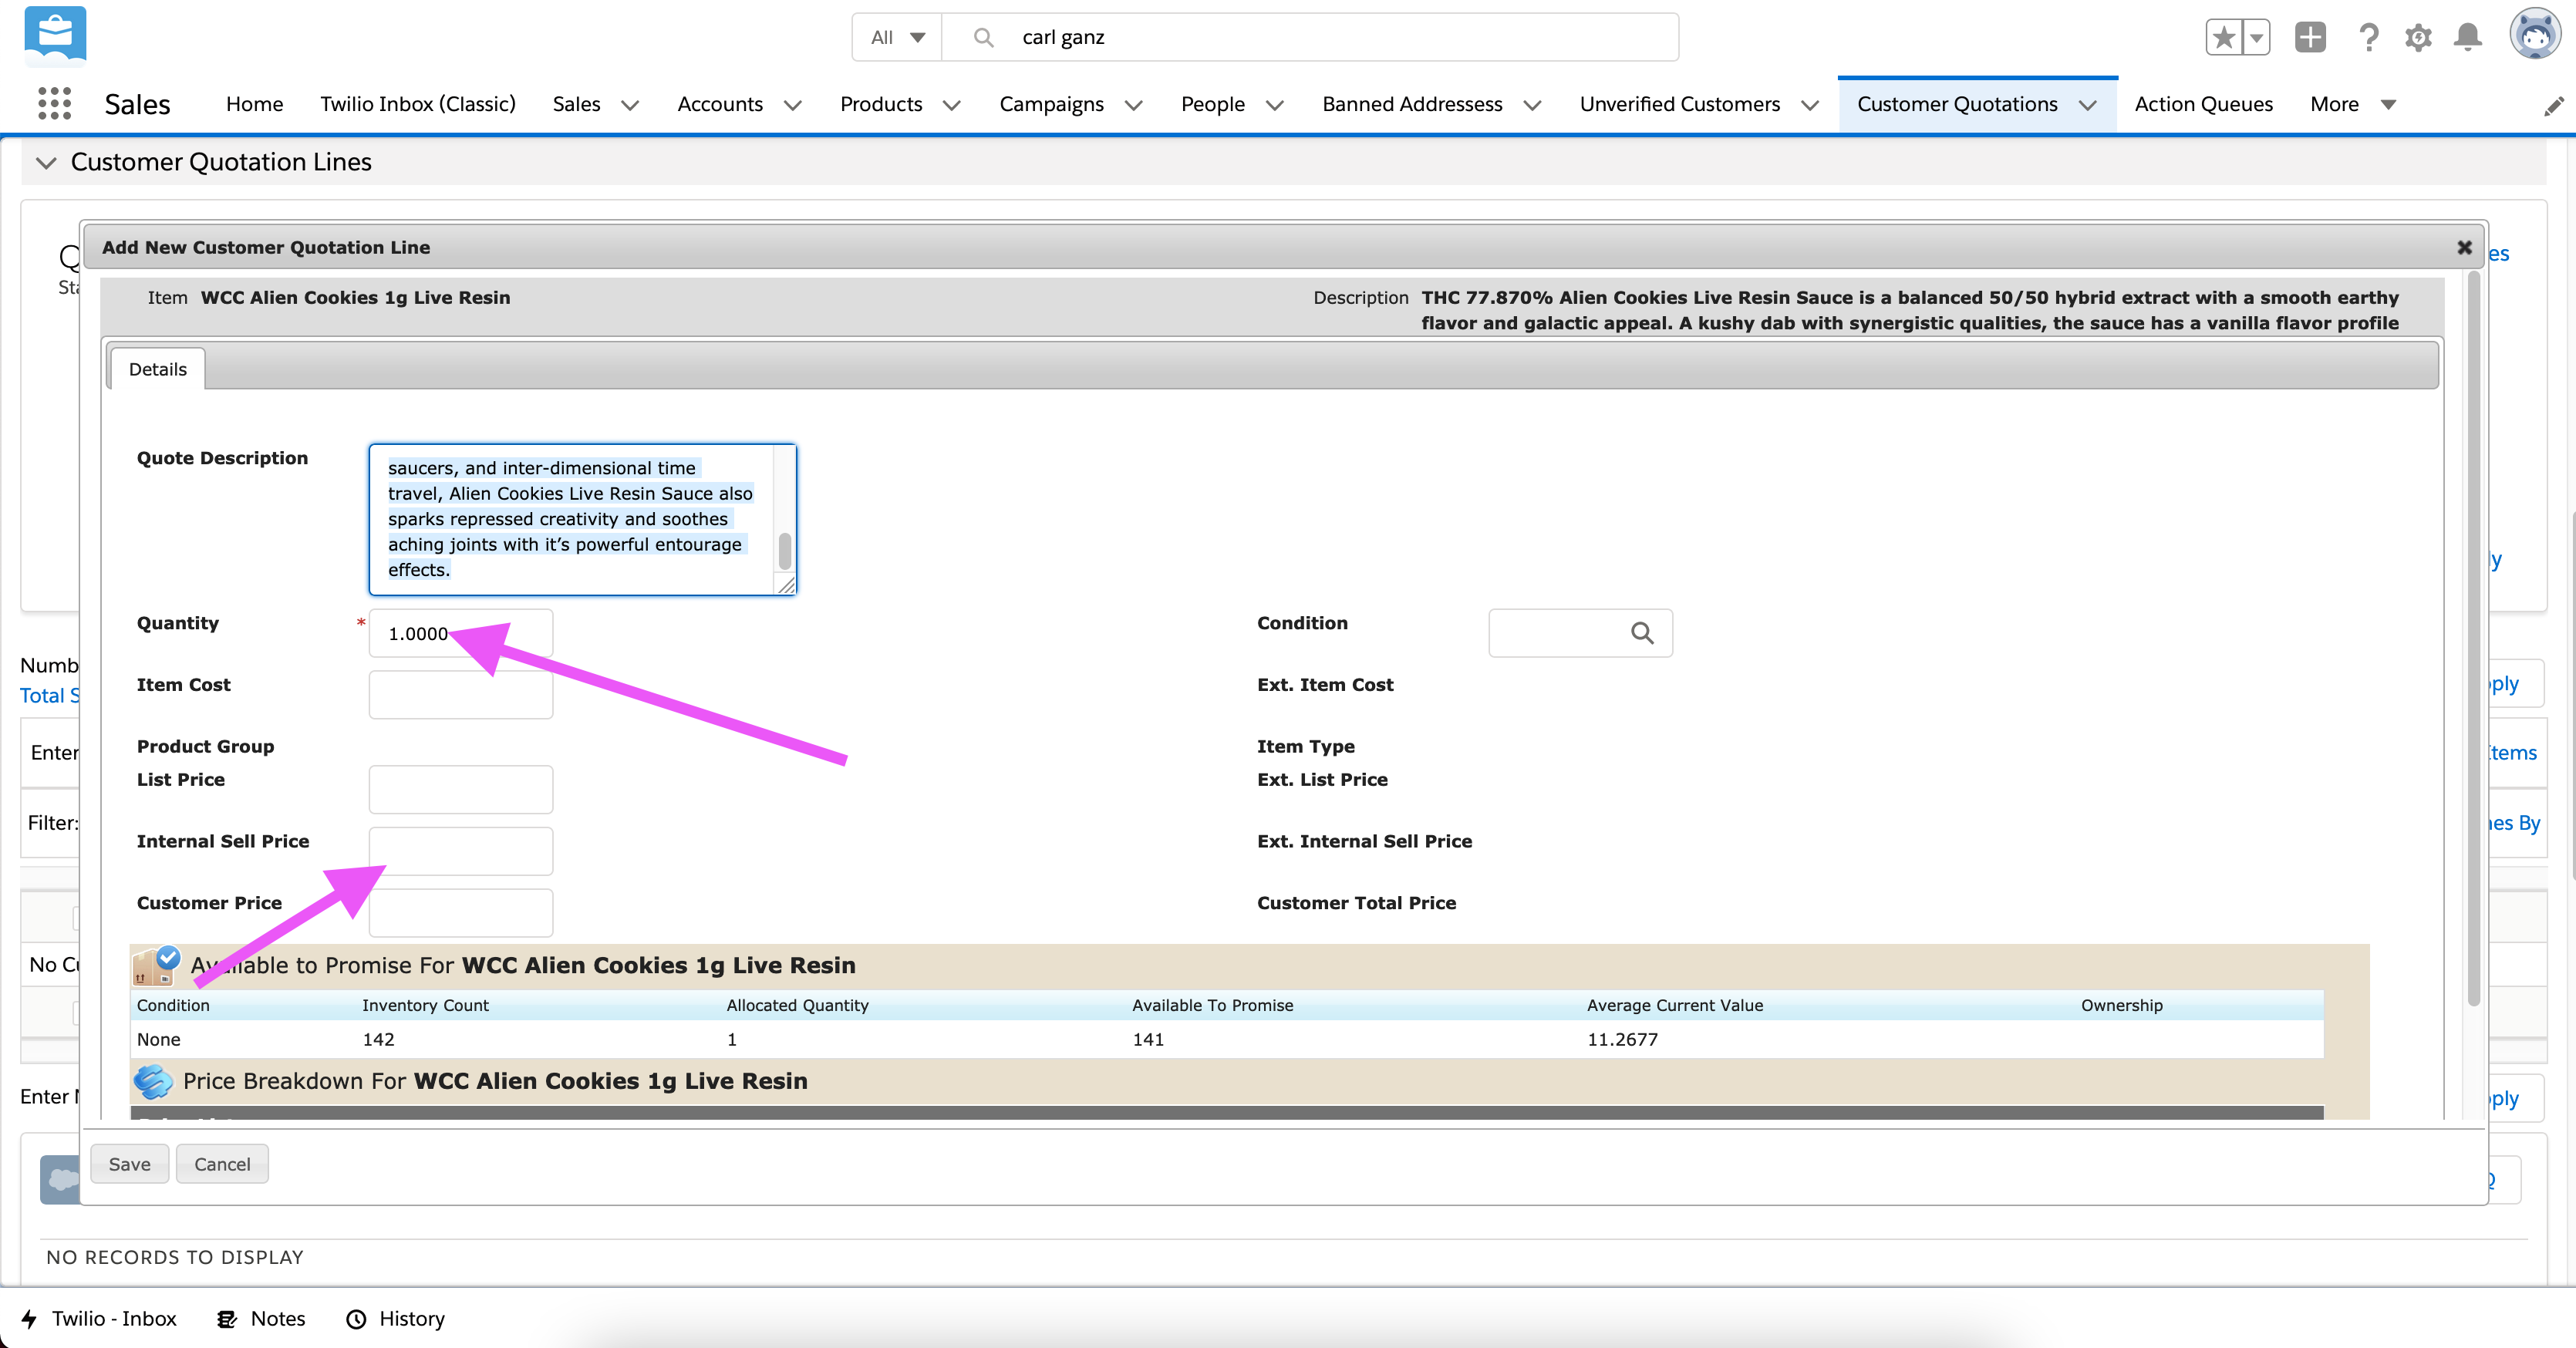 The Quantity is set to 1 by default, but can be manually updated. The “internal sell price” (it’s an accounting term), or as humans call it, the “price”, appears blank but upon saving it will automatically use the default price in the system.
The popup also indicates the current inventory for the selected item.
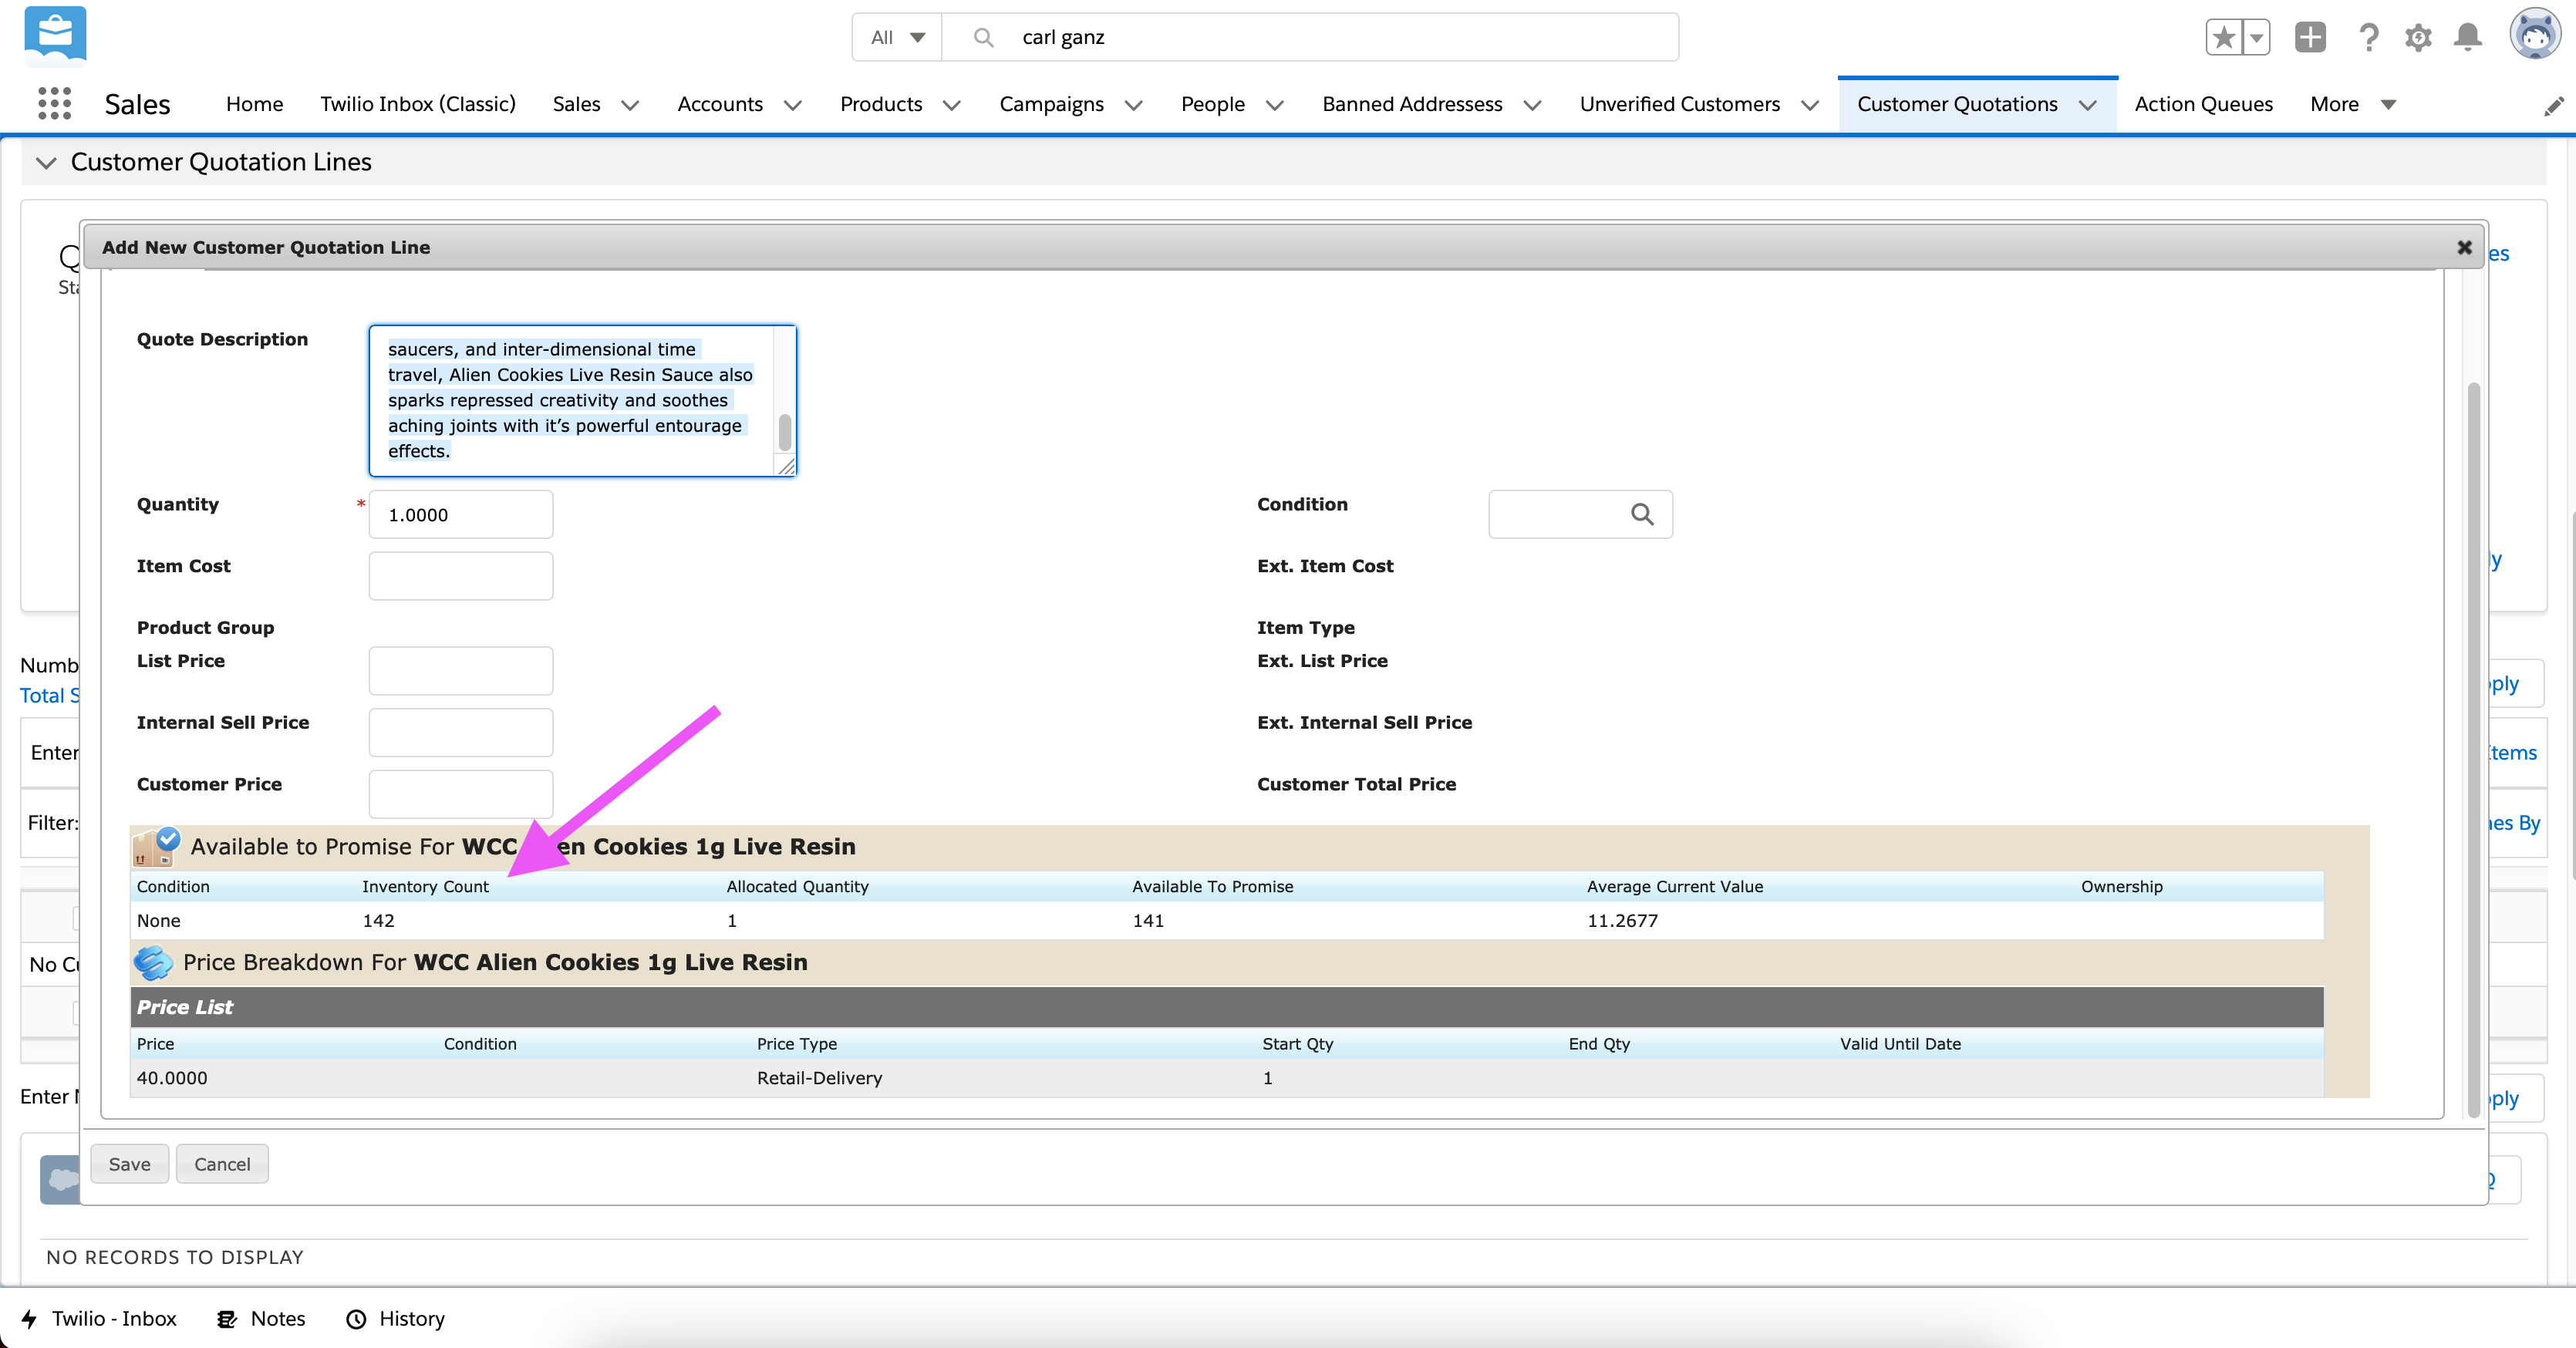
Inventory levels for selected product
Once the item is added taxes will automatically be calculated and the items table will display all relevant info.
 You can edit the fields in the table by scrolling up and clicking the “User Preferences” button.
User Preferences button
You can choose, which fields you would like to display. Below is an image of the recommended configuration.
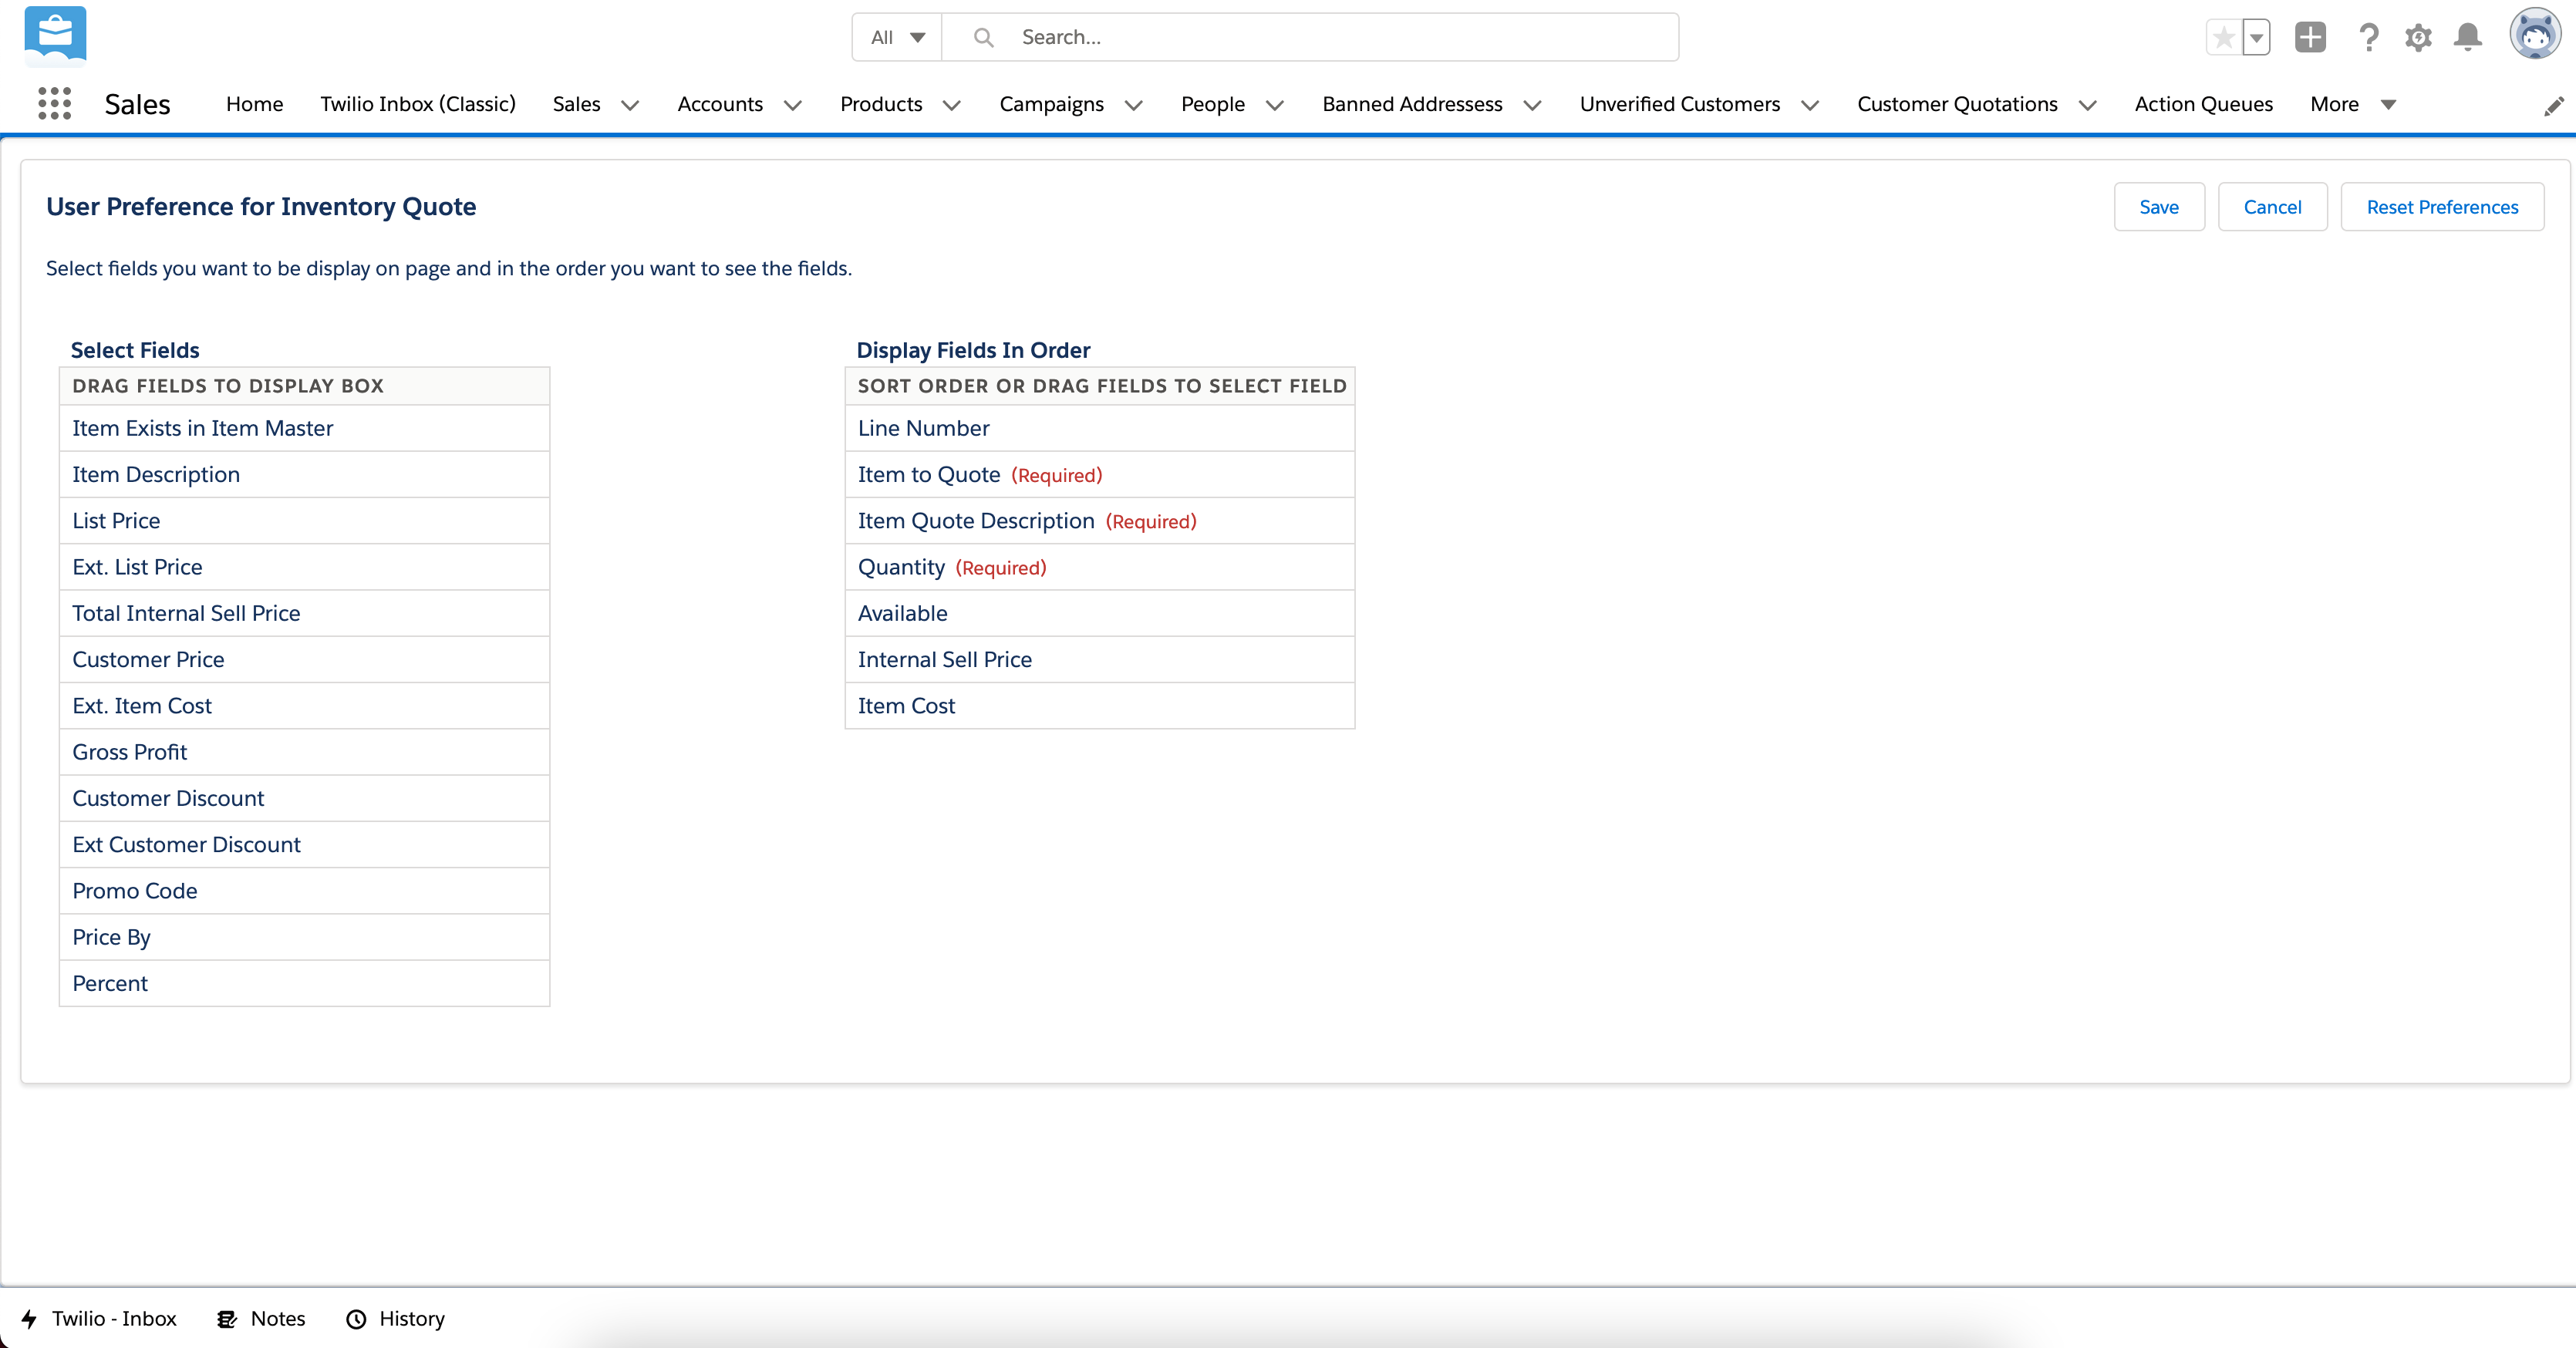
Recommended Settings
Line items can be edited by clicking the “Edit” button above and below the items table.
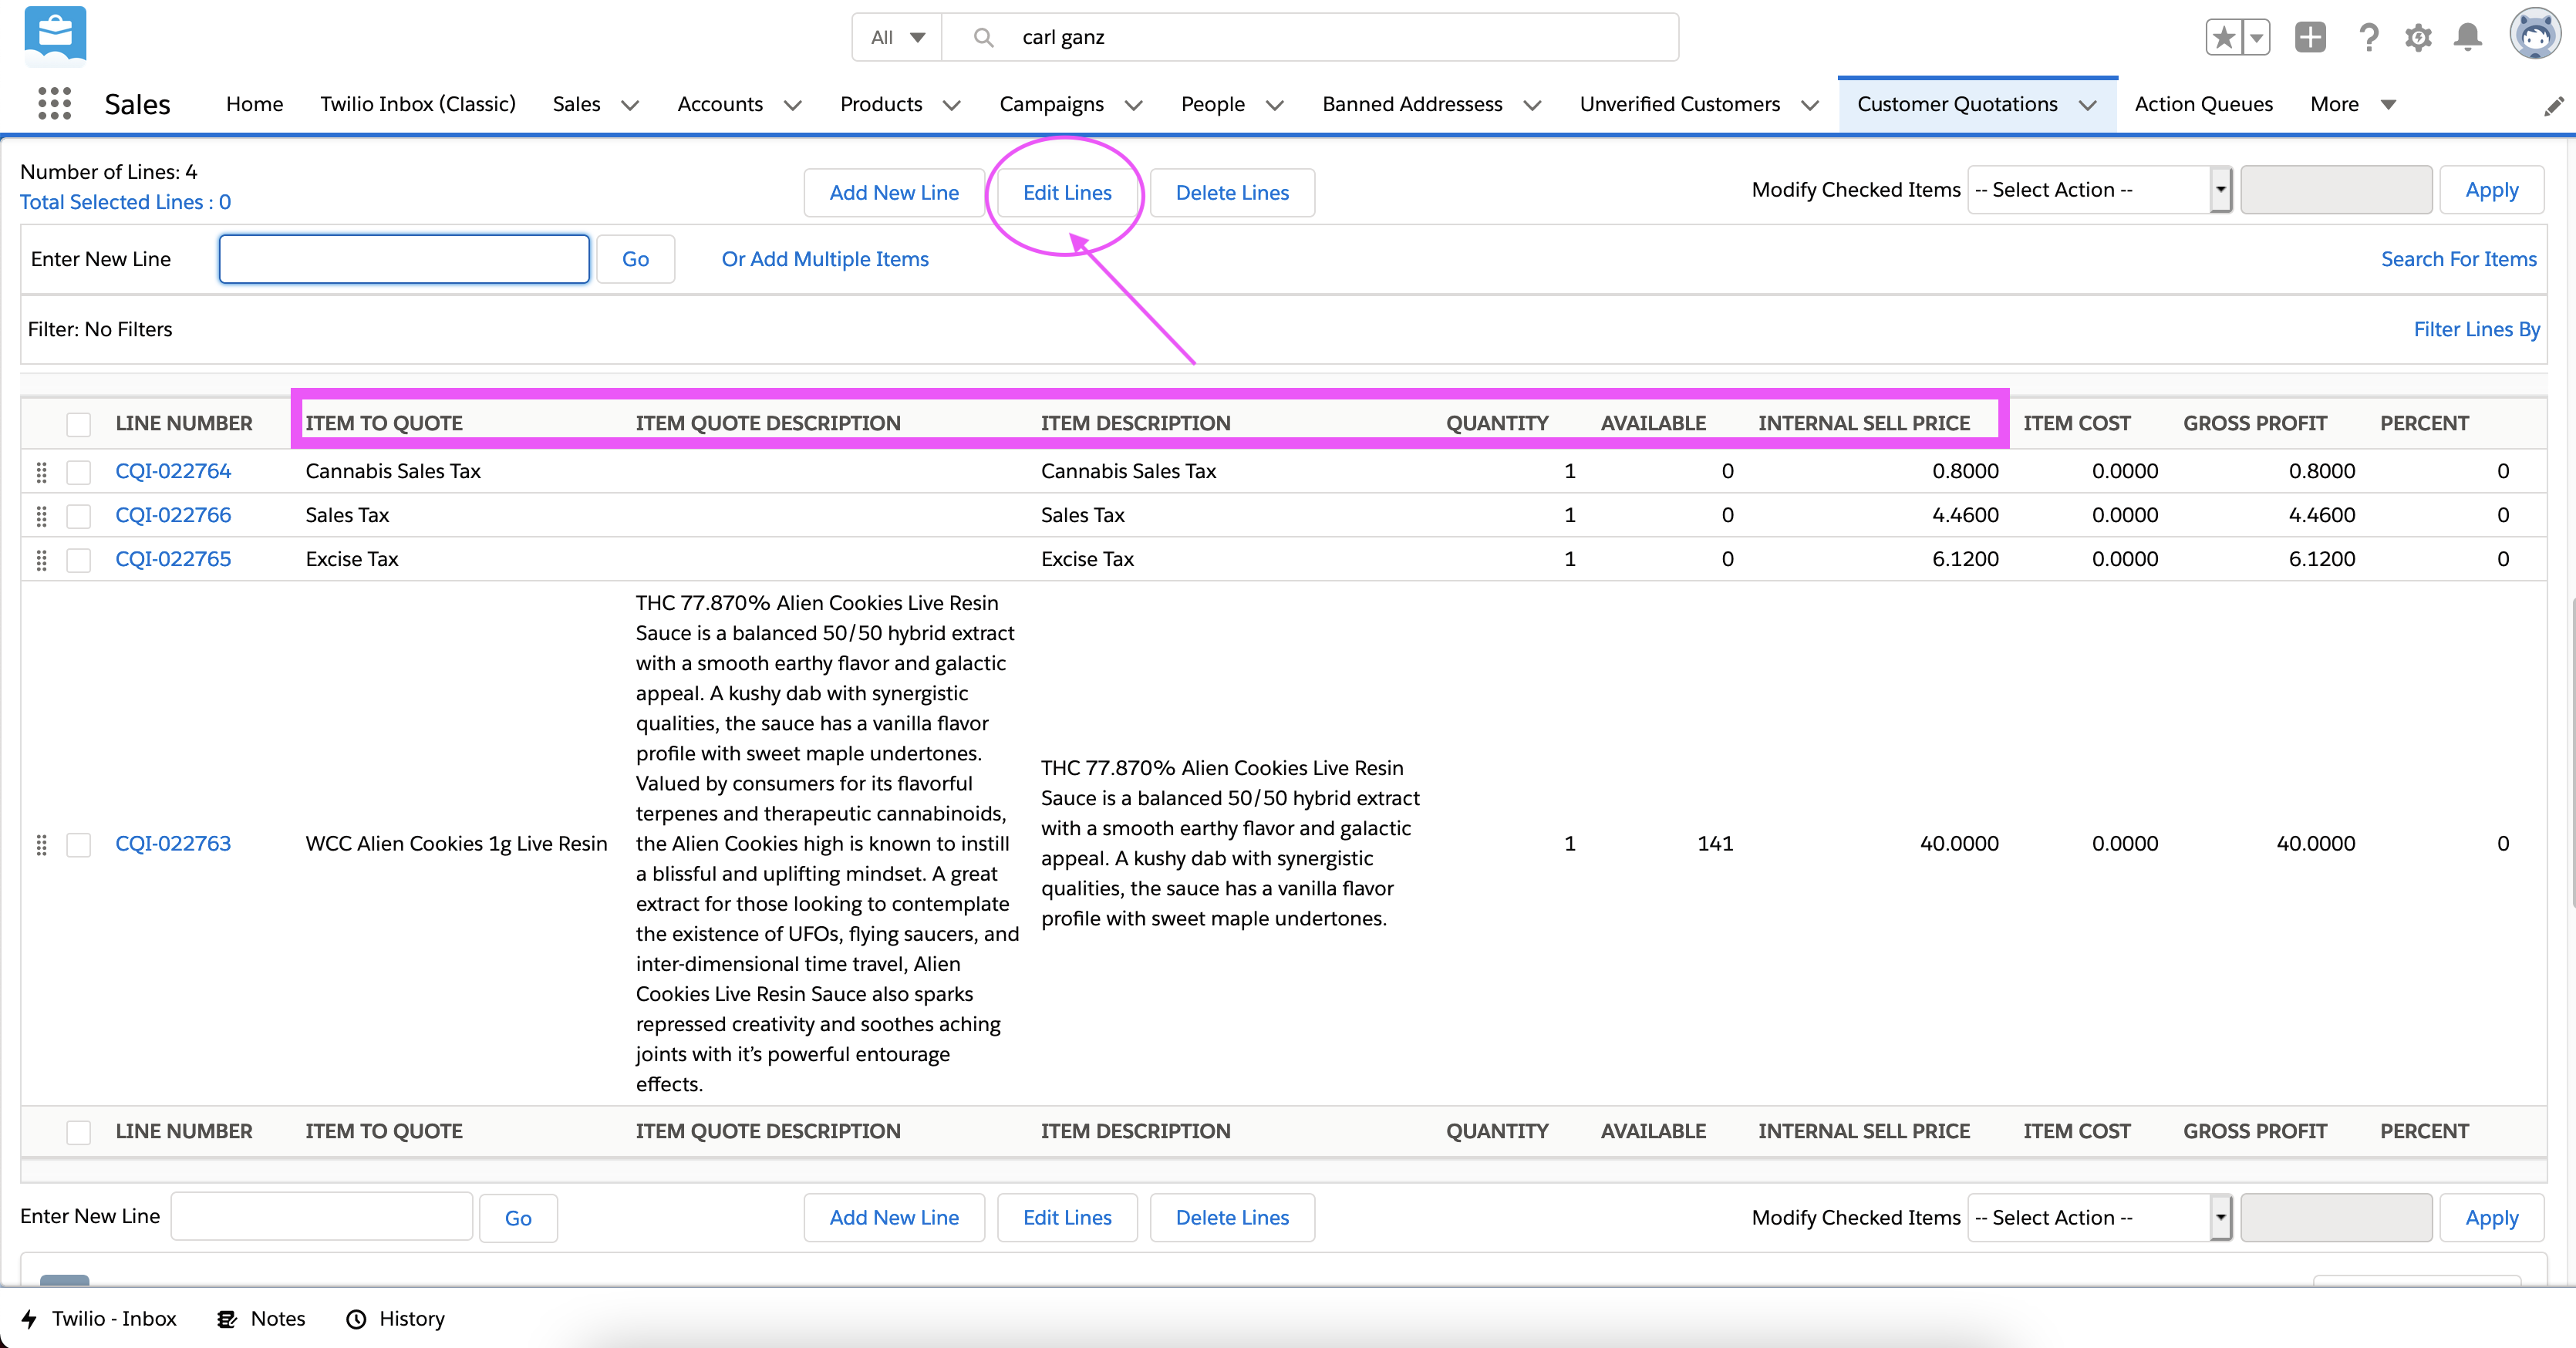
 The Quantity and “Internal Sell Price” are the primary fields you would want to edit.
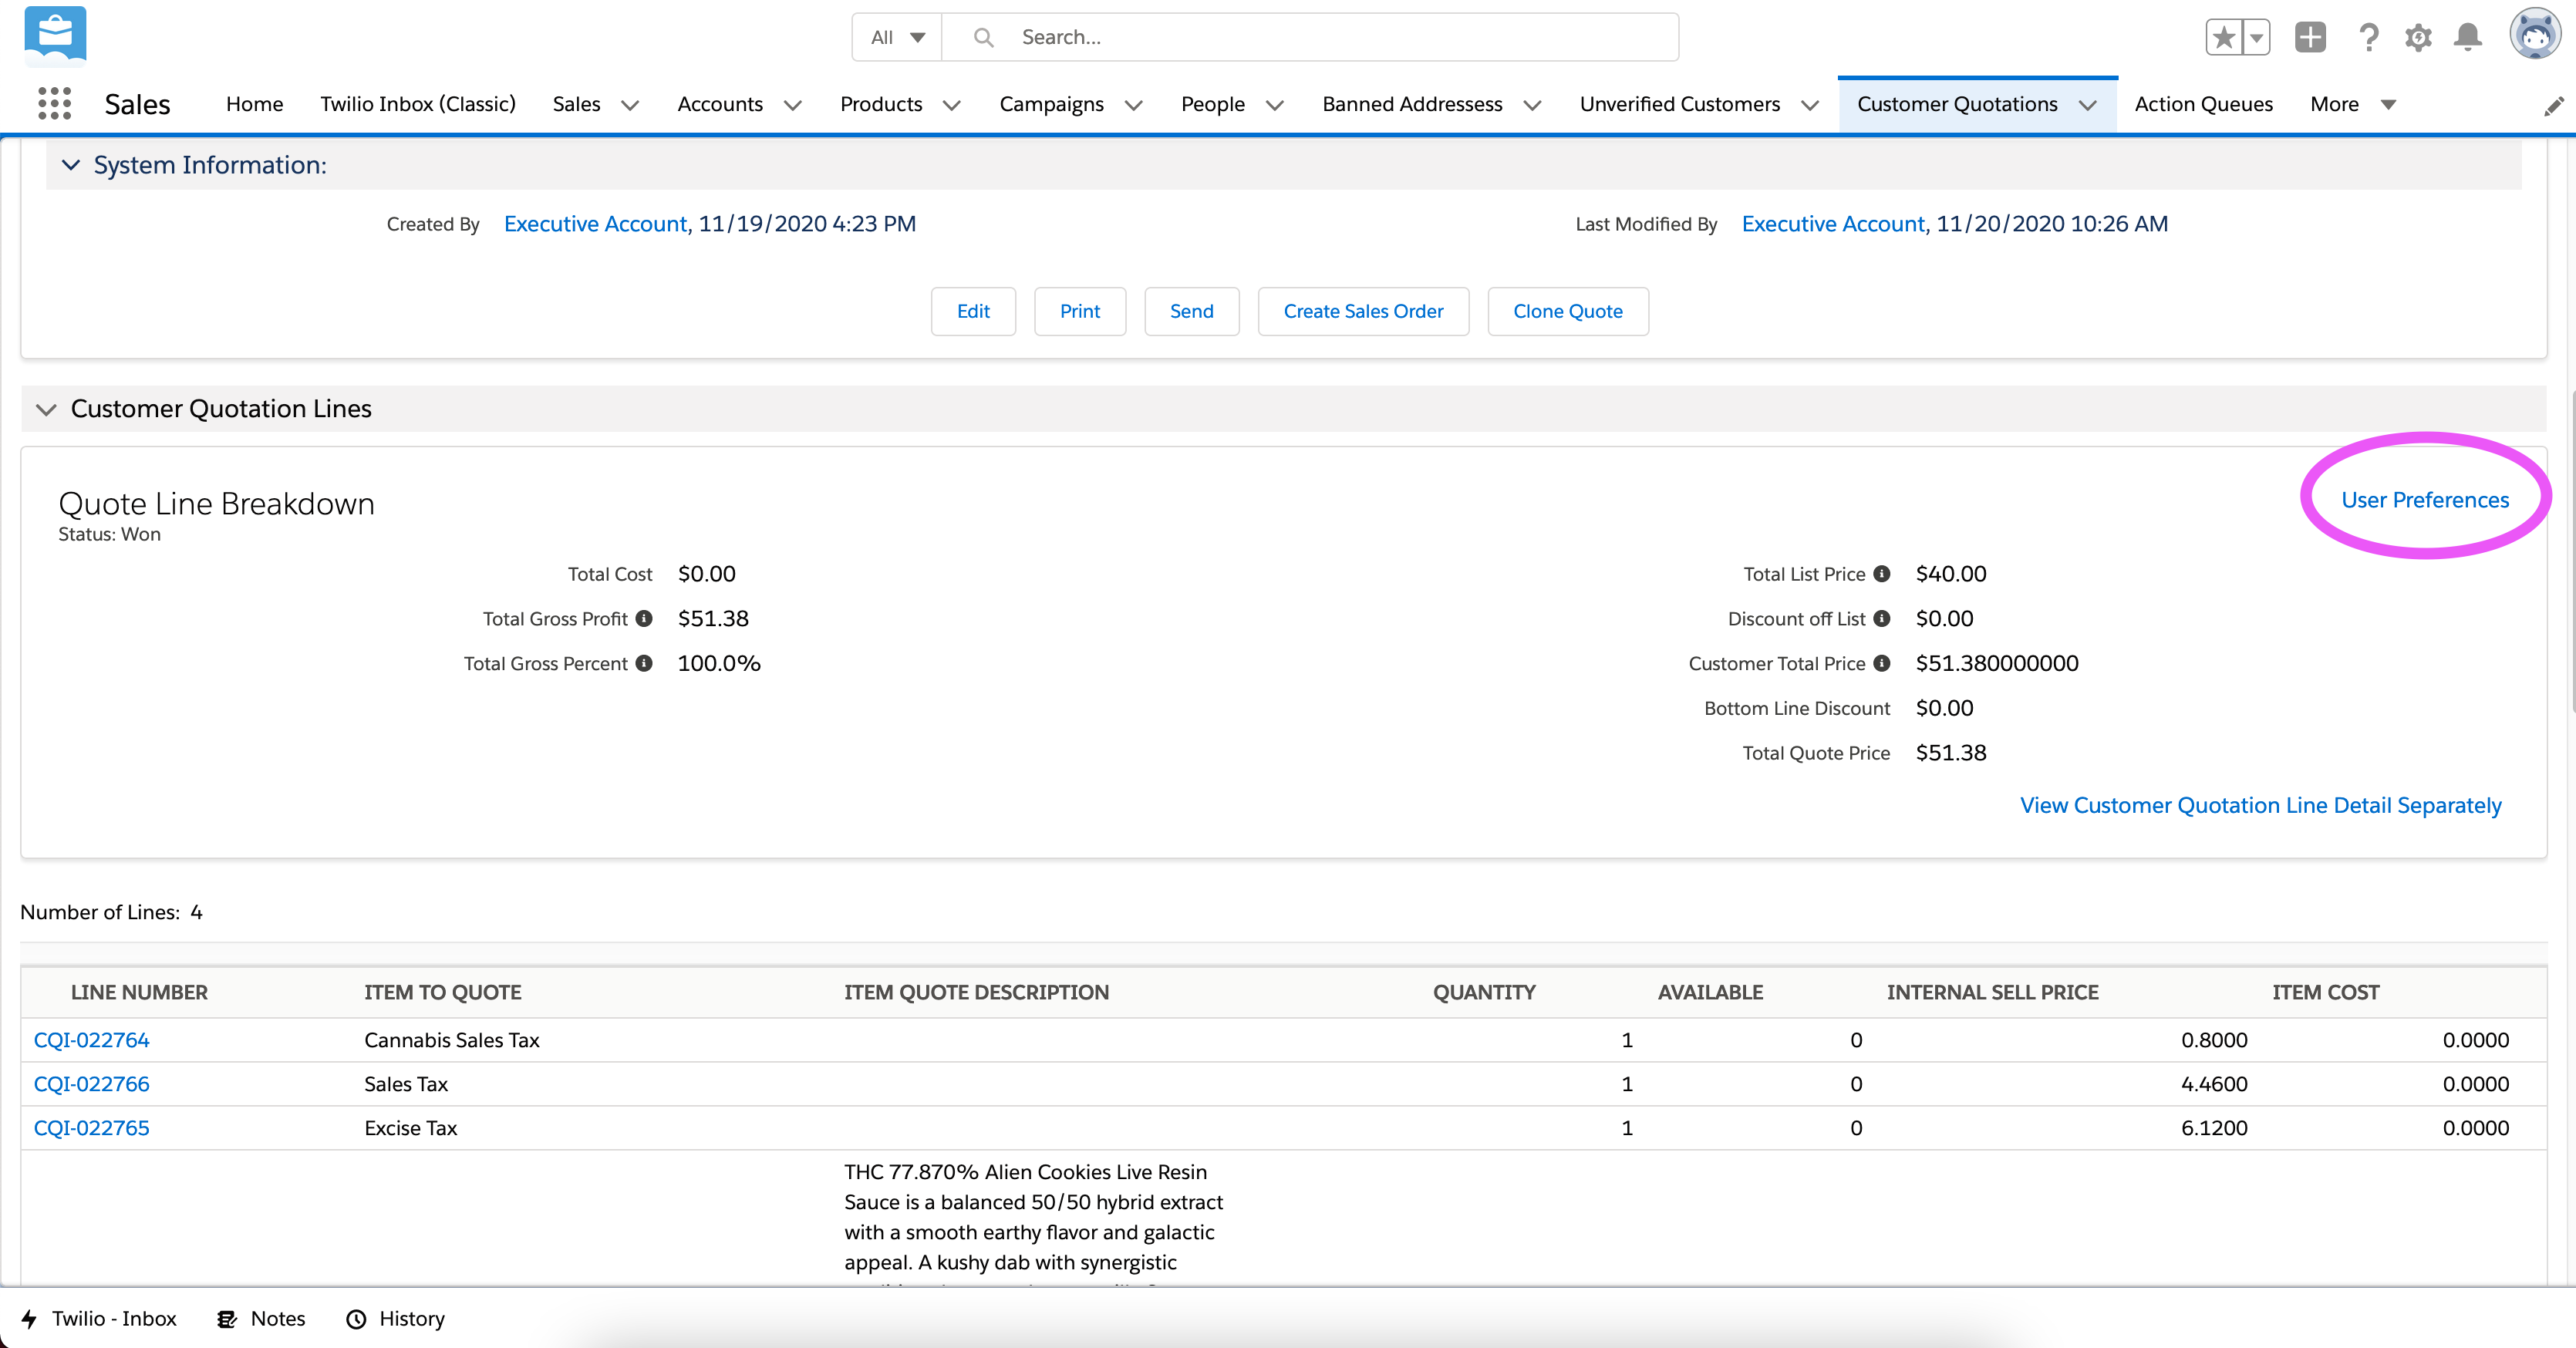
Once you have endered all the line items, and the customer agrees to proceed it is time to convert the quote to a Sales Order.
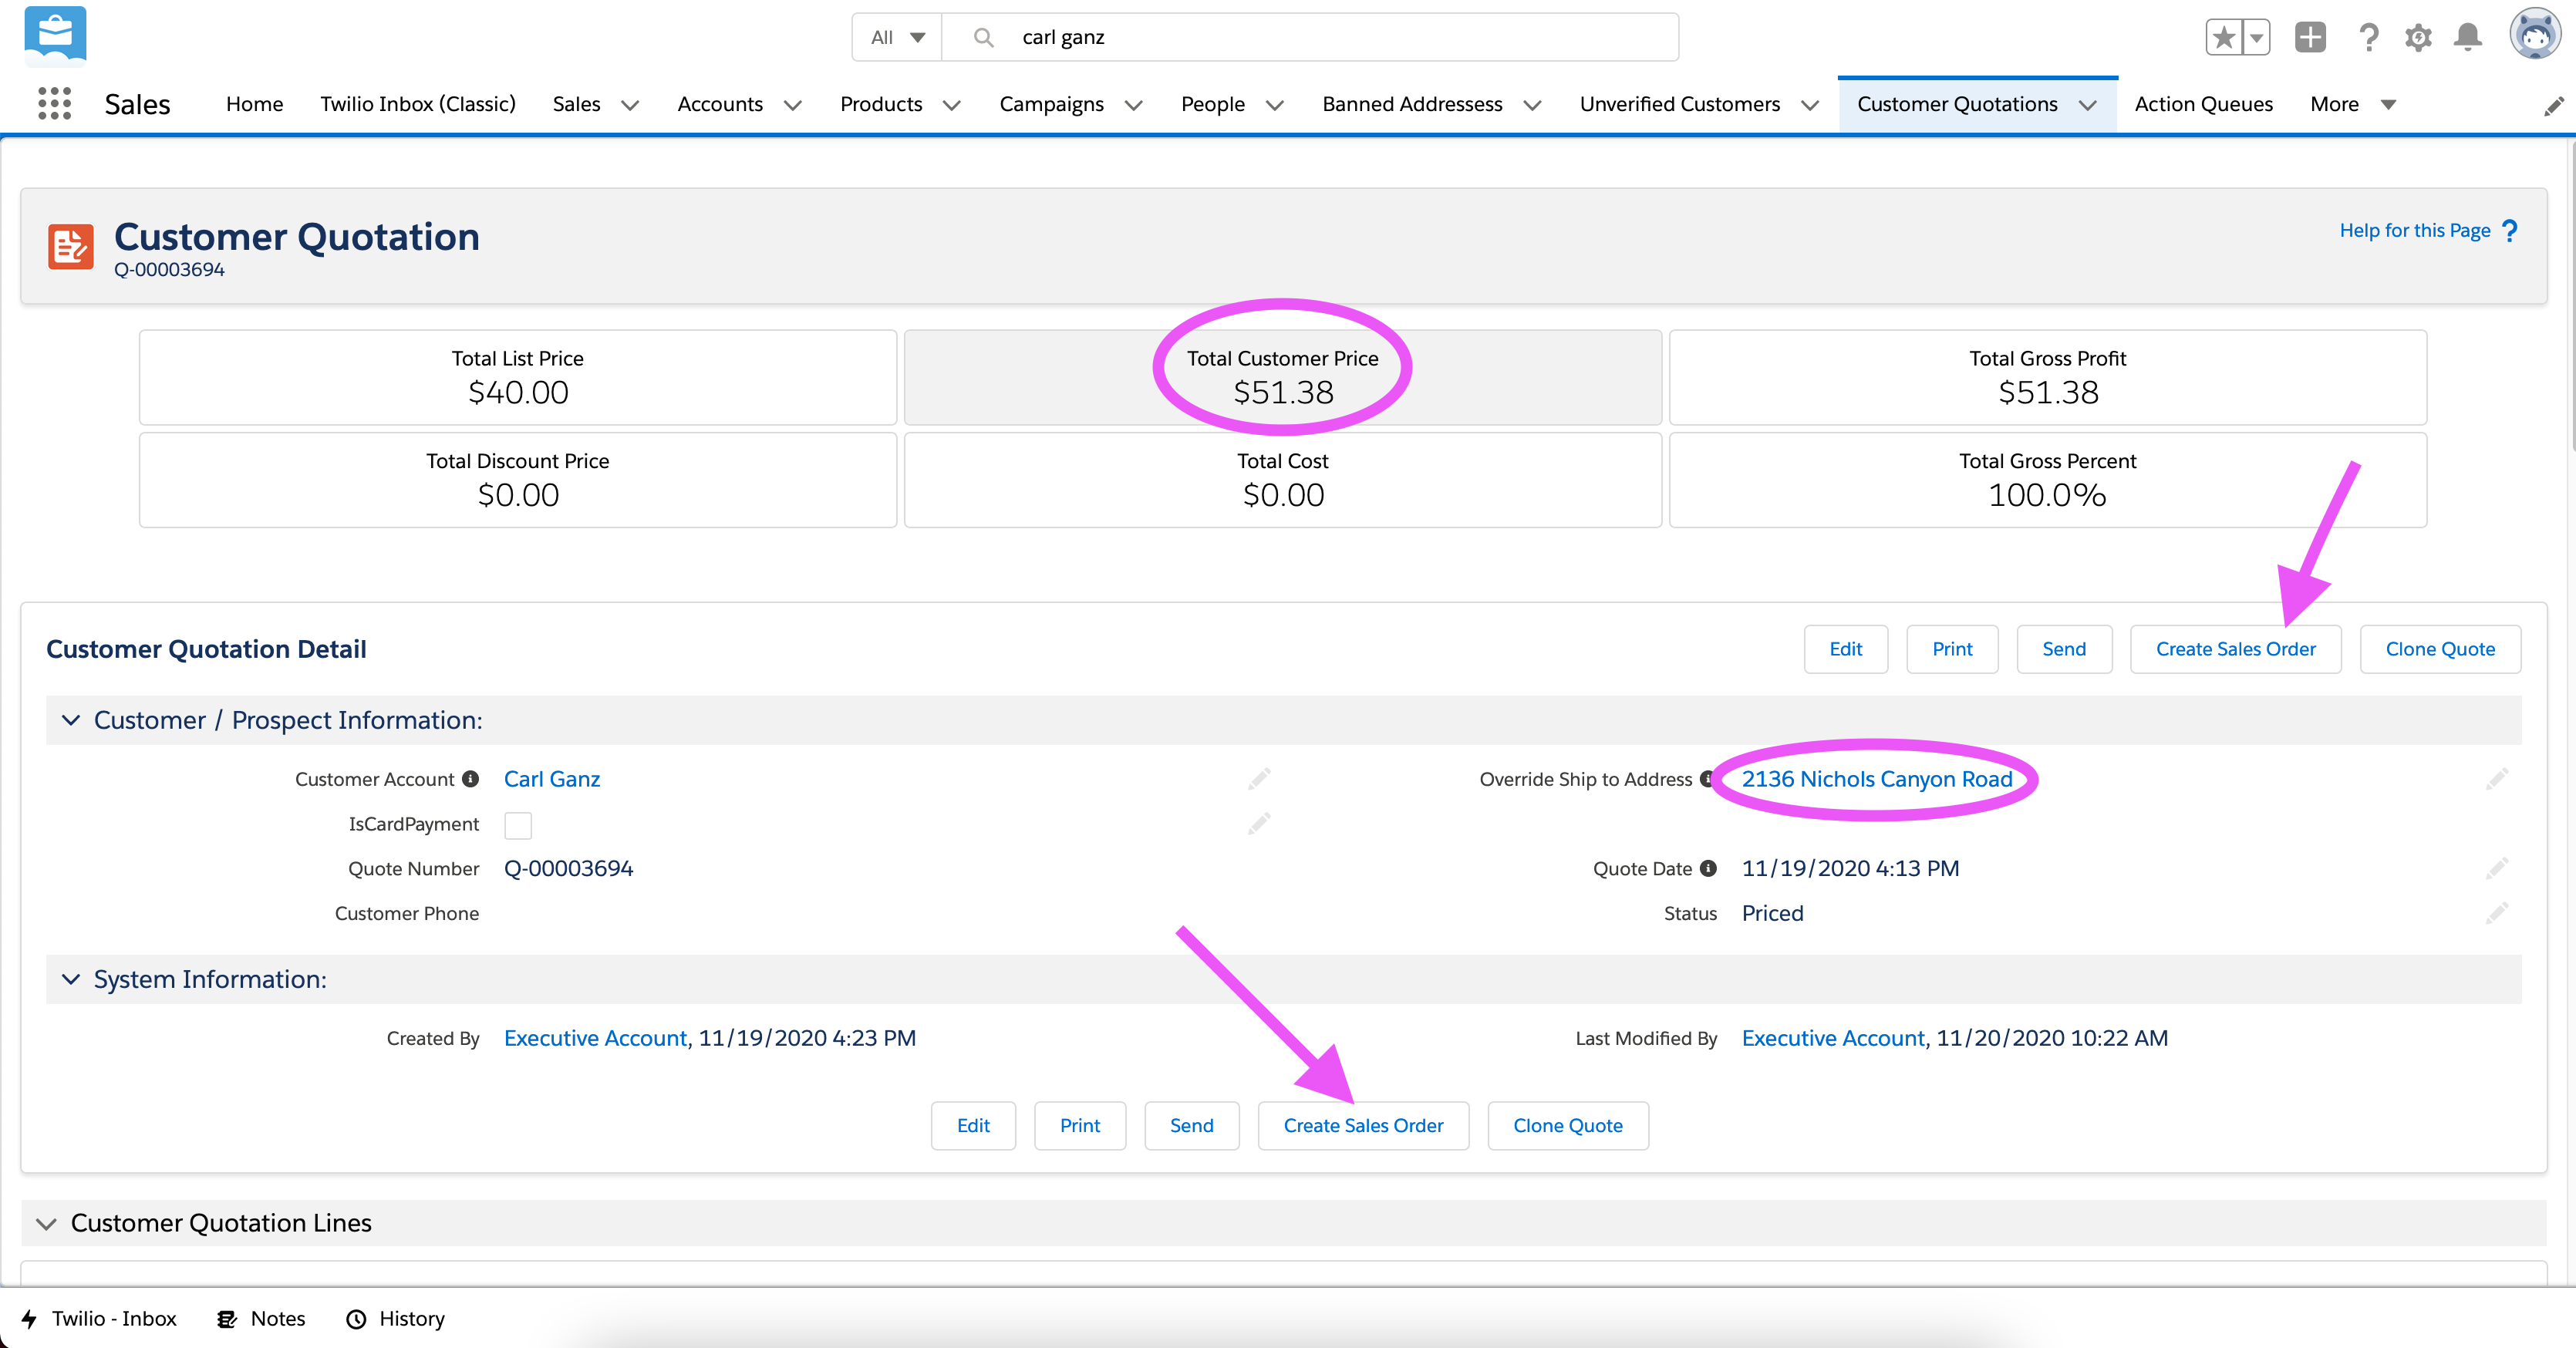 At the top of quote page is all the essential information you need to validate:
- The total price the customer will pay
- The customer’s delivery address
- the customer’s payment method
Once validated there is a “Create Sales Order” button that will convert the quote to a Sales Order. At this point the dispatcher should be finished, and the rest of the work should be handled on Onfleet, and Driver app (both of which we will discuss later).
2.3.5 Sales Order
For a variety of reasons dispatchers may need to interact directly with Sales Orders. Sales Orders are included on the Person Account page on the “SOs” tab.
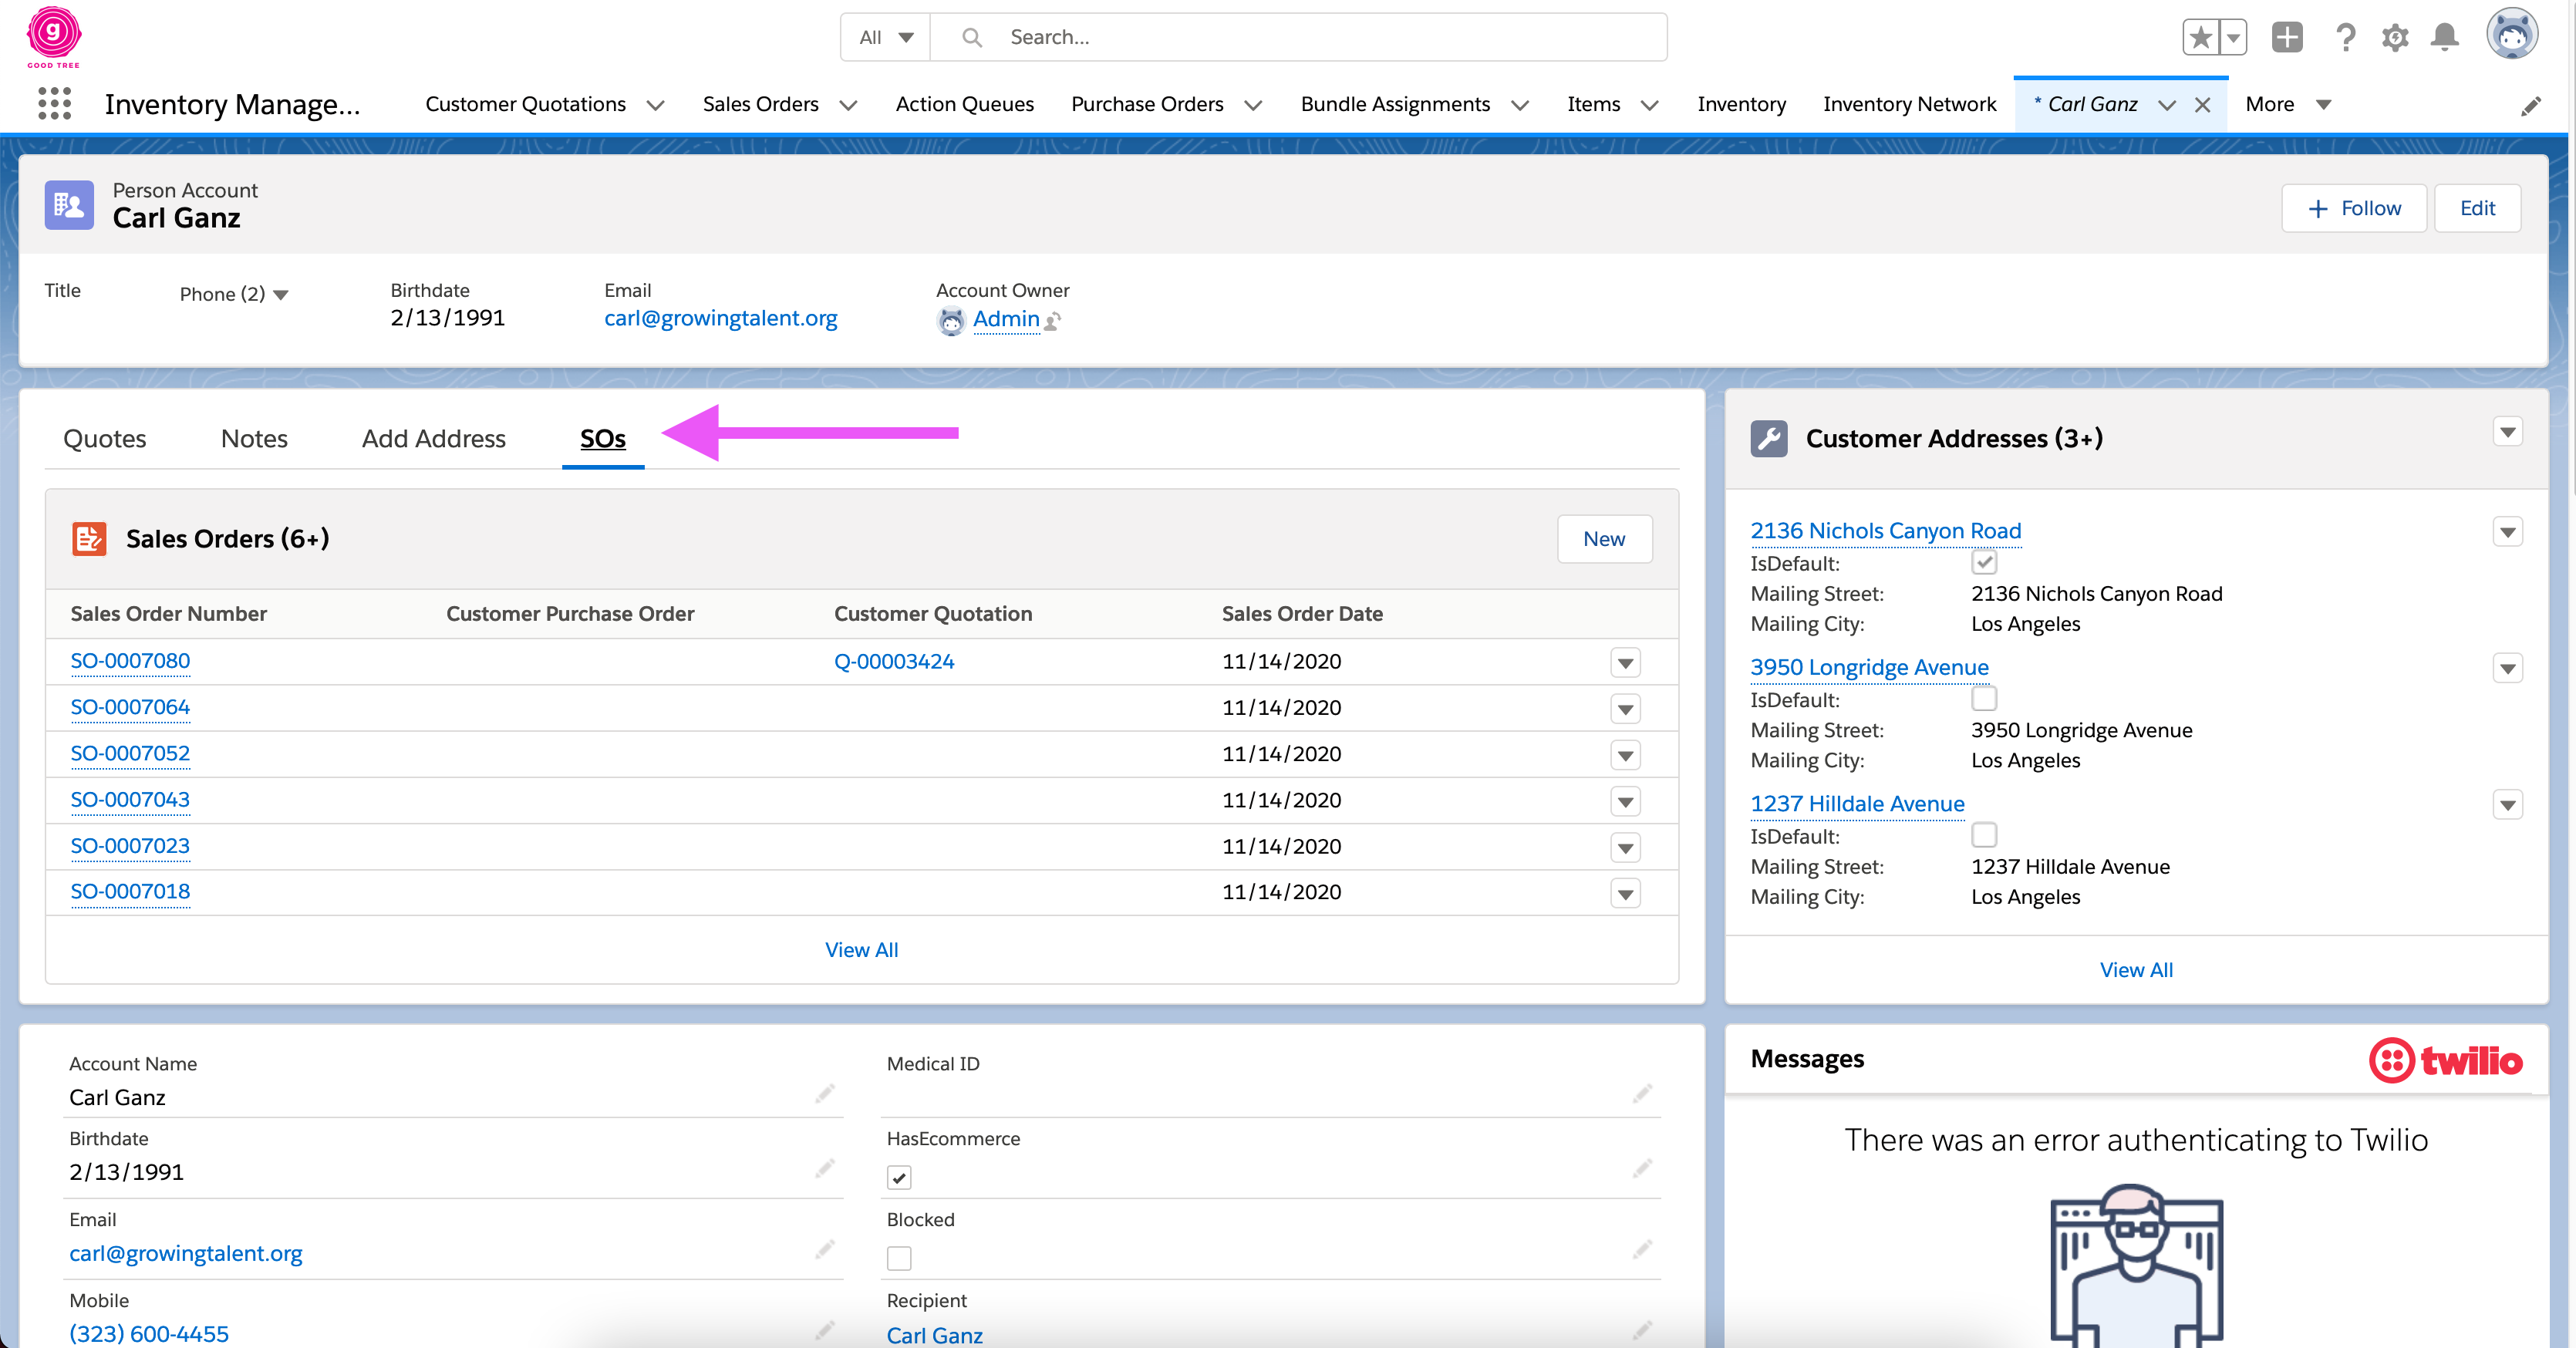
Customer Sales Orders
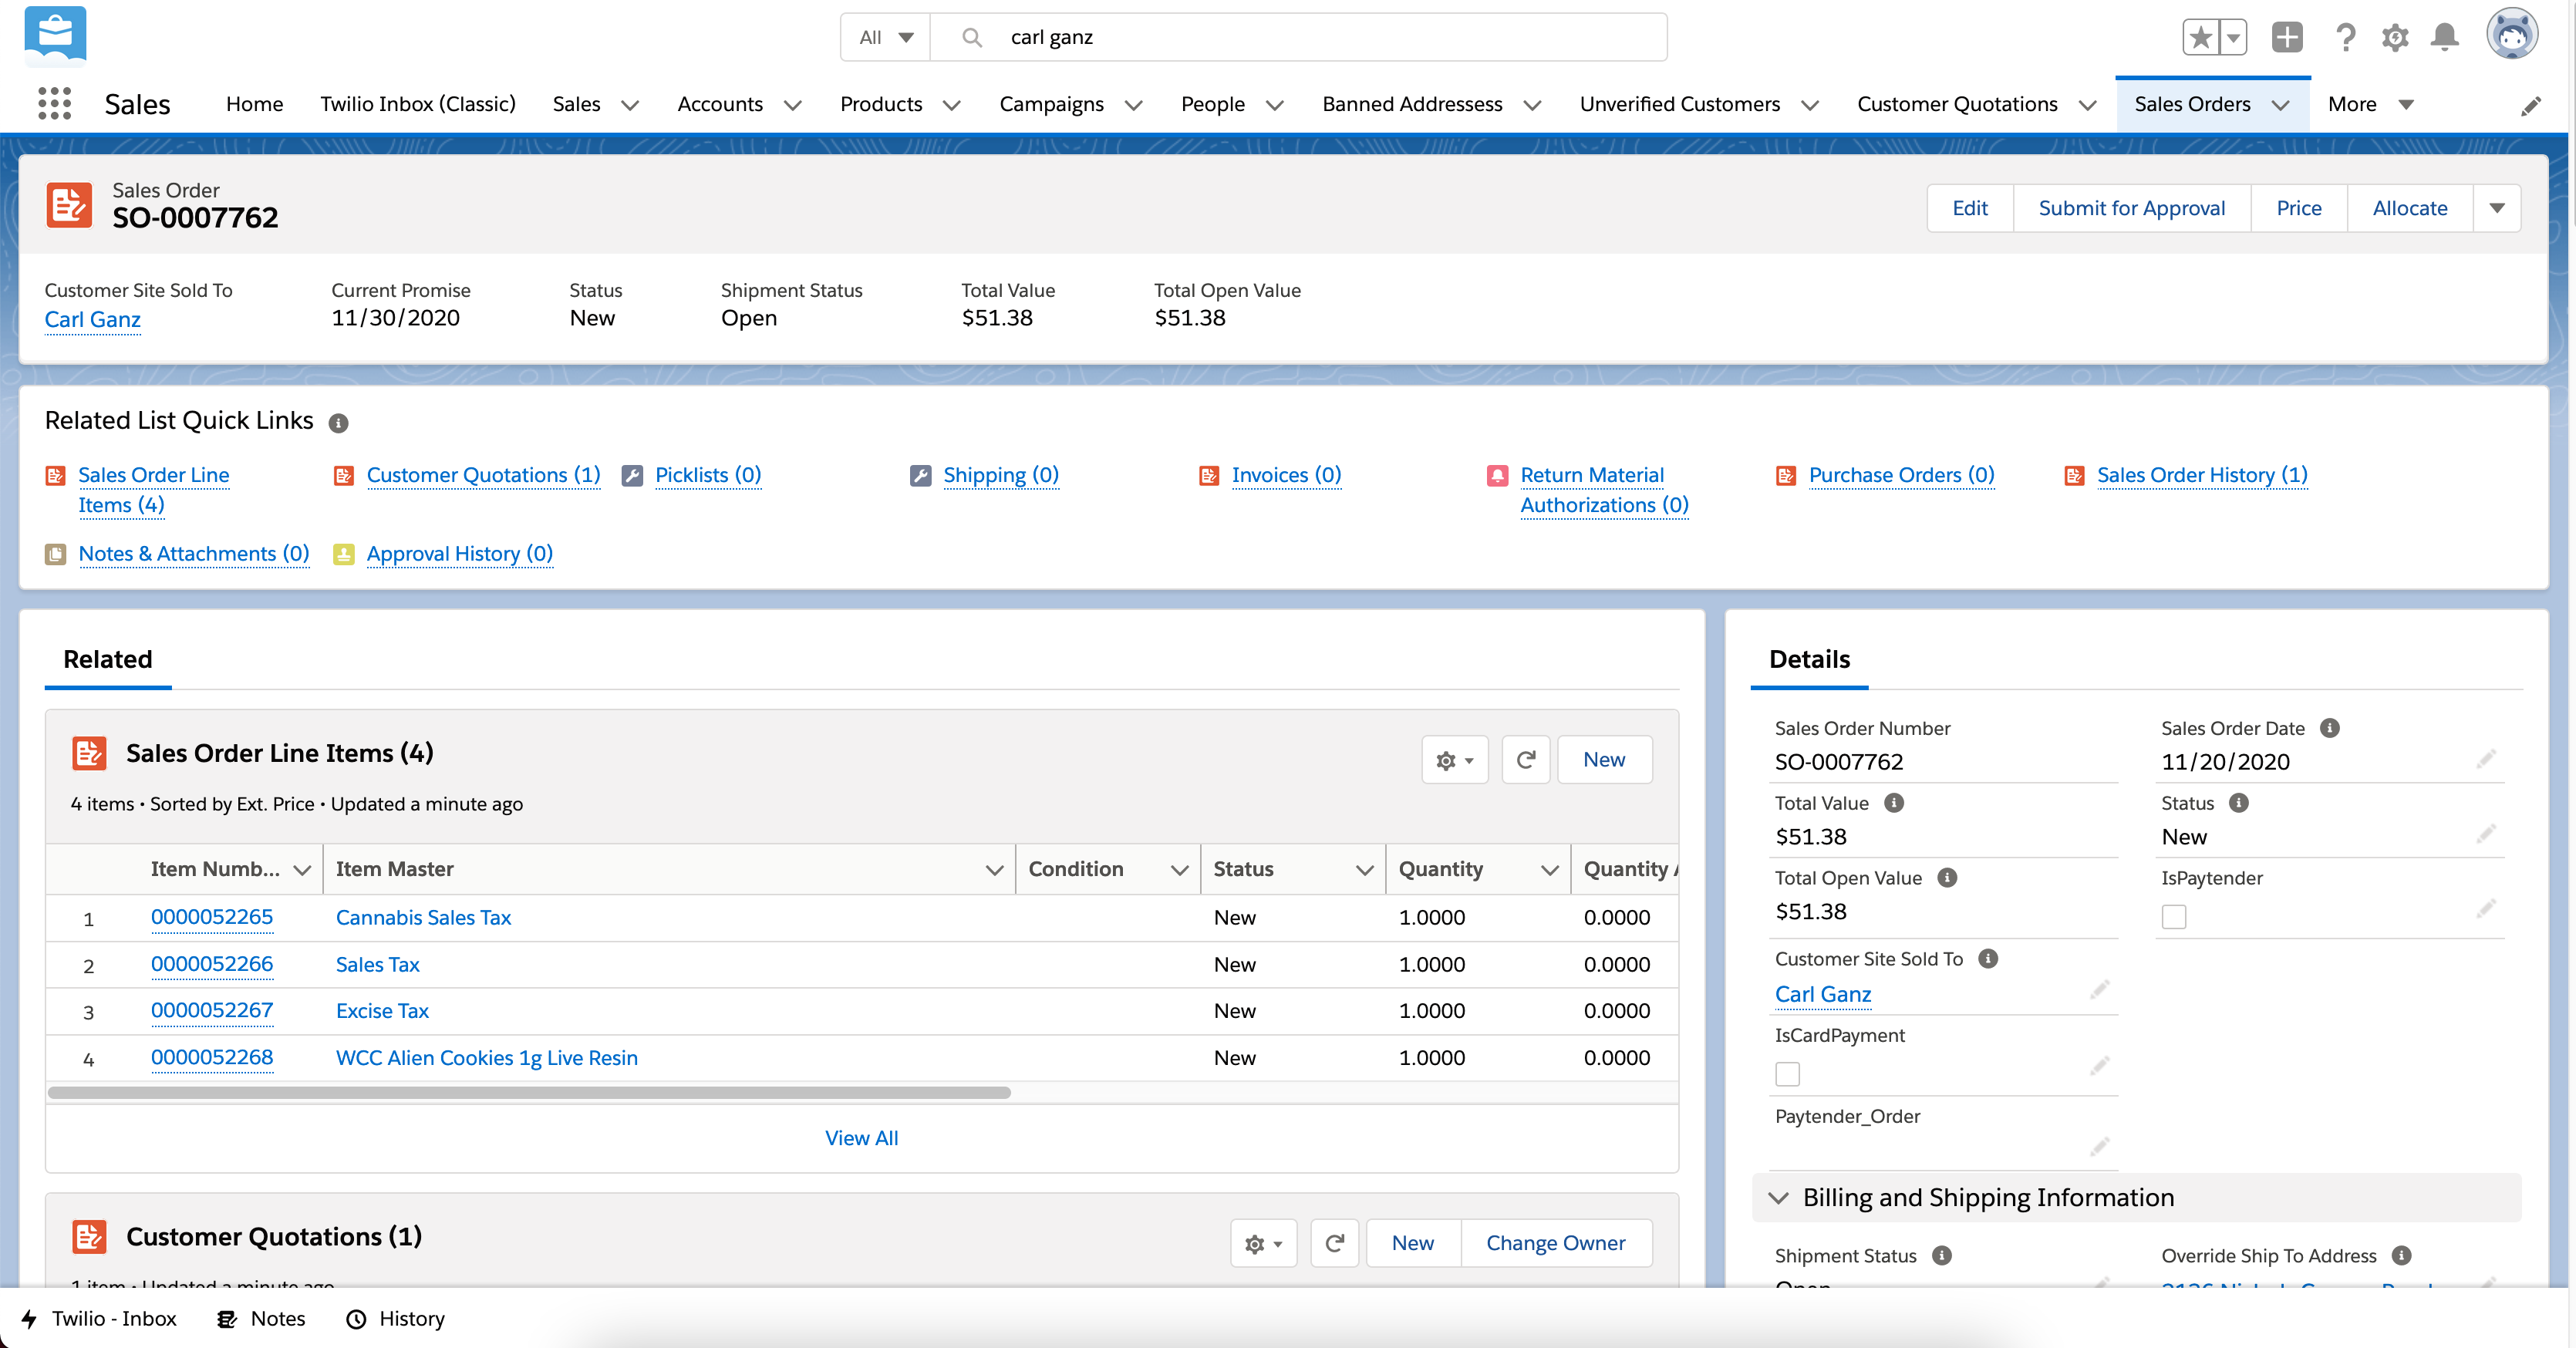
Sales Order Page

Sales Order Page
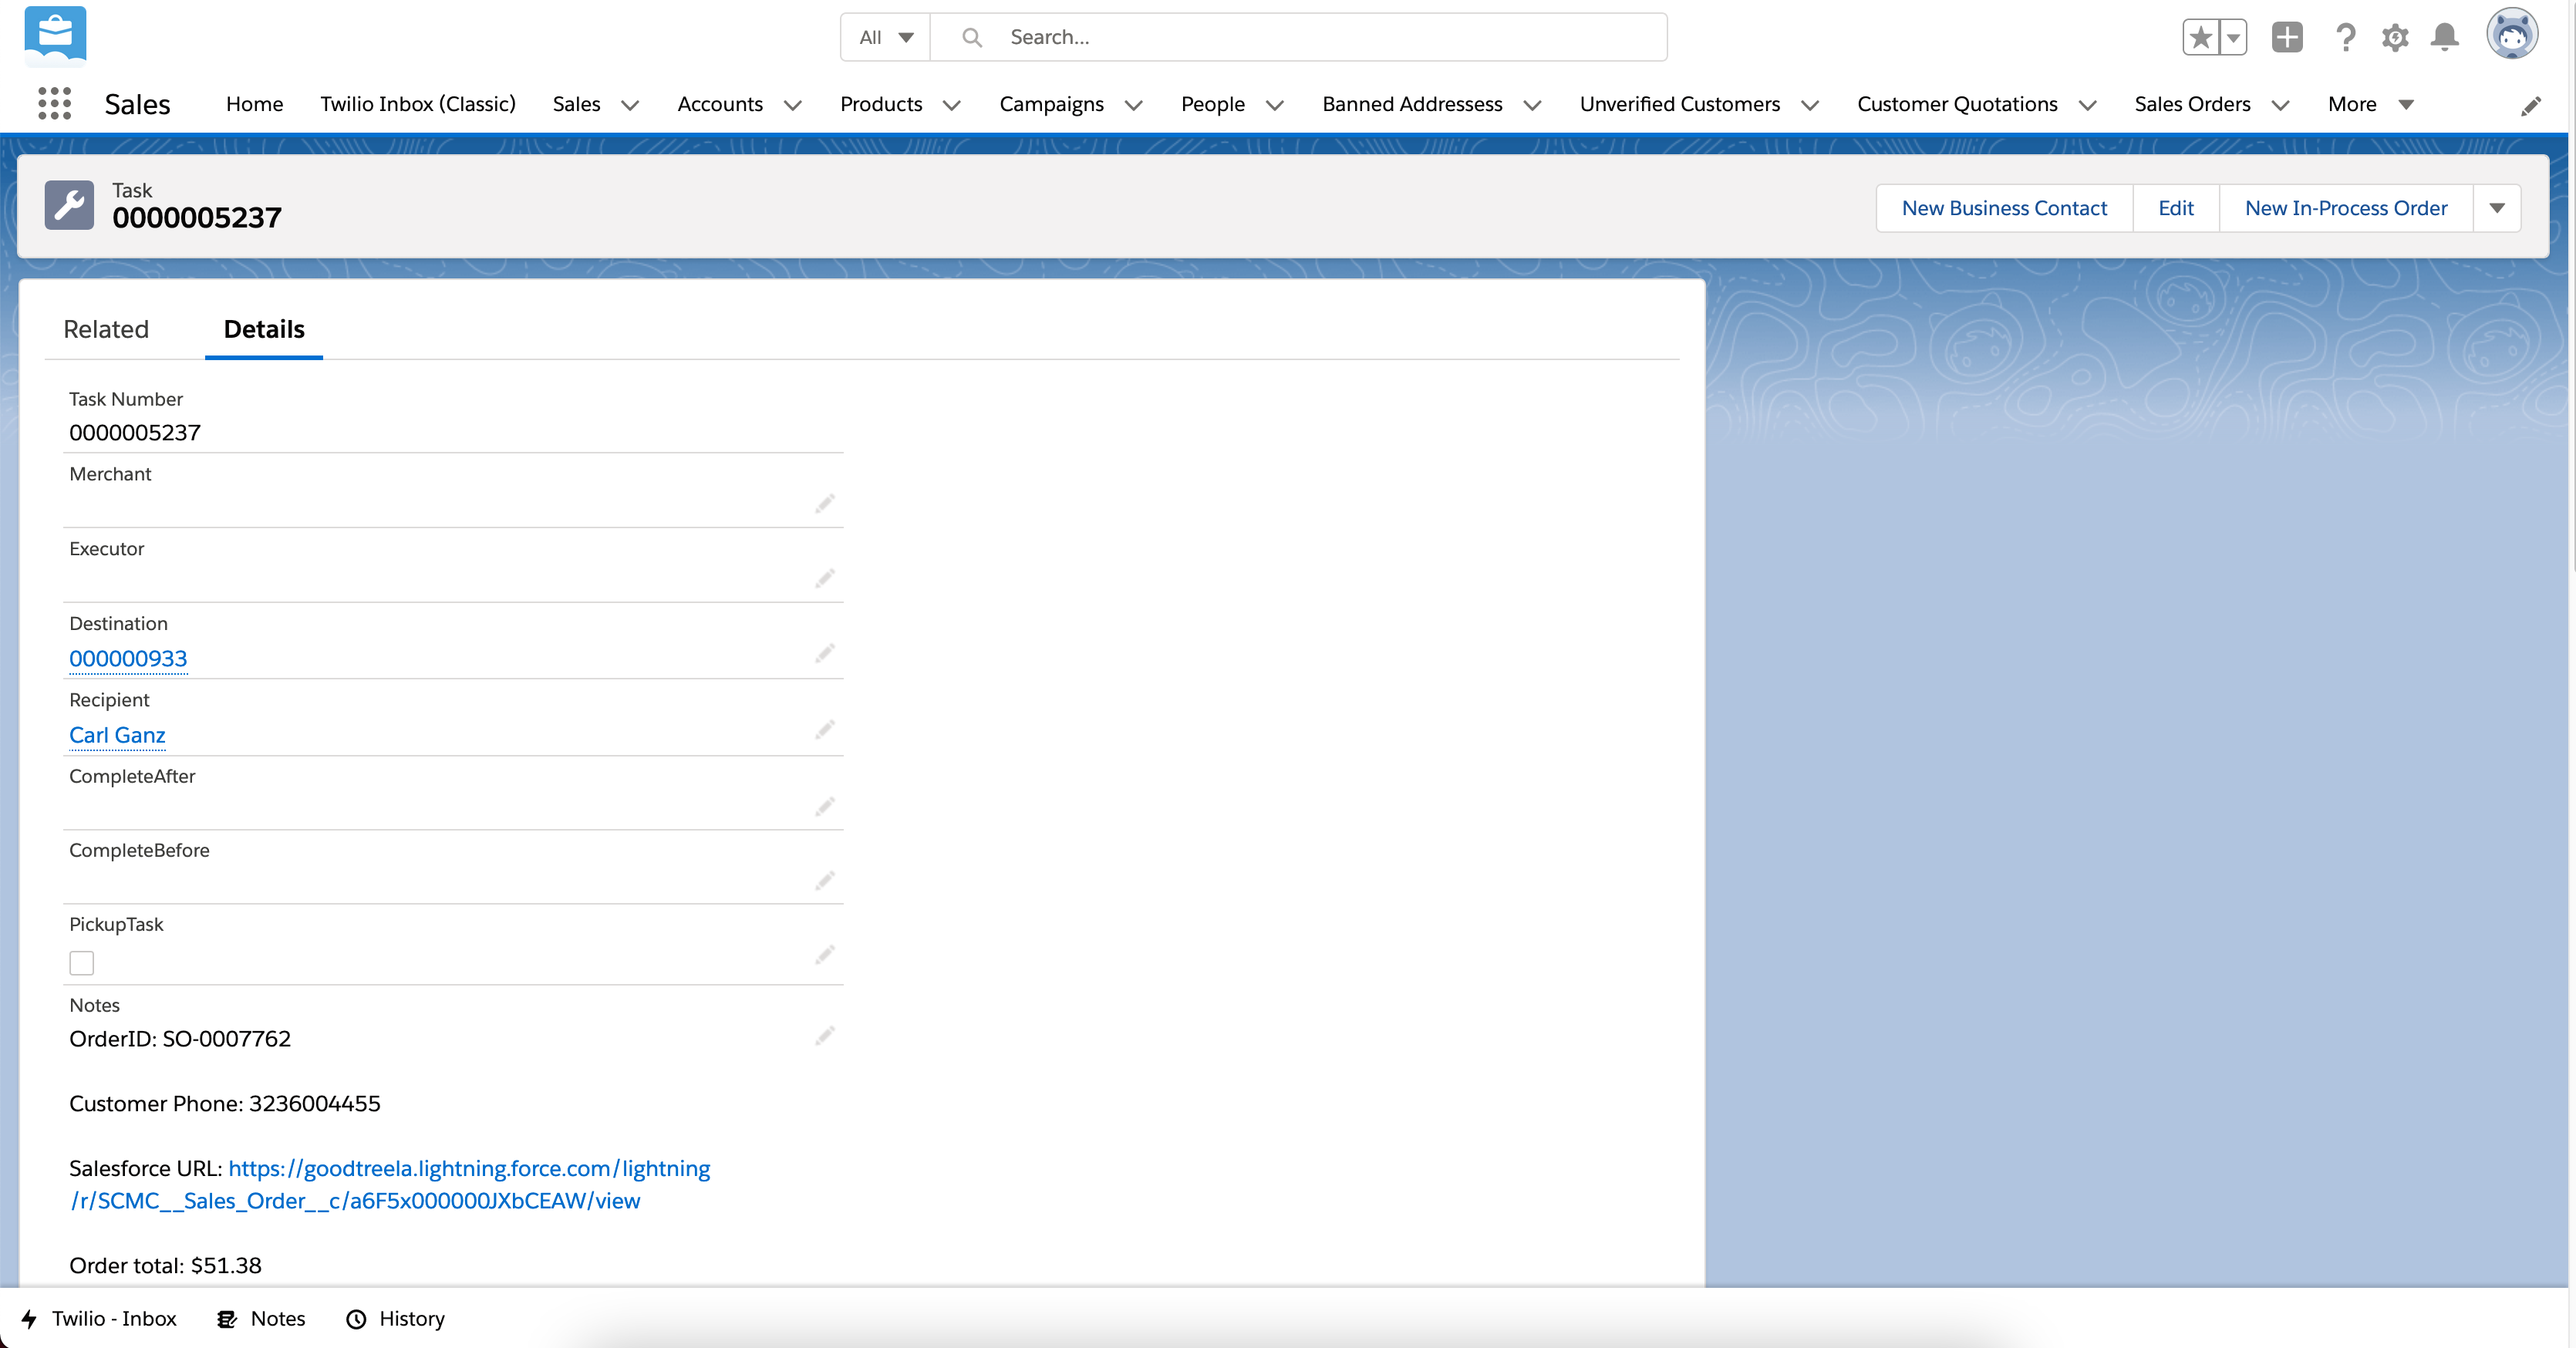
The Sales Order includes many essential fields described below:
| Field | Description |
|---|---|
| SO Number | The Name of the Sales Order ie SO-000123 |
| Total Value | The total price of the order including tax |
| Customer Site Sold To | This is the account of the customer |
| IsCardPayment | Indicates whether customer is paying with debit card |
| IsPaytender | Indicates whether customer is paying online with Paytender |
| Paytender_Order | Link to Paytender Order object that contains information about status of online payment |
| Override Ship To Address | Override Ship To Address is the delivery address, despite the name it is always populated |
| IsPackaged | Indicates whether driver has marked order as packaged in Driver app |
| IsCancelled | Indicates whether Onfleet task was deleted or failed |
| Warehouse | IMPORTANT! Warehouse indicates where the inventory for this order will be allocated from. When the related Onfleet task is assigned to a driver, this field is automatically populated with the Bundle that driver is using. |
| Task | This is the Onfleet Task object that holds information like the driver, and delivery status |
There are two extra important fields:
Status
Shipment Status
2.3.5.0.1 Status
| Value | Description |
|---|---|
| New | Initial status |
| Approved | Indicates order has been assigned to a driver, and is ready to be completed. Orders cannot be edited in Approved state |
| Revised | Indicates order was approved, but has been ‘Reverse Allocated’ and can now be edited again |
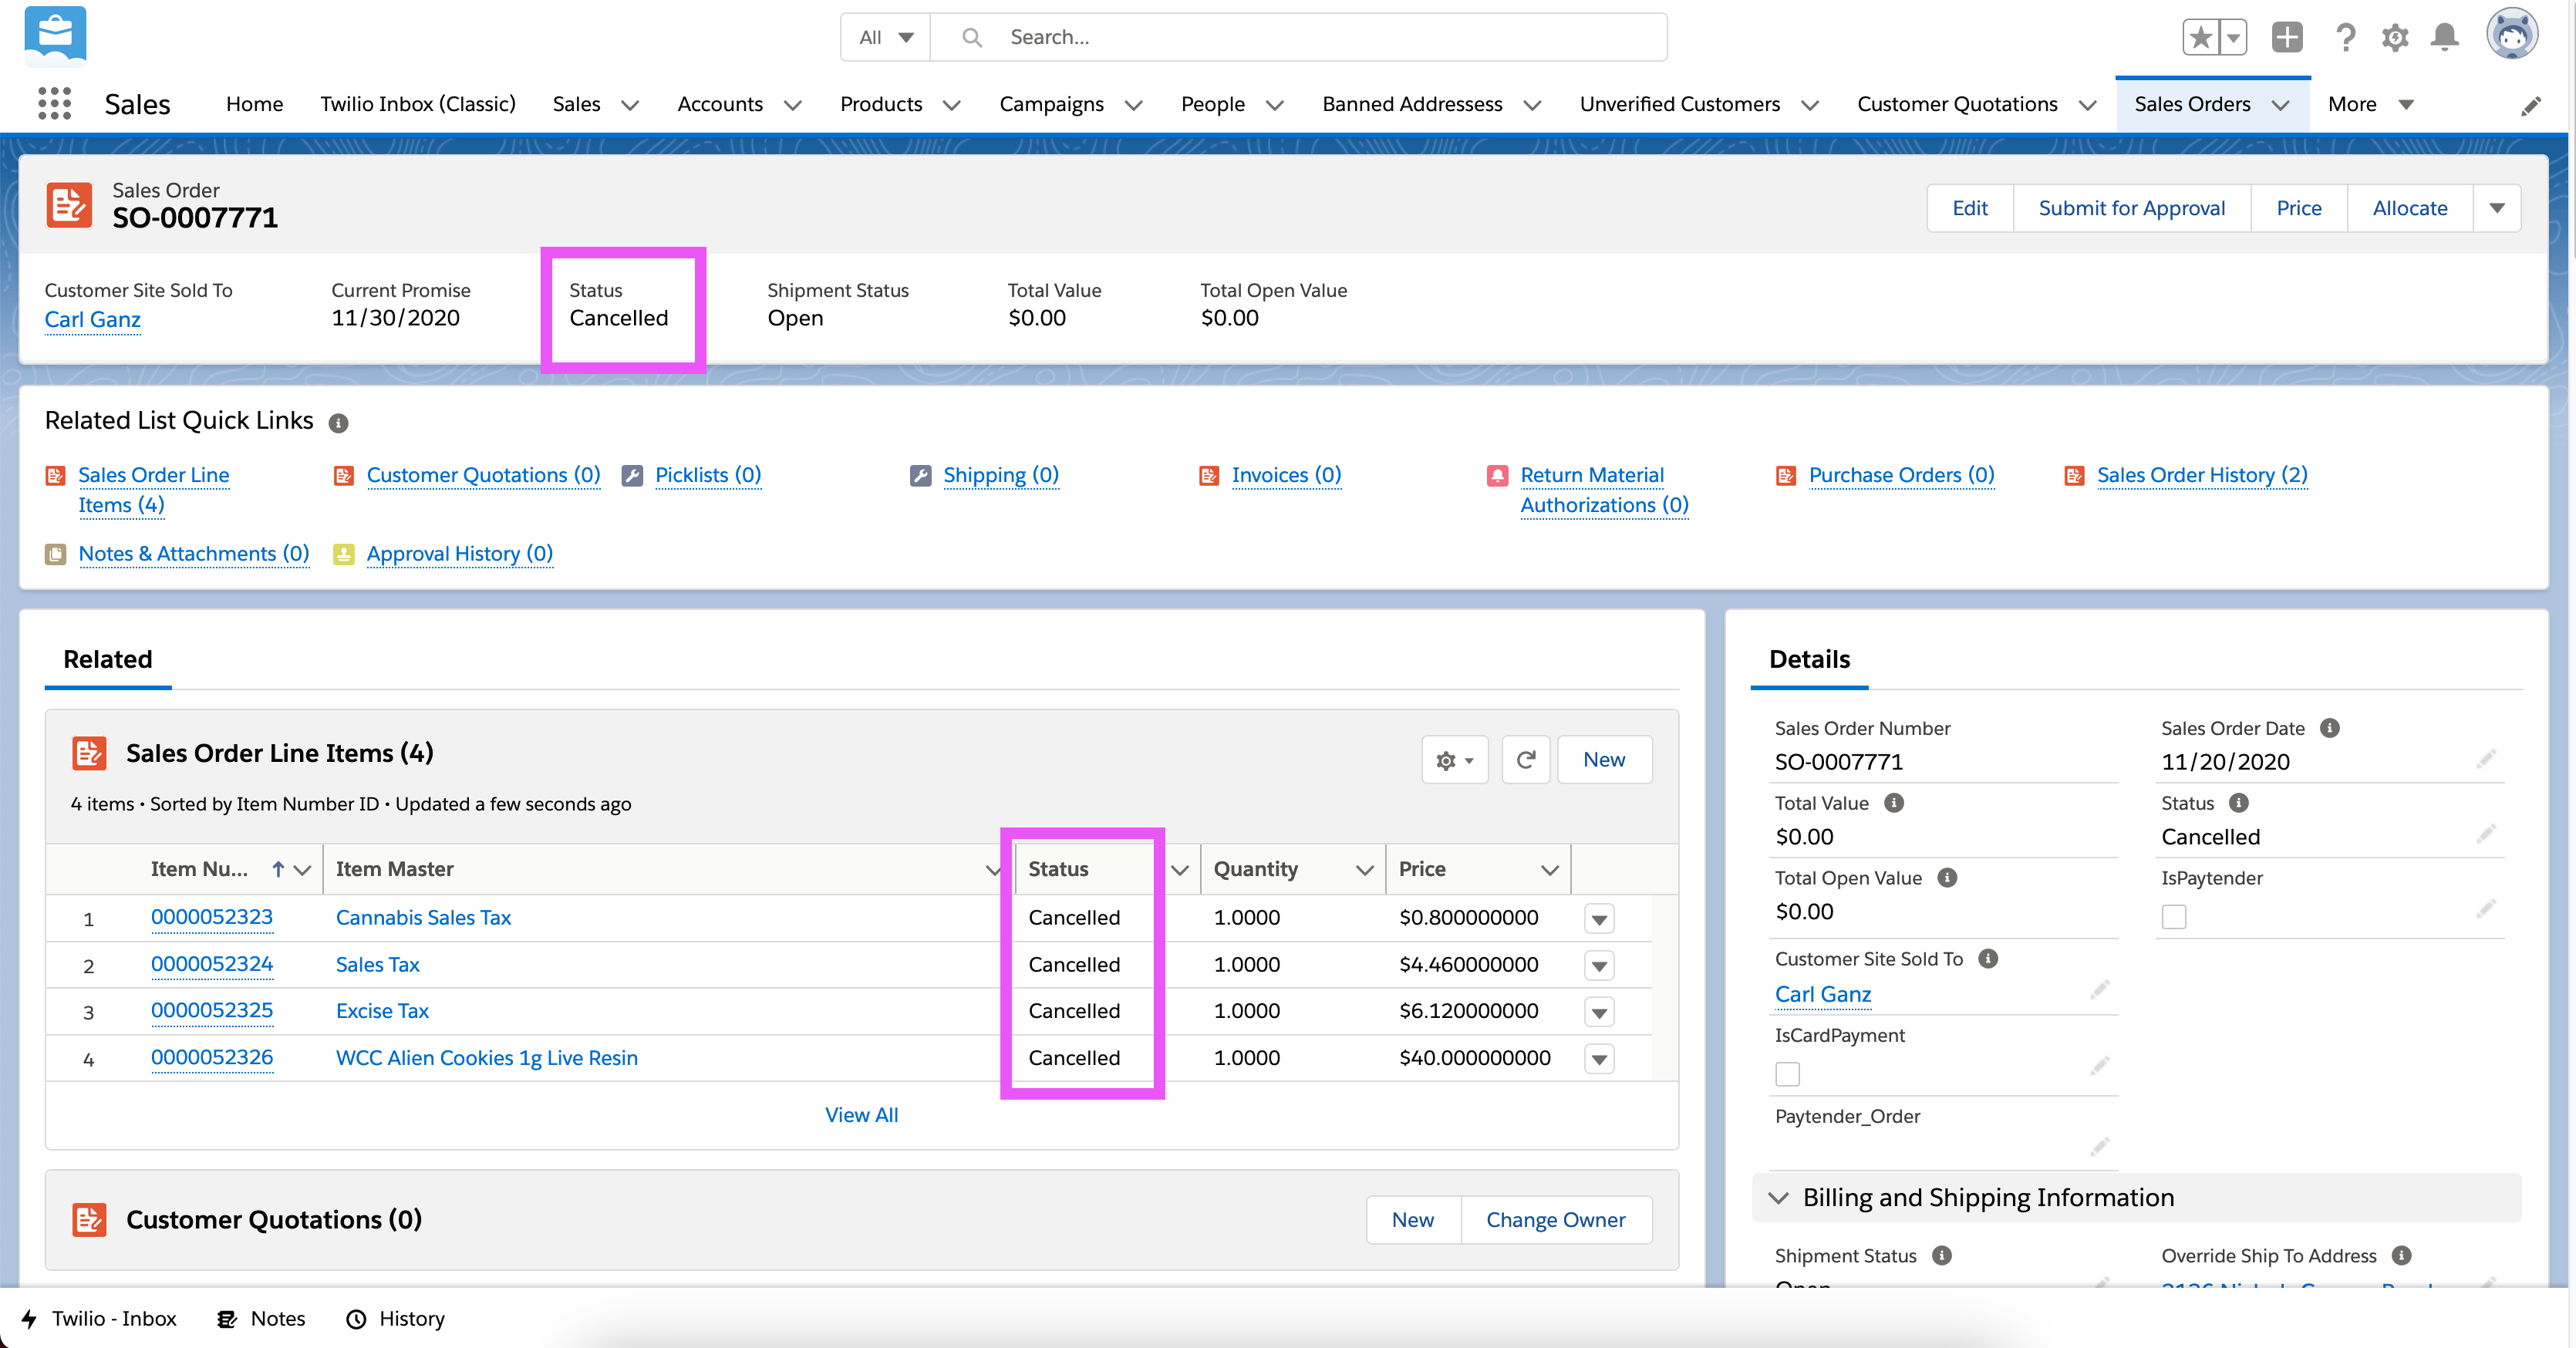
| Cancelled | Indicates the order was cancelled |
2.3.5.0.2 Shipment Status
| Value | Description |
|---|---|
| Open | Initial status |
| Allocated | Indicates that the driver was assigned and the inventory for this order has been allocated from their bundle |
| Pending Pulling All Items | Indicates order is allocated and approved and ready to be completed by driver |
| Partially Allocated | Indicates there is problem with order because only some items were allocated |
| Back Orders Exist | Backorders mean there is not enough inventory in system to allocate |
| All Items on Backorder | Backorders mean there is not enough inventory in system to allocate |
| Fulfilled | Once a driver completes the Onfleet task the status is Fulfilled |
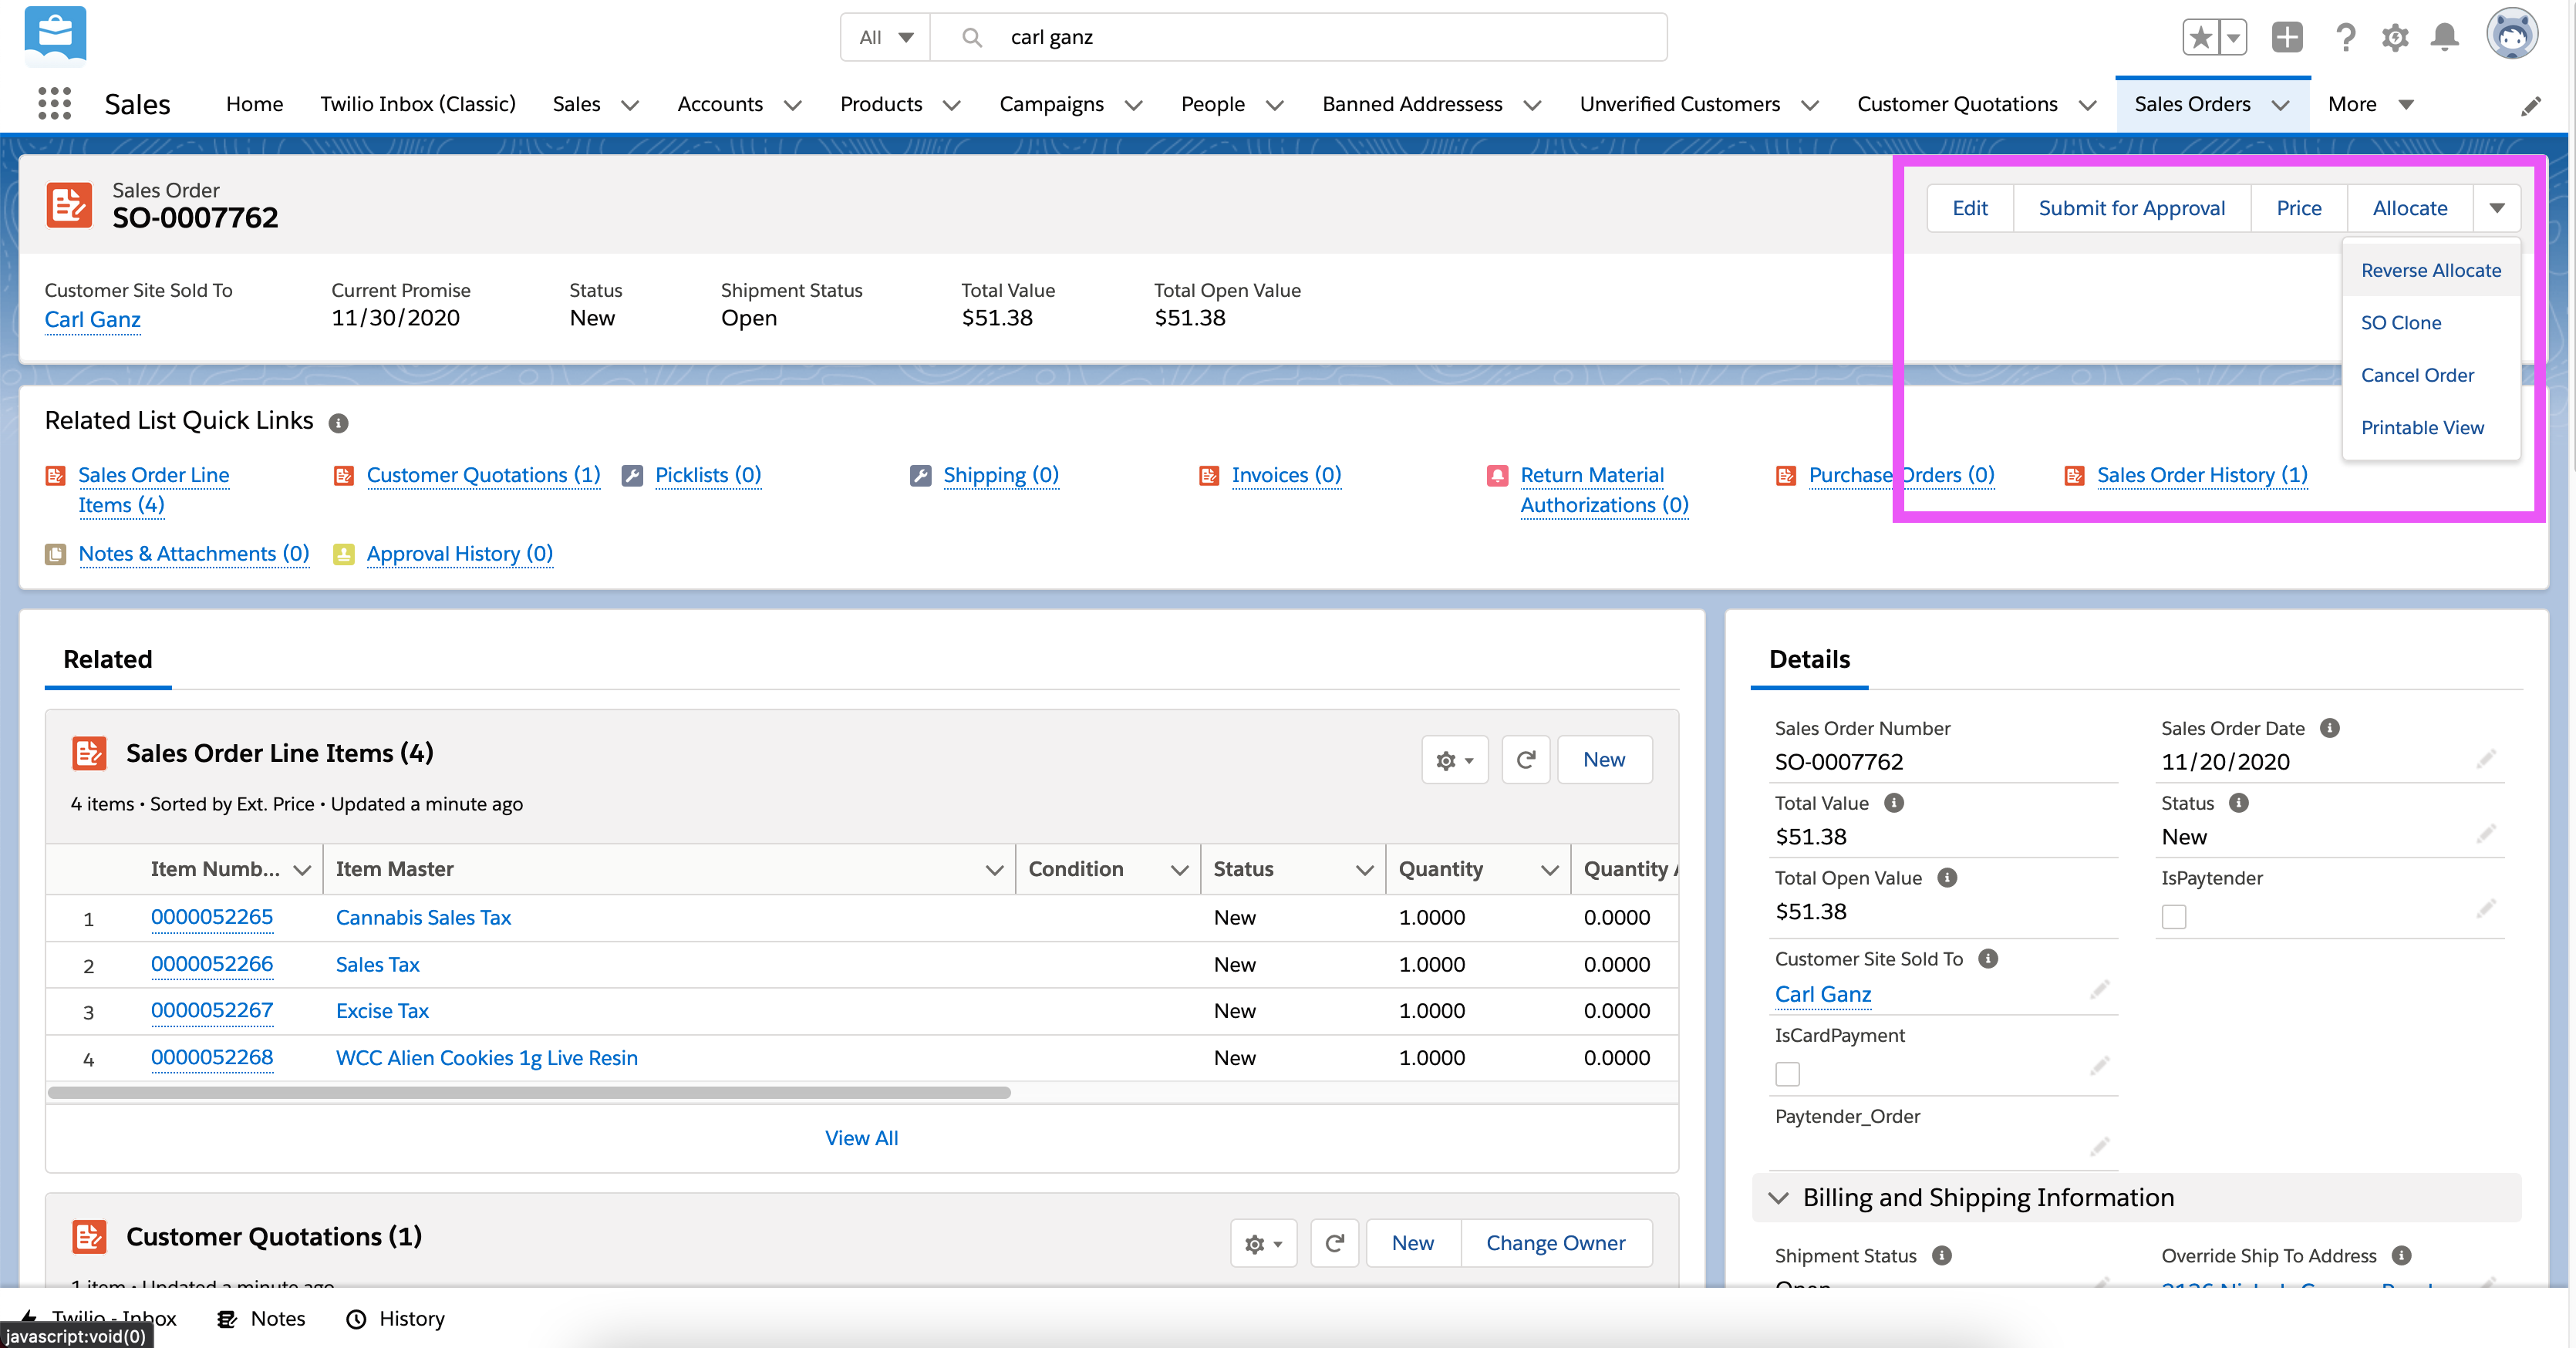
Ultimately none of this data should be changed manually. The Onfleet integration should handle the Sales Order workflow, but occasionally dispatchers need to edit Sales Orders.
When an order is in the ‘New’ or ‘Revised’ state new items can be added.
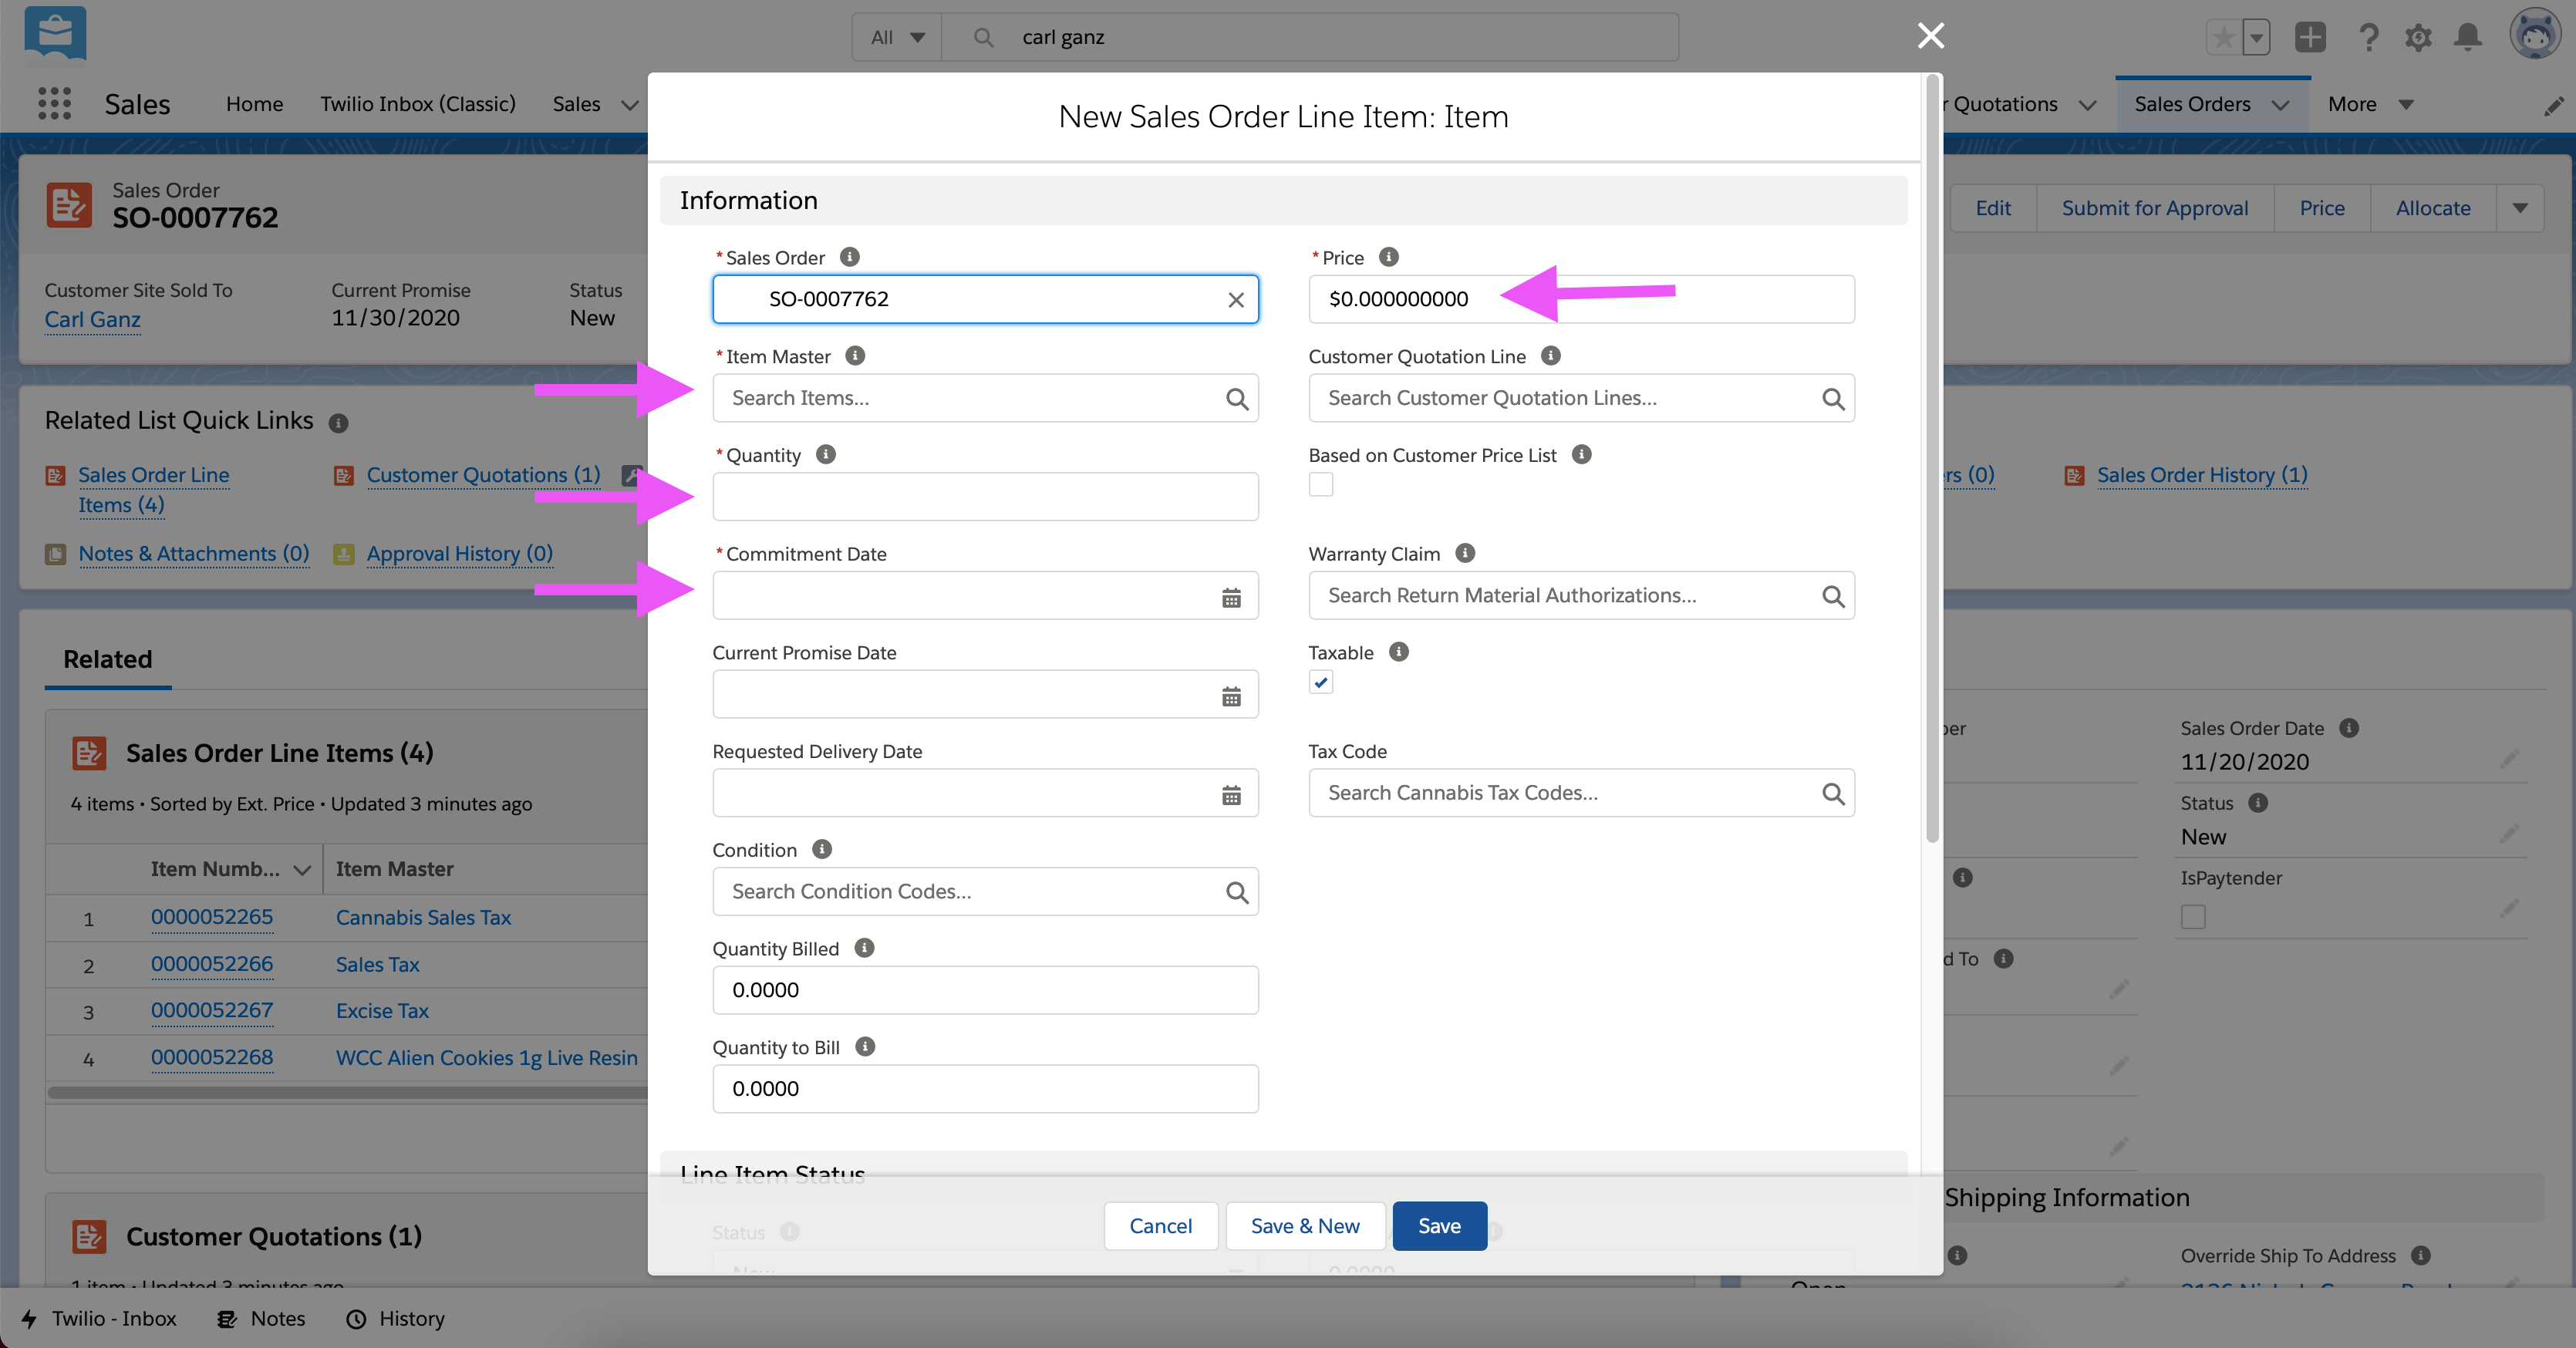 The Item and quantity are the most important fields. For commitment date simply put today, and for price you can leave $0 and then click “Price” button on top right of page to update based on default in system or you can manually set price in this form.
You can also edit or cancel existing items by scrolling to right of items table and clicking button dropdown.
If you need to edit an order that is already “Approved” you must first reverse allocate by pressing the button on the top right.
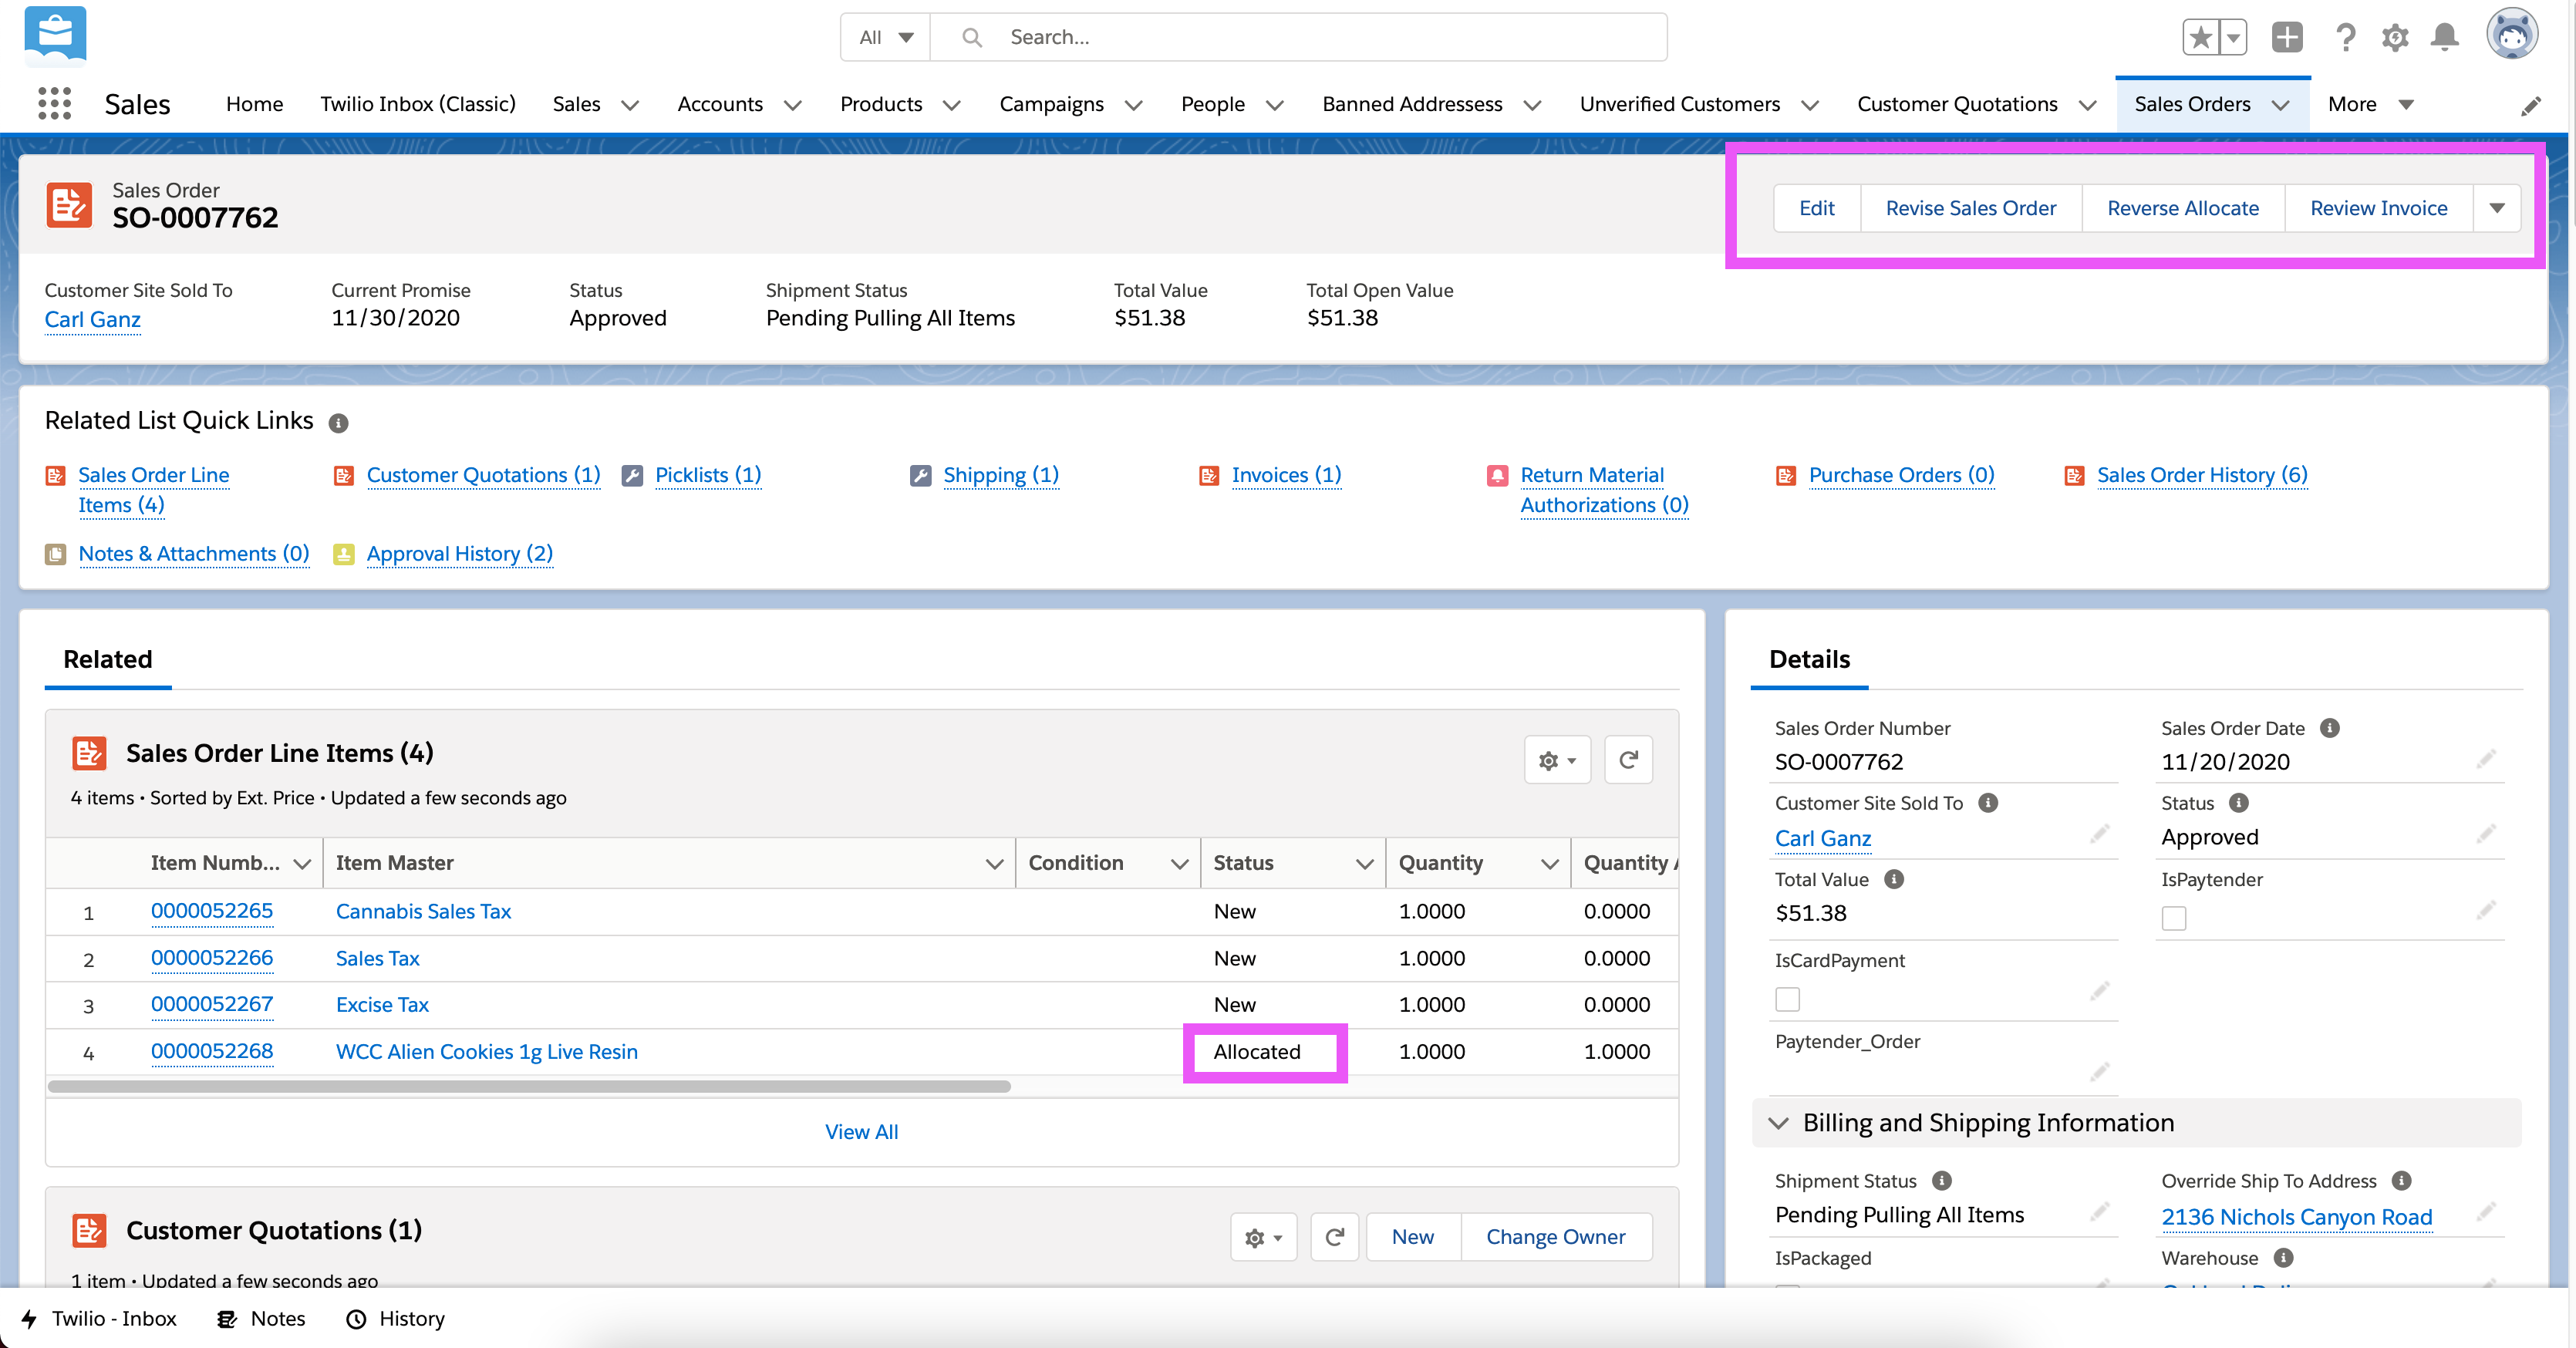
Reverse Allocate Buttons
Once you reverse allocate you will be able to freely edit the order, but once you finish editing you must return the order to the Approved state. This is done by pressing the “Allocate” button on top right, and then pressing the “Submit for Approval” button on top right. In general, if an order is already ‘Approved’ then it is already assigned to a driver, which means they can edit the order on the Driver app (discussed next chapter) without going through all these steps.
 Sometimes customers will have to pay using a combination of cash and debit card. In this case we check the IsCardPayment box but we also populate the PartialCashPayment field with the amount of cash the customer is paying.
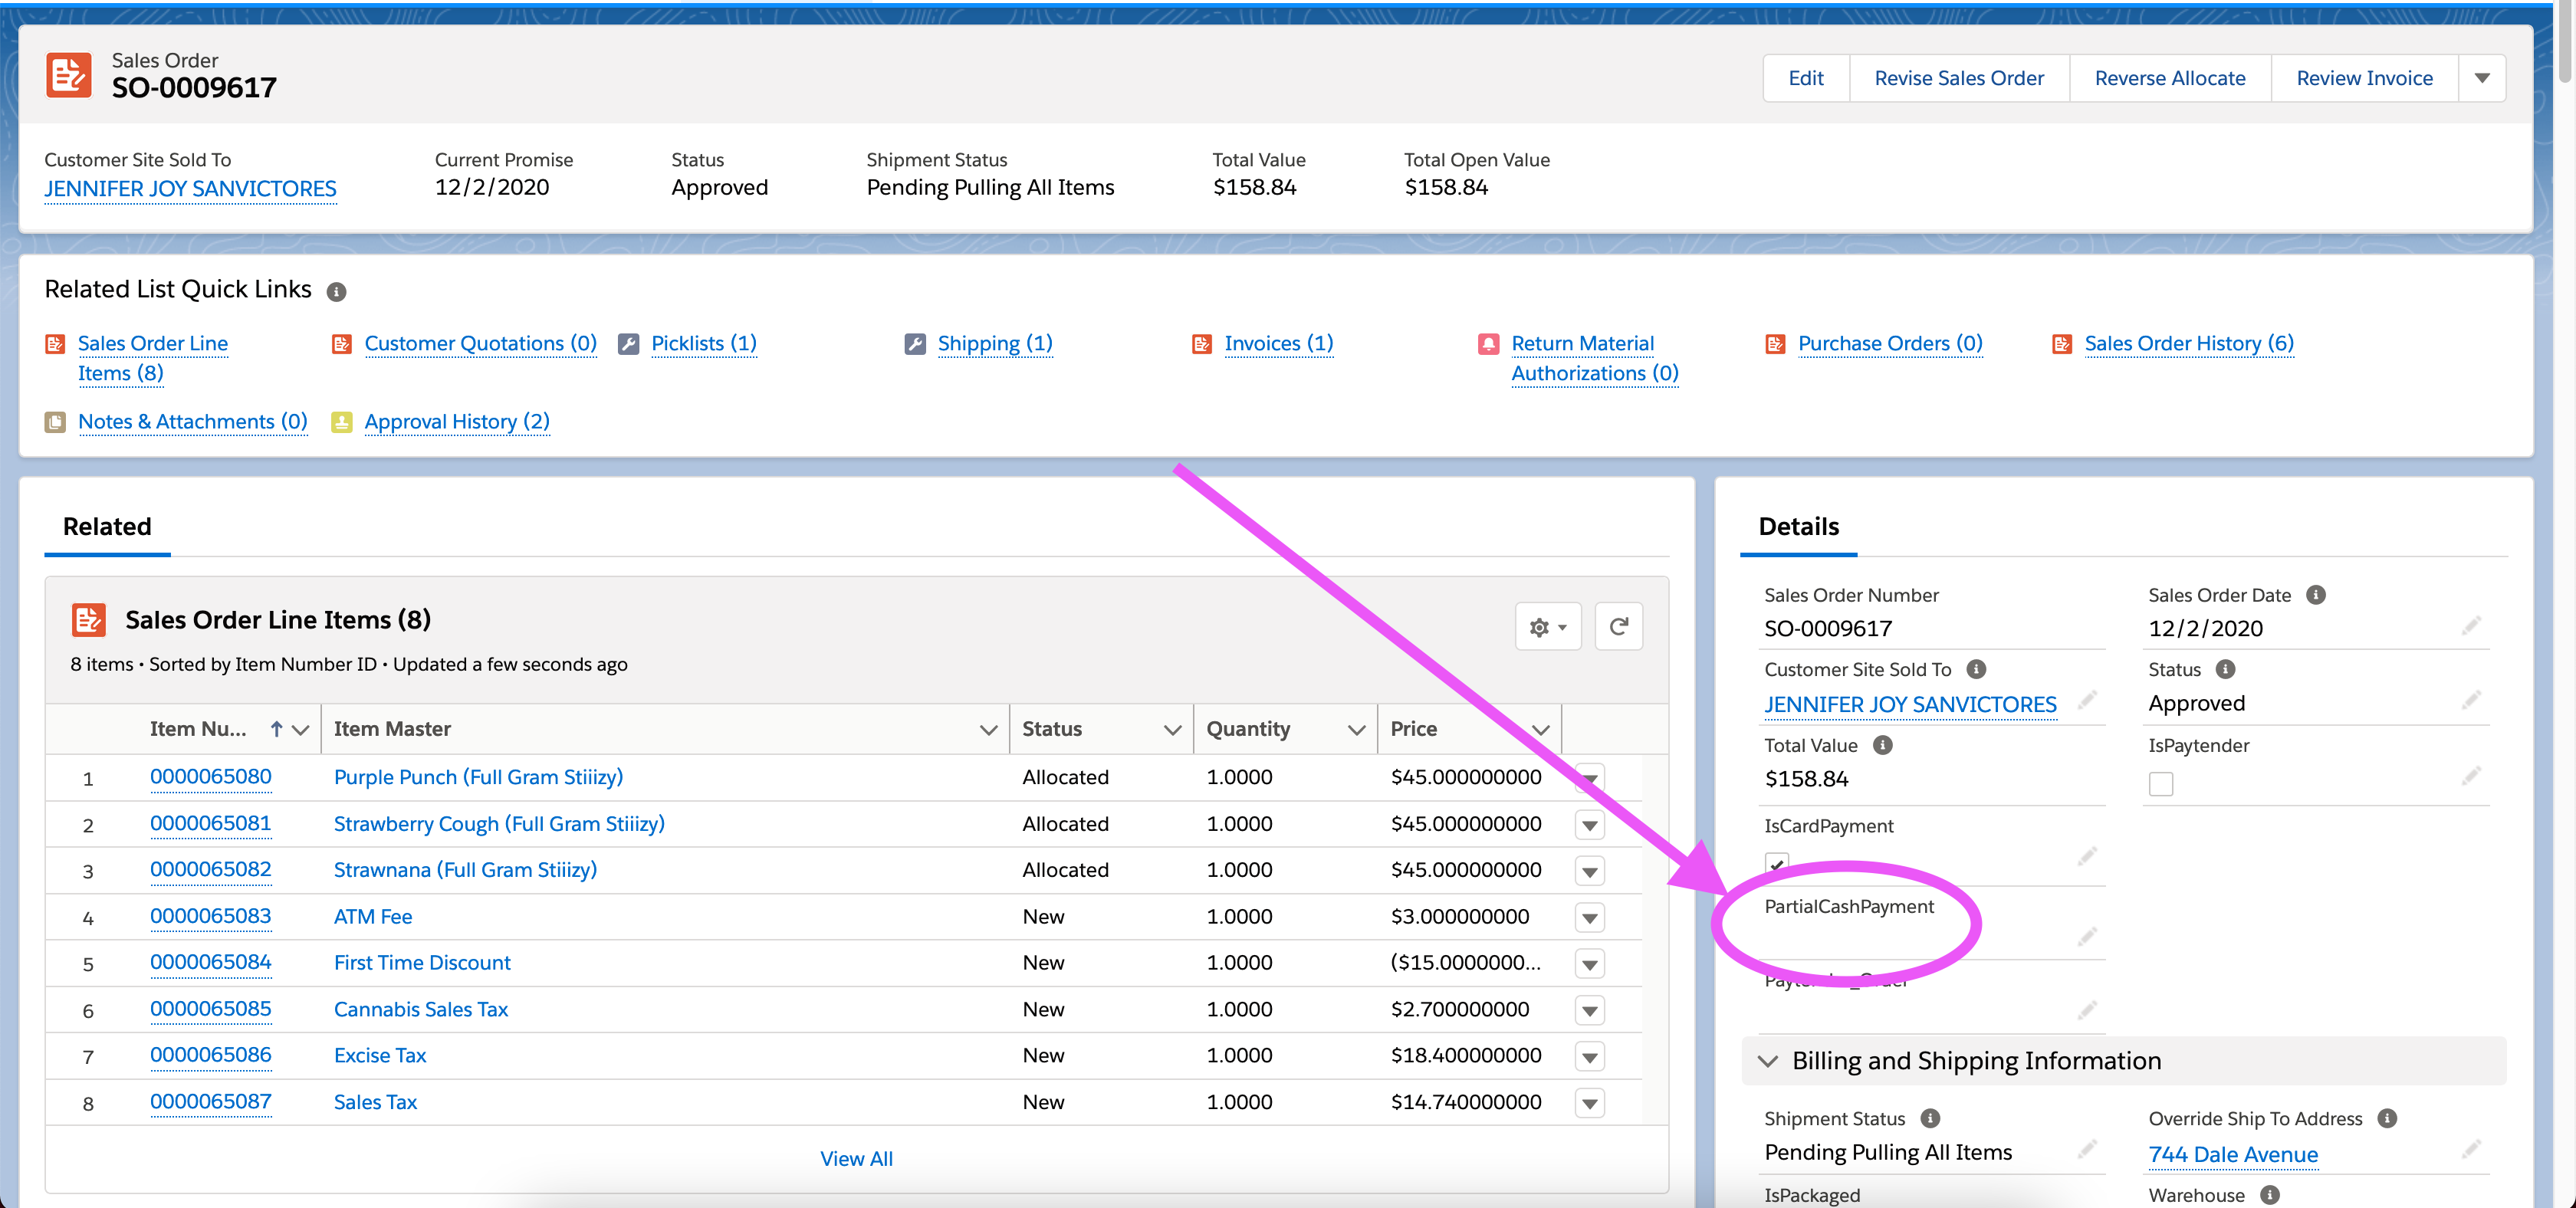
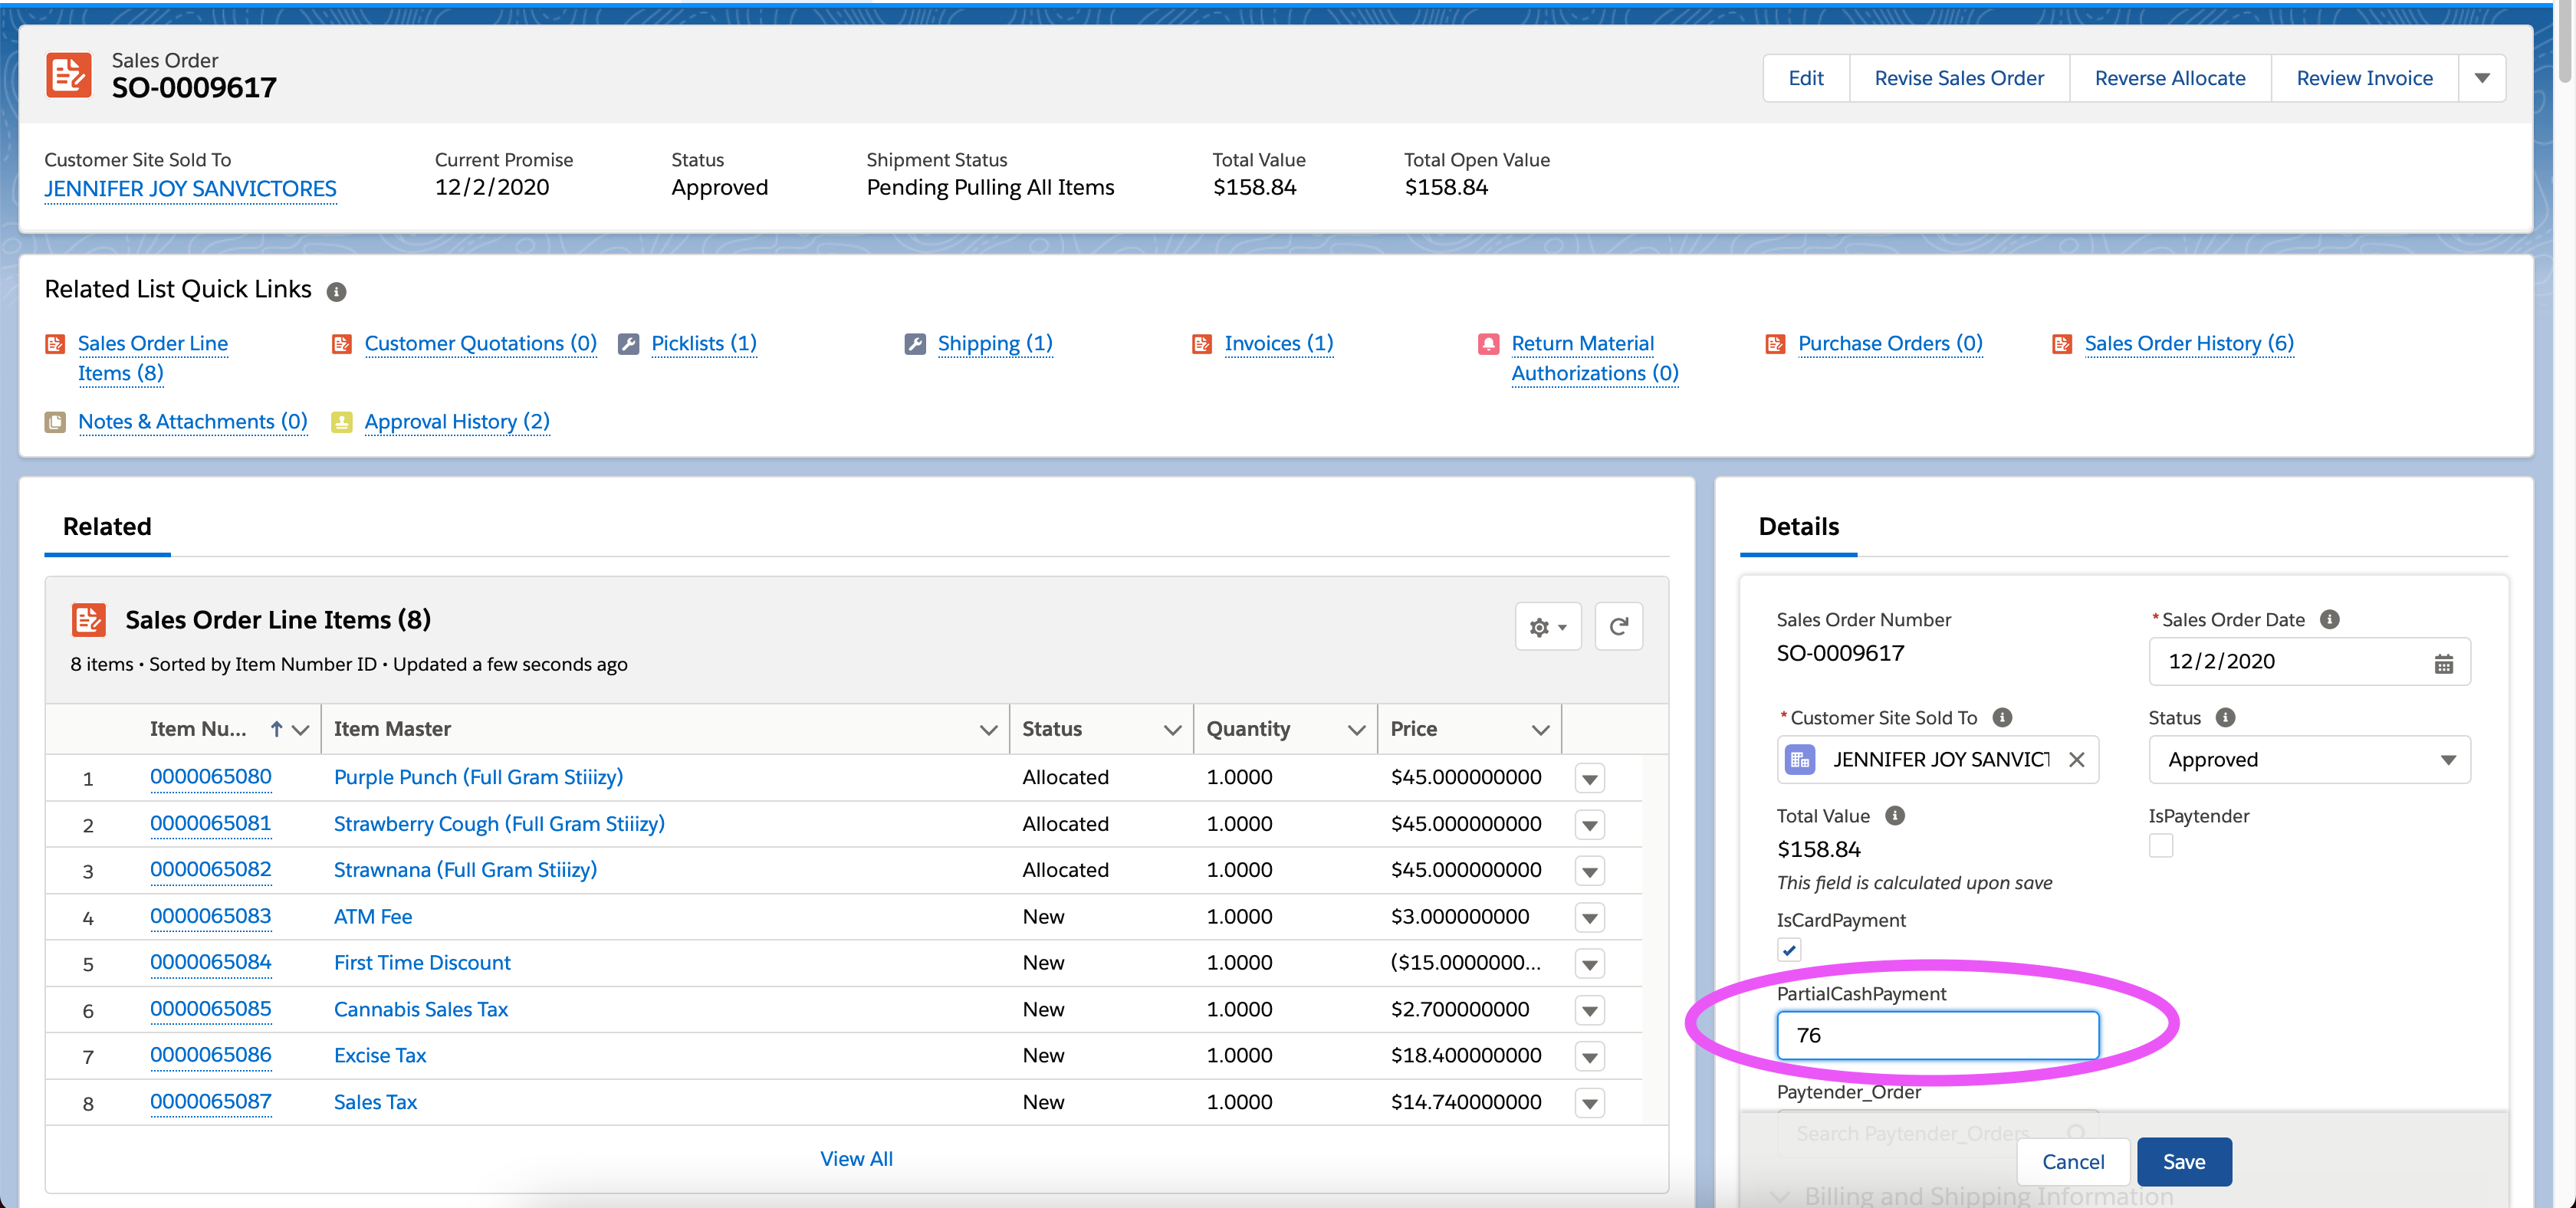
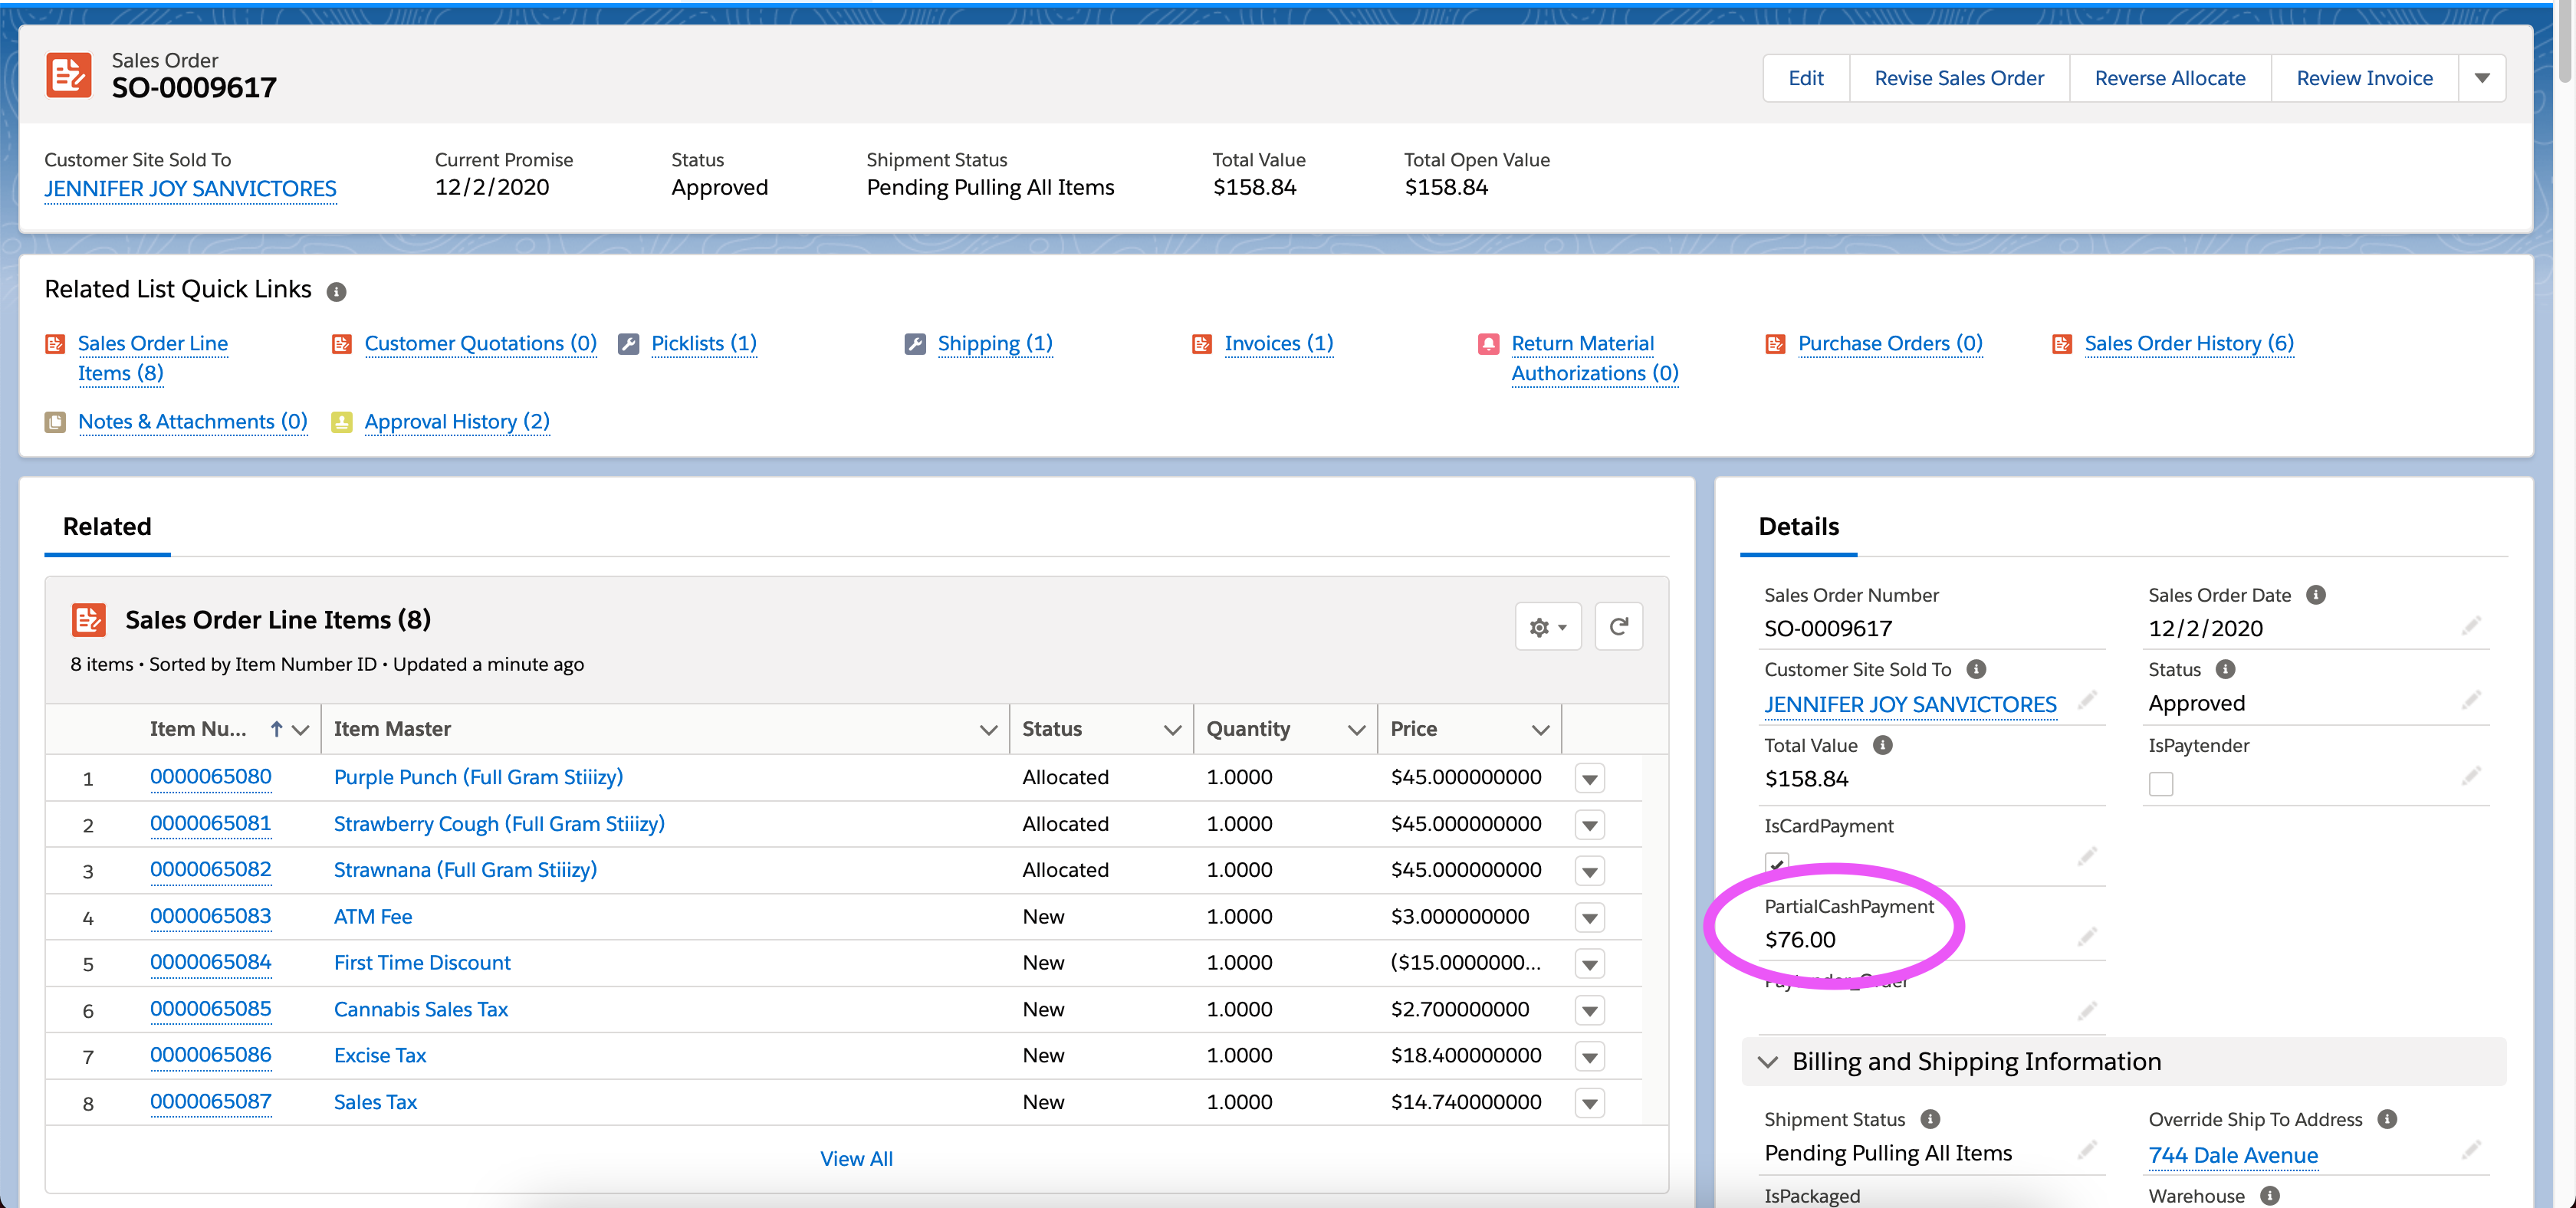
Partial Payment
2.3.6 Onfleet
The next step is to assign the Onfleet task to a driver:
Onfleet
Simply drag the task to the driver who should fulfill the order. This will automatically update the information in the related task in Salesforce.
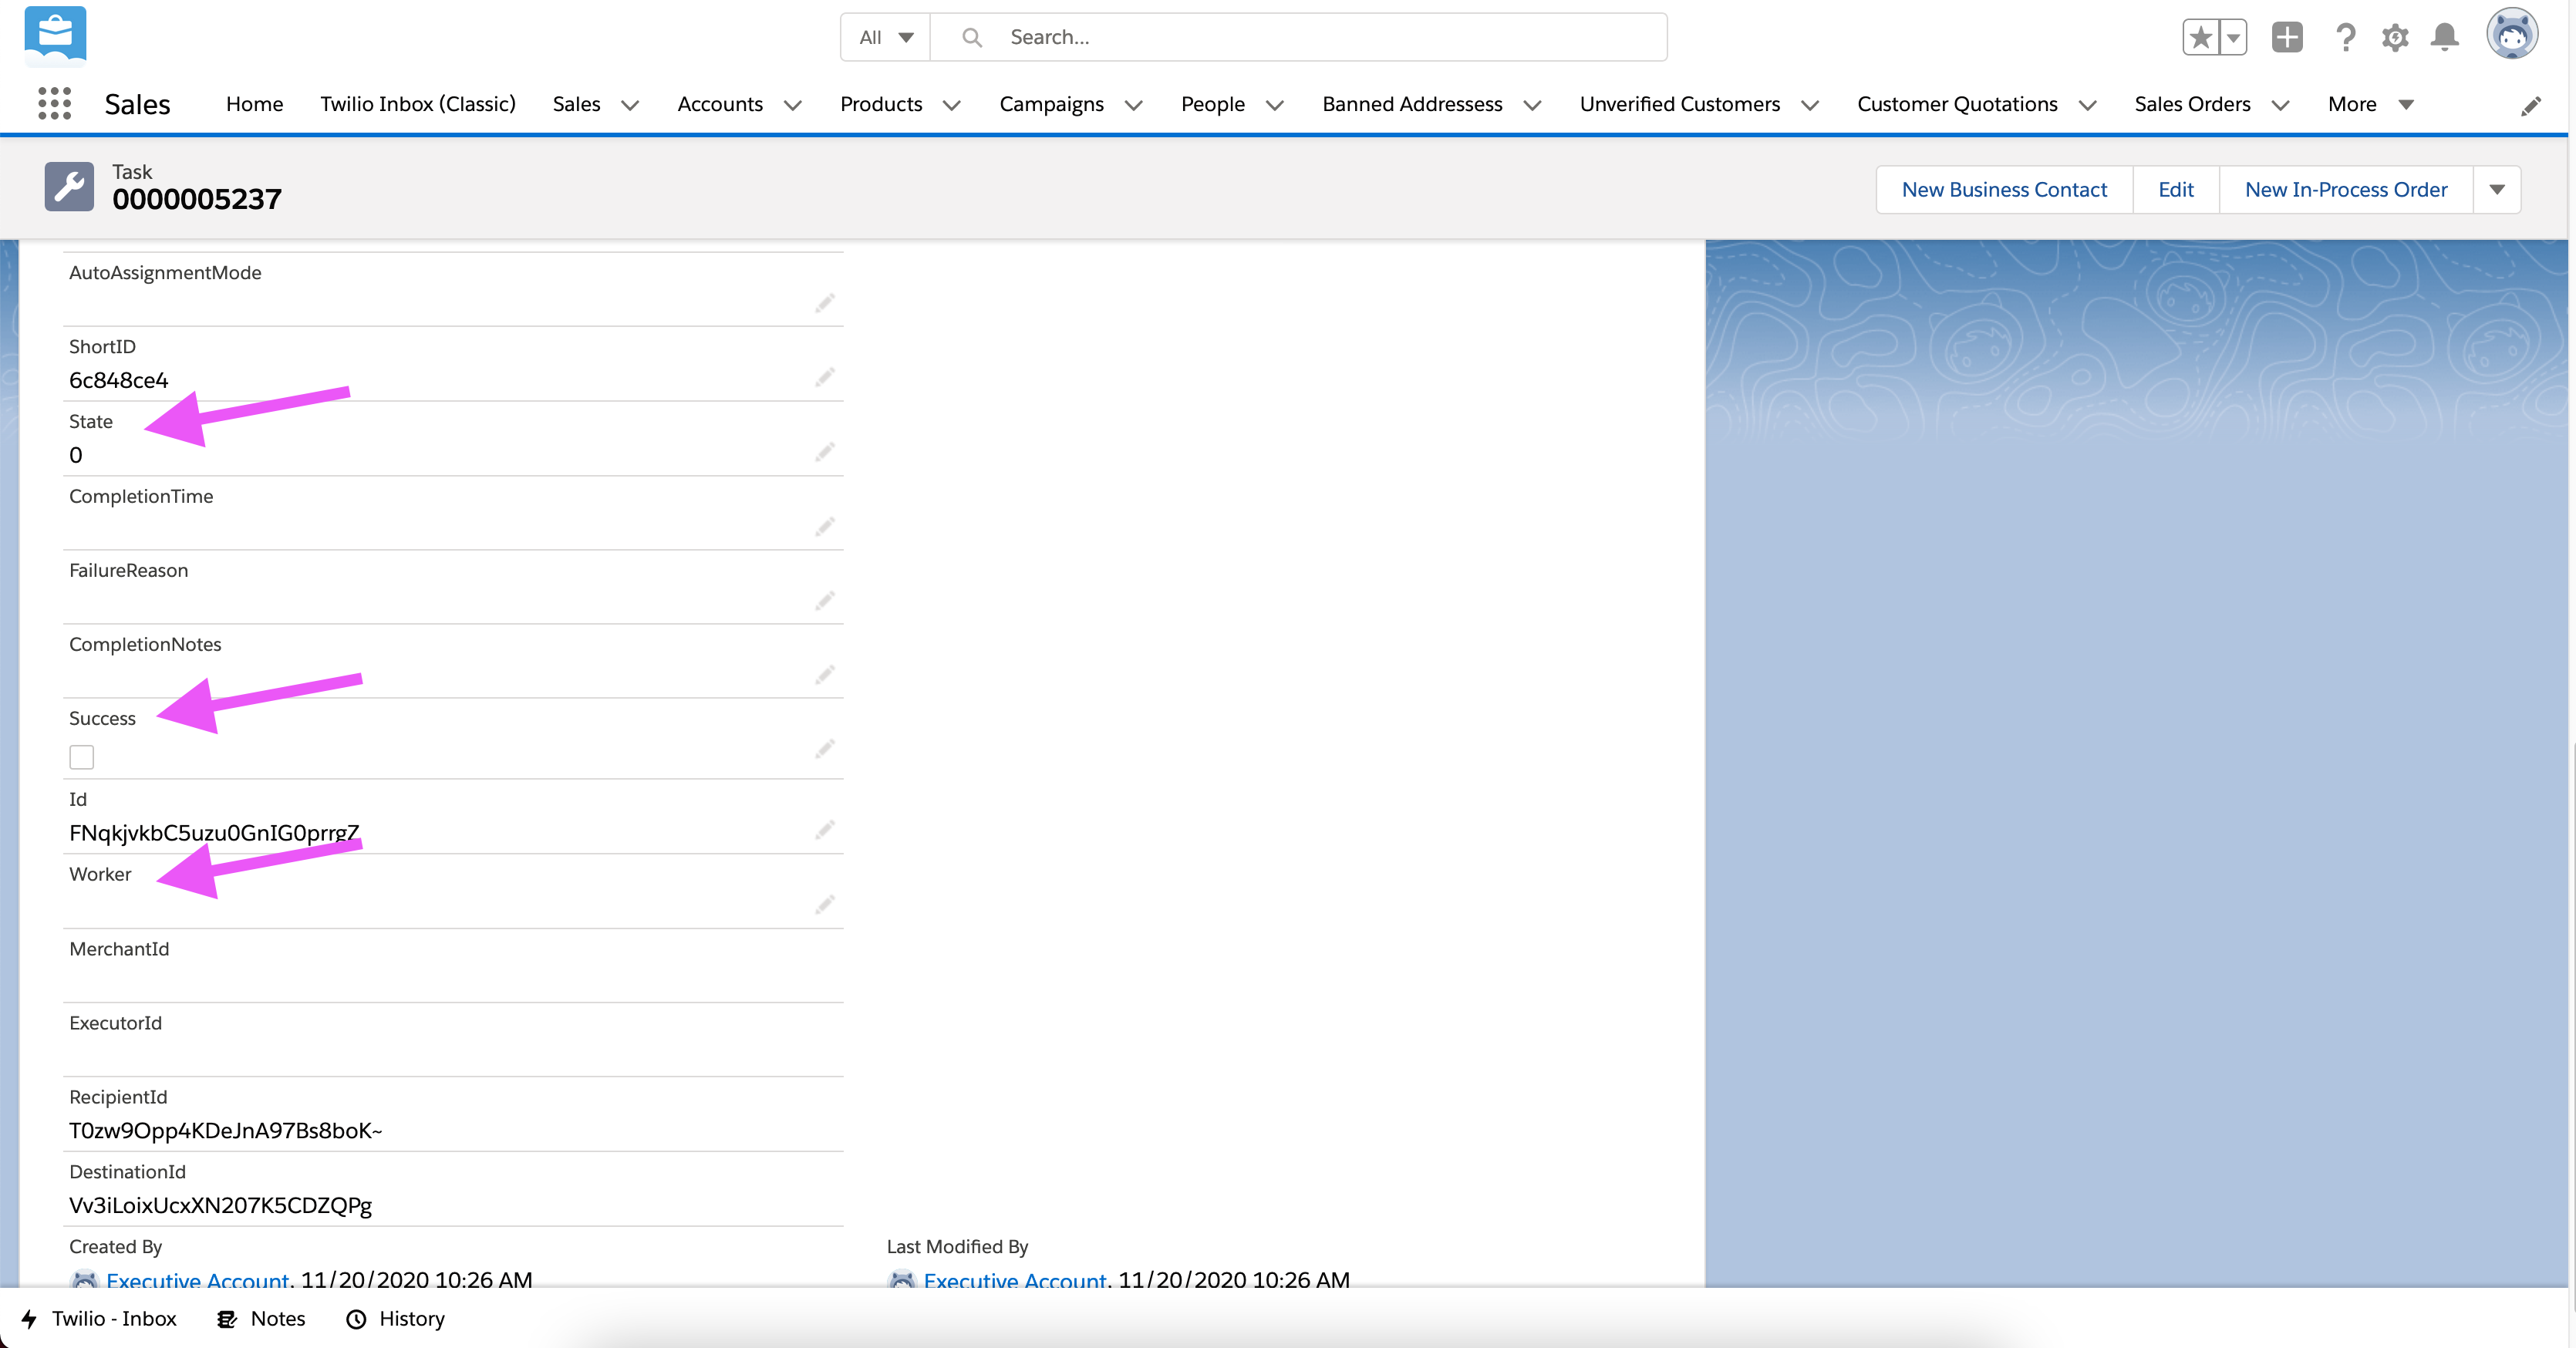
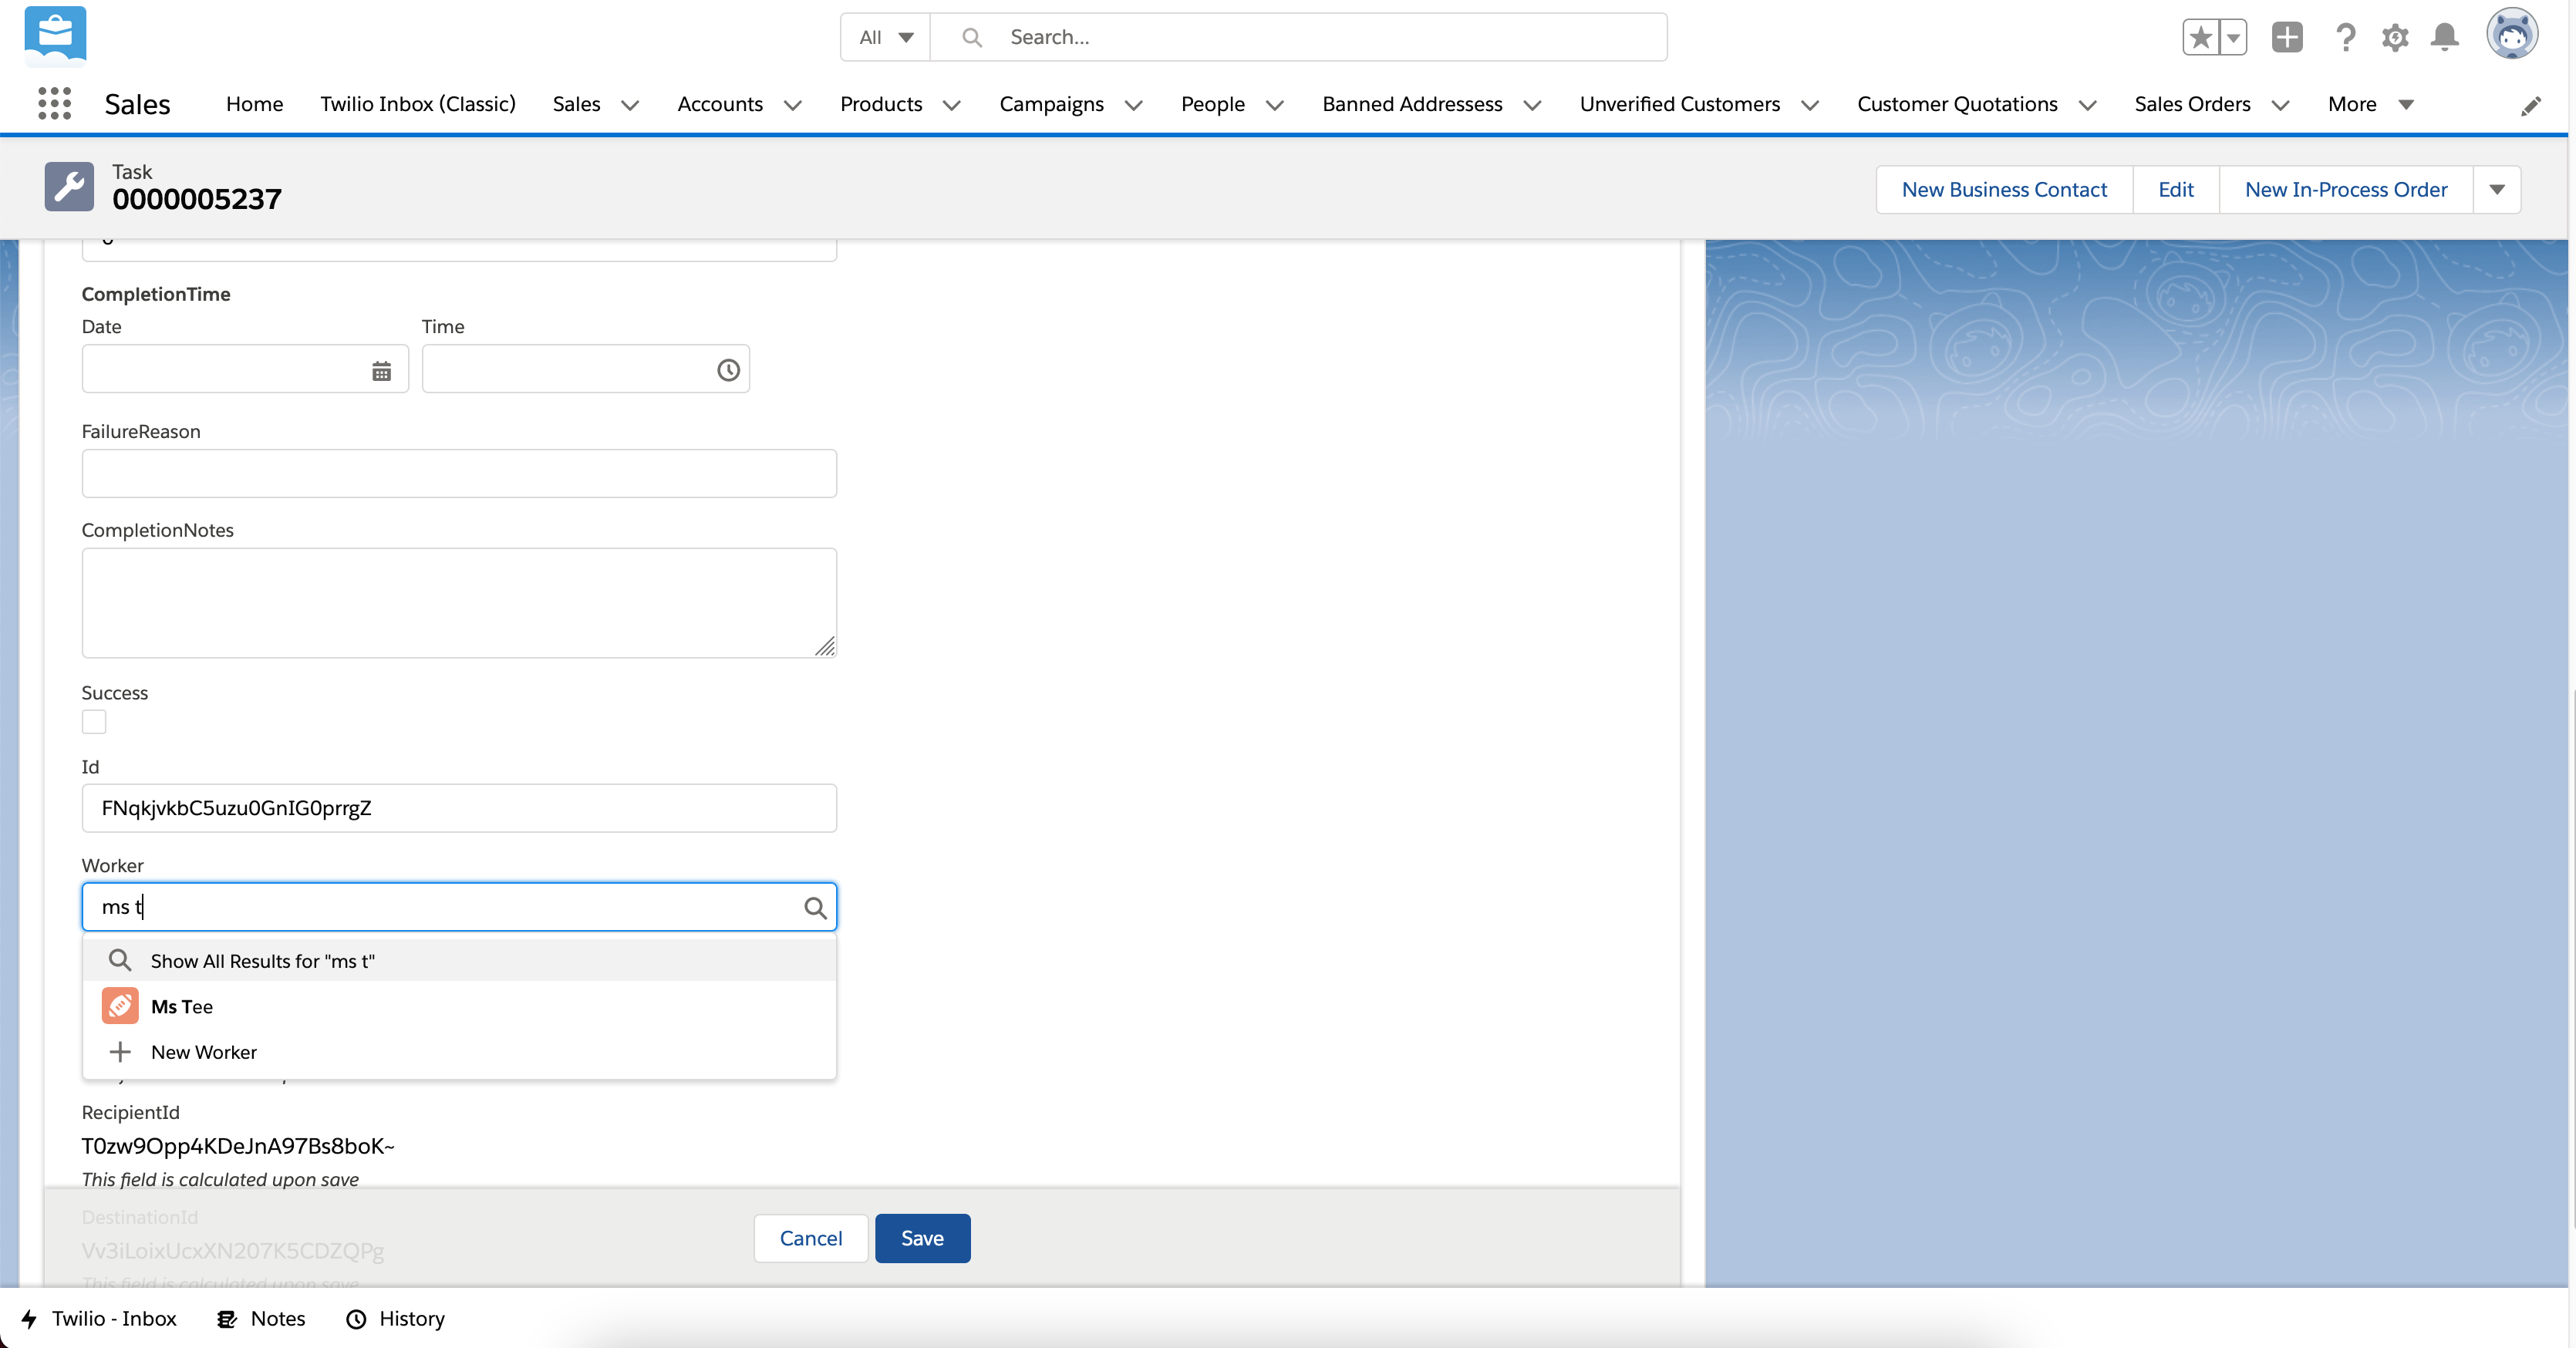
There are 3 values that are essential to the Onfleet integration:
| Field | Description |
|---|---|
| State | State takes on the values 0, 1, 2, & 3, which represent unassigned, assigned, en route, and completed respectively |
| Success | Success indicates that the task was succesfully completed, but this value can’t be true until the state takes on value 3 since obviously the order can’t be a success before the driver completes it |
| Worker | Worker is the driver the task is assigned to |
Assigning a driver in Onfleet is equivalent to updating Worker field in Task.
Updating Driving
When the Worker field for the related Task is populated, whether by Onfleet or manually in Salesforce, the Warehouse for the Sales Orders is automatically updated to be the driver’s bundle, and the order is automatically allocated and submitted for approval.
When the state is 3, the task has been completed, and based on the outcome, whether it was successful or not, the related Sales Order will automatically mark the Sales Order as shipped and completed (or canceled if task was failed).
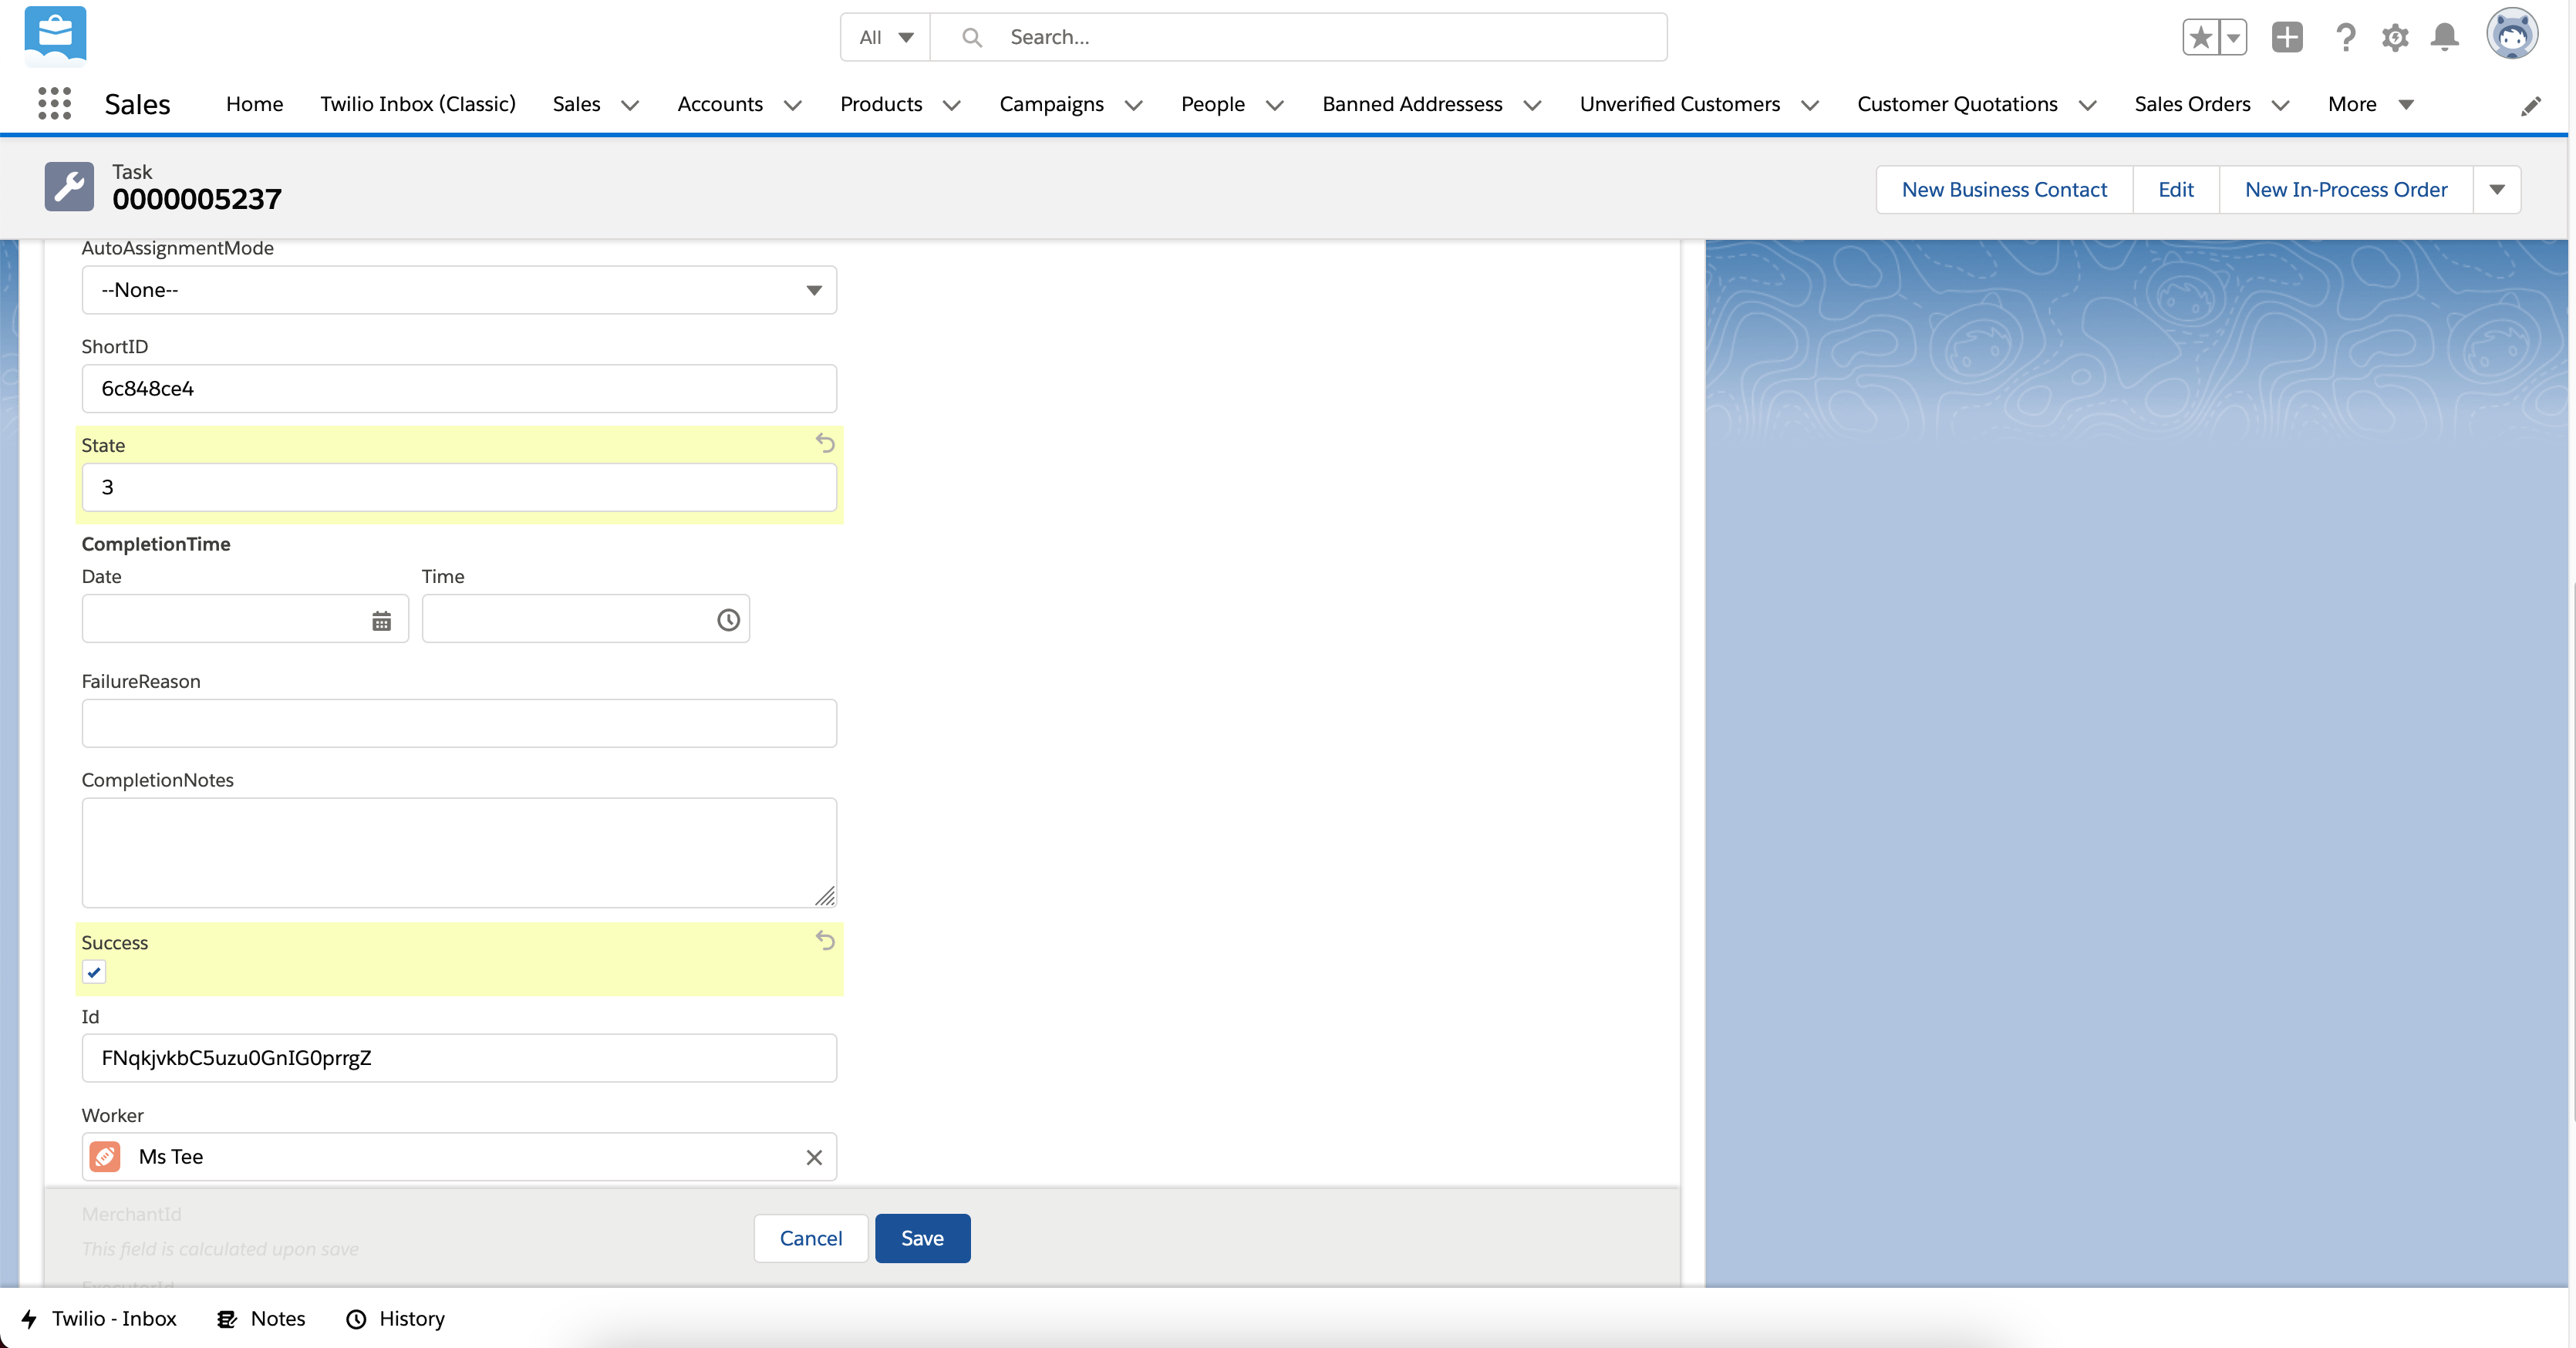
Mark order succesfully completed
You will see the Sales Order is successfully completed when the status is Shipped
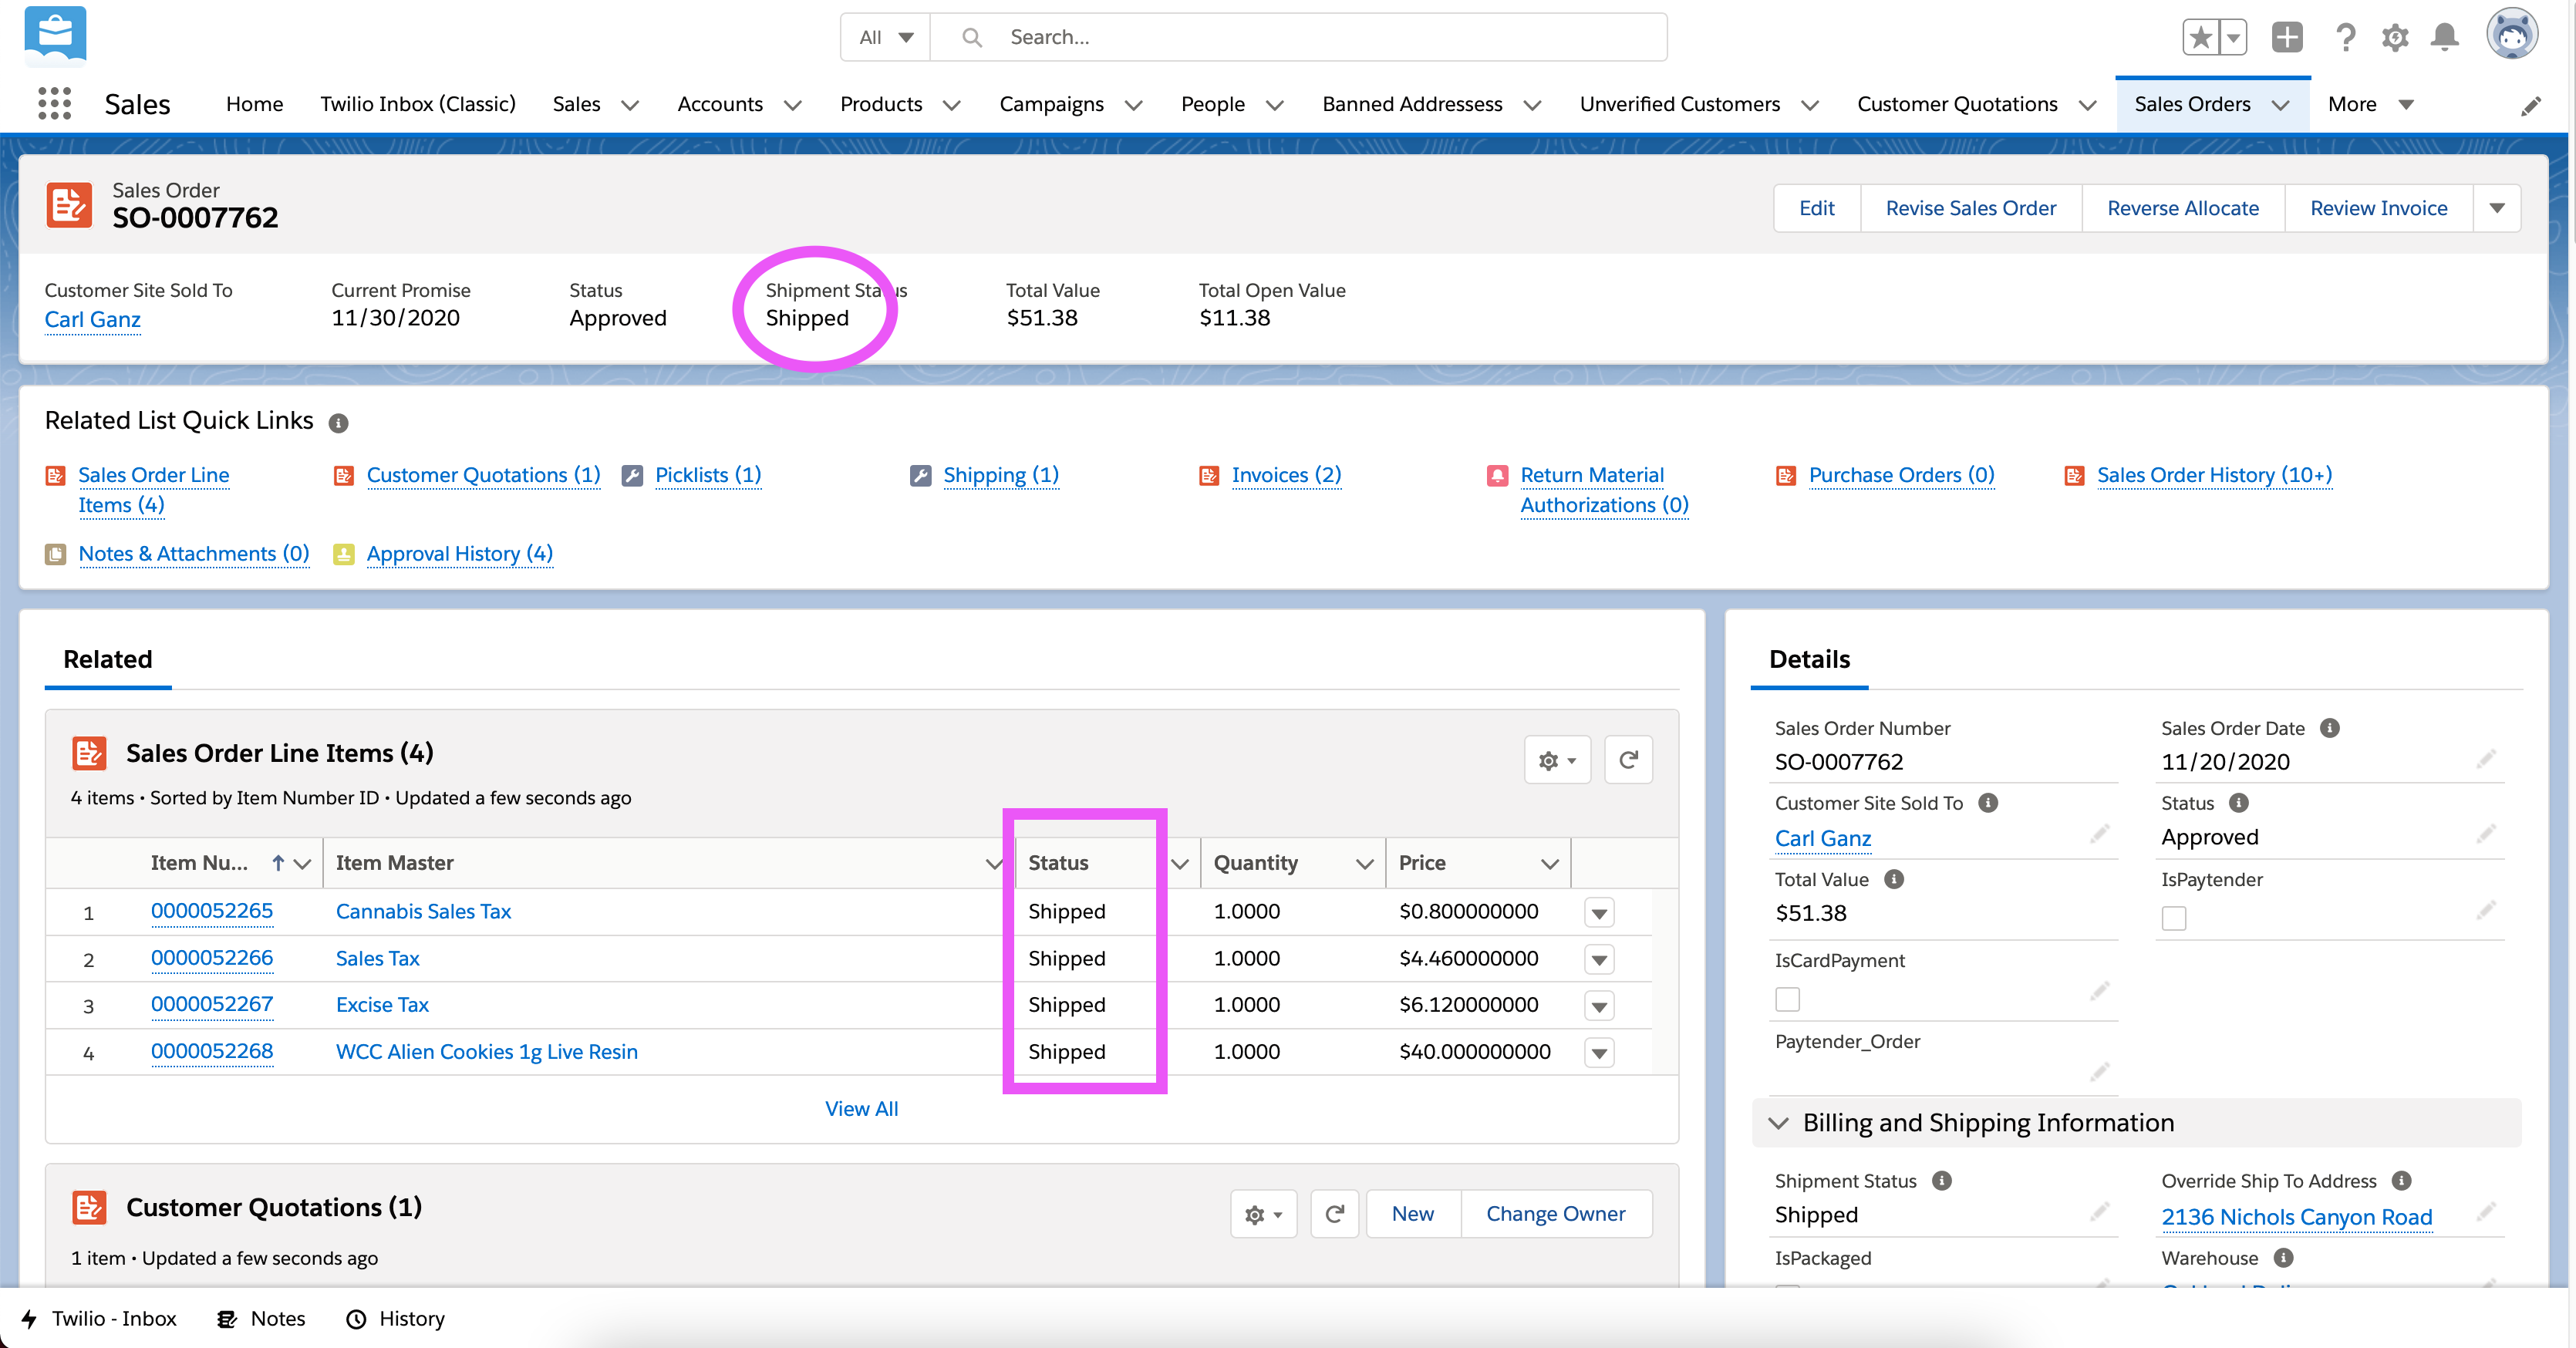
Succesful Order
If you don’t want to manually enter Onfleet data, you can mark an order as completely shipped by pressing PickPackButton
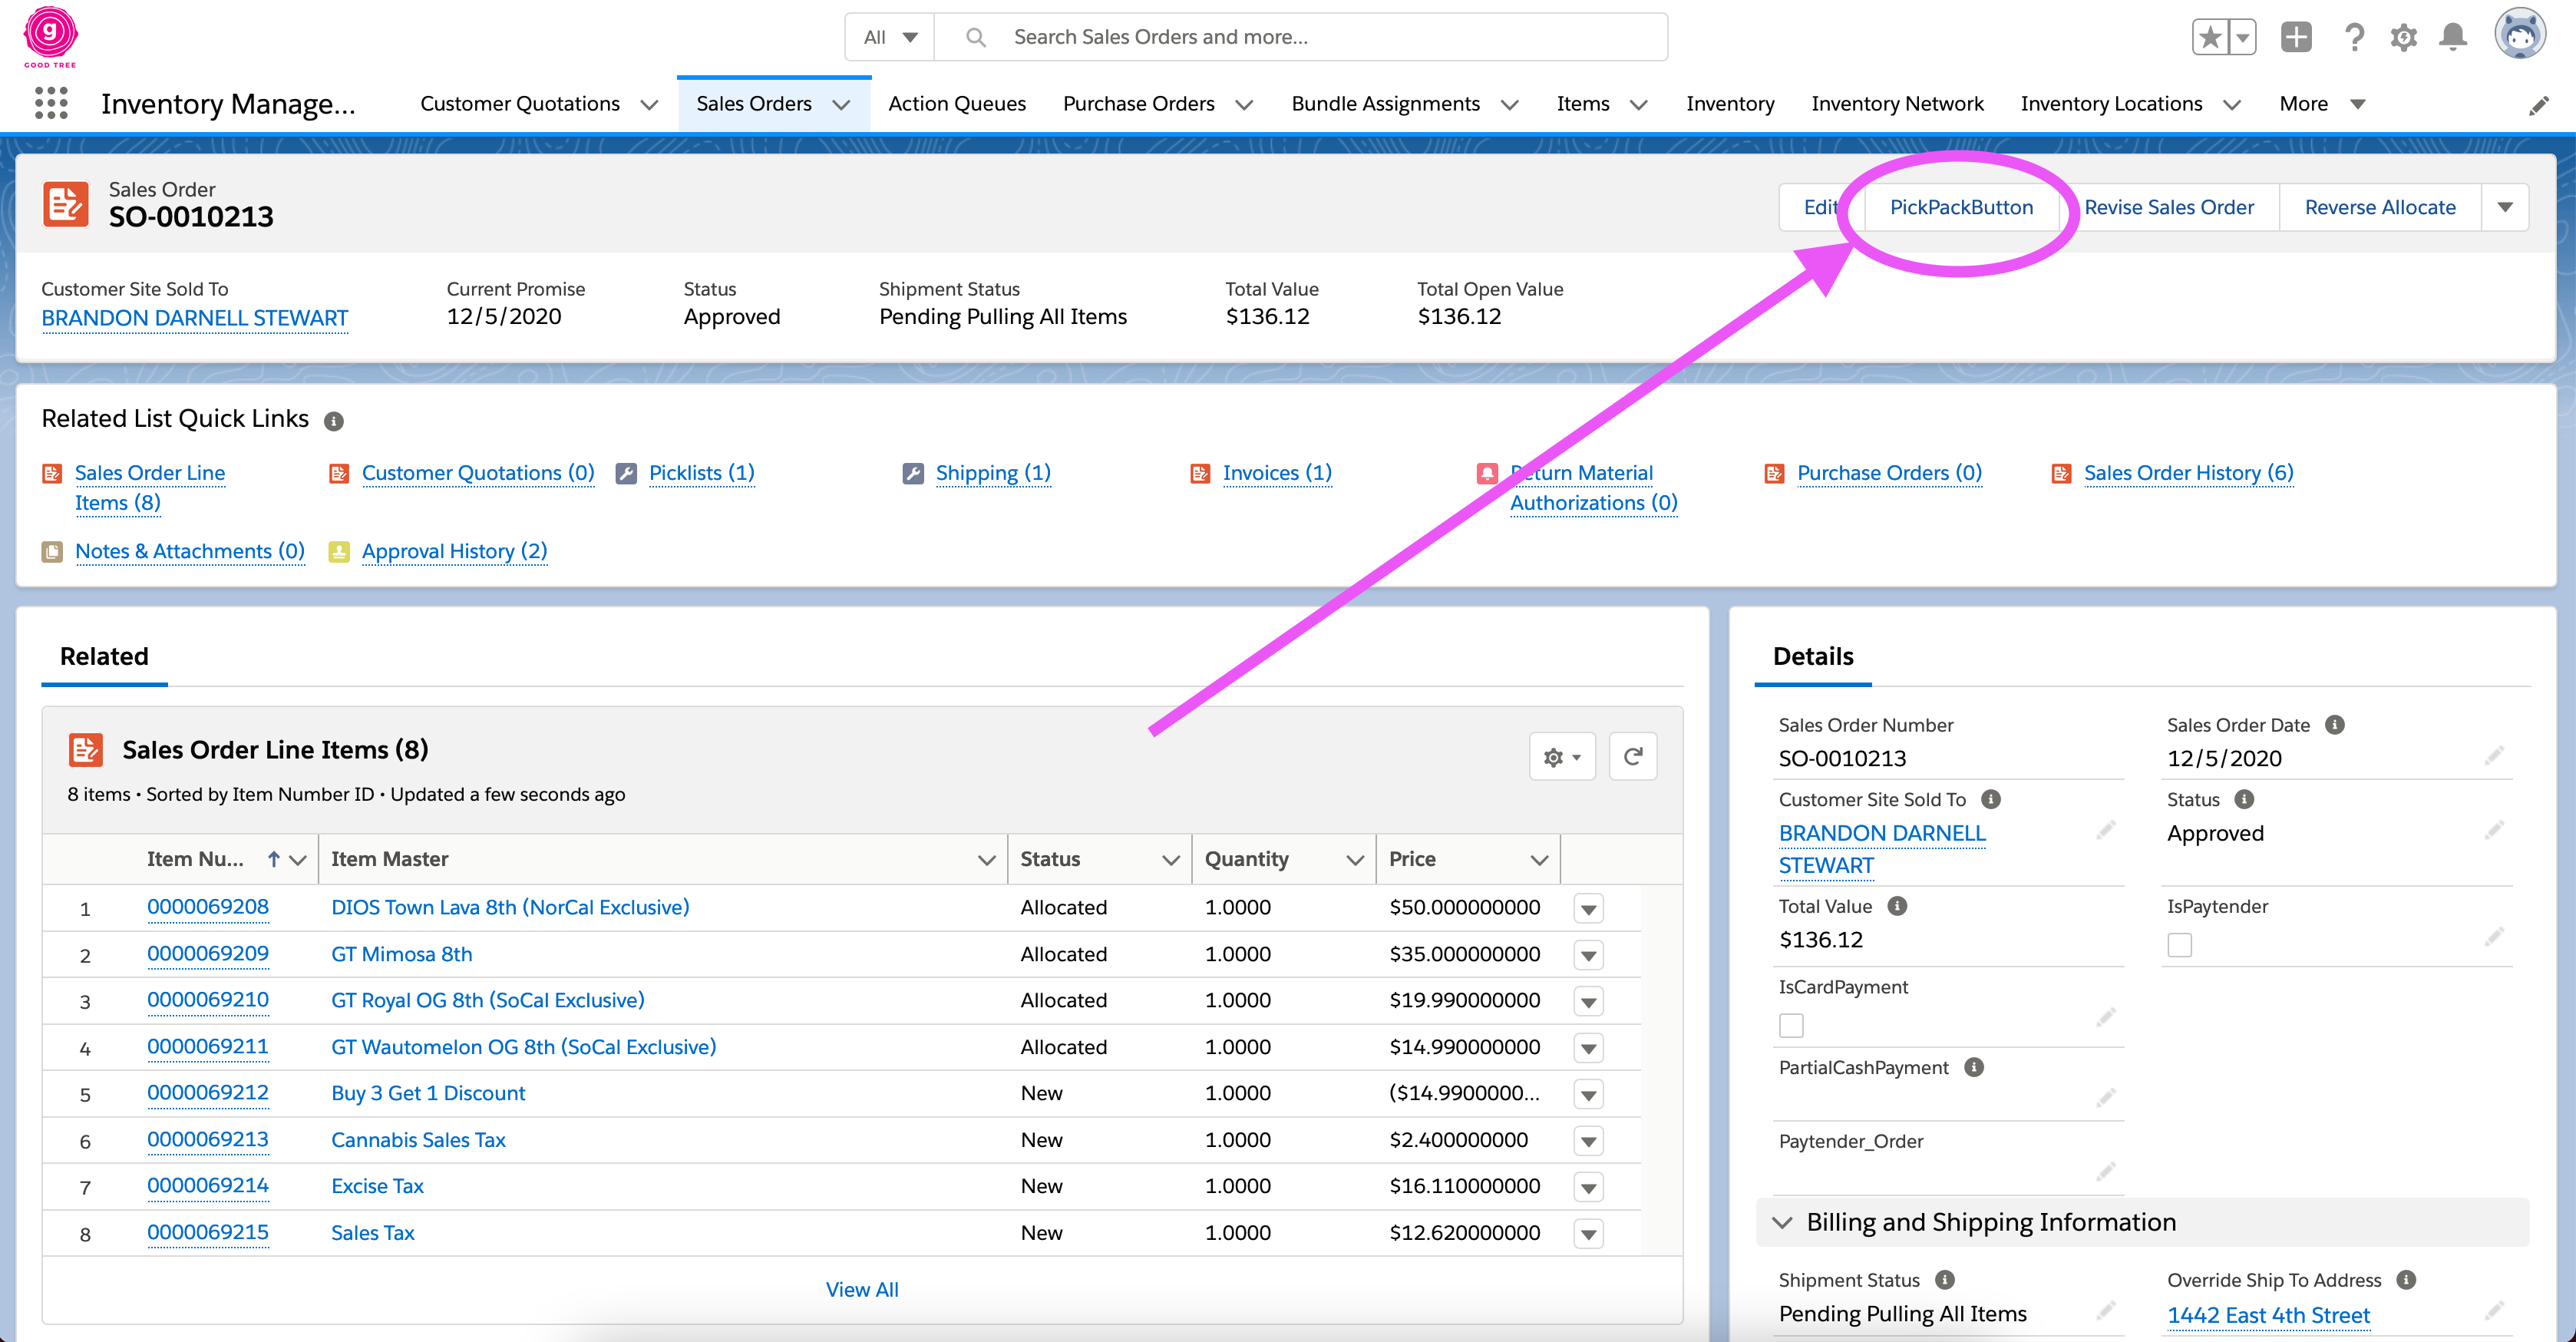
PickPackButton
If the order is cancelled you will see a checkbox marked named isCanceled.
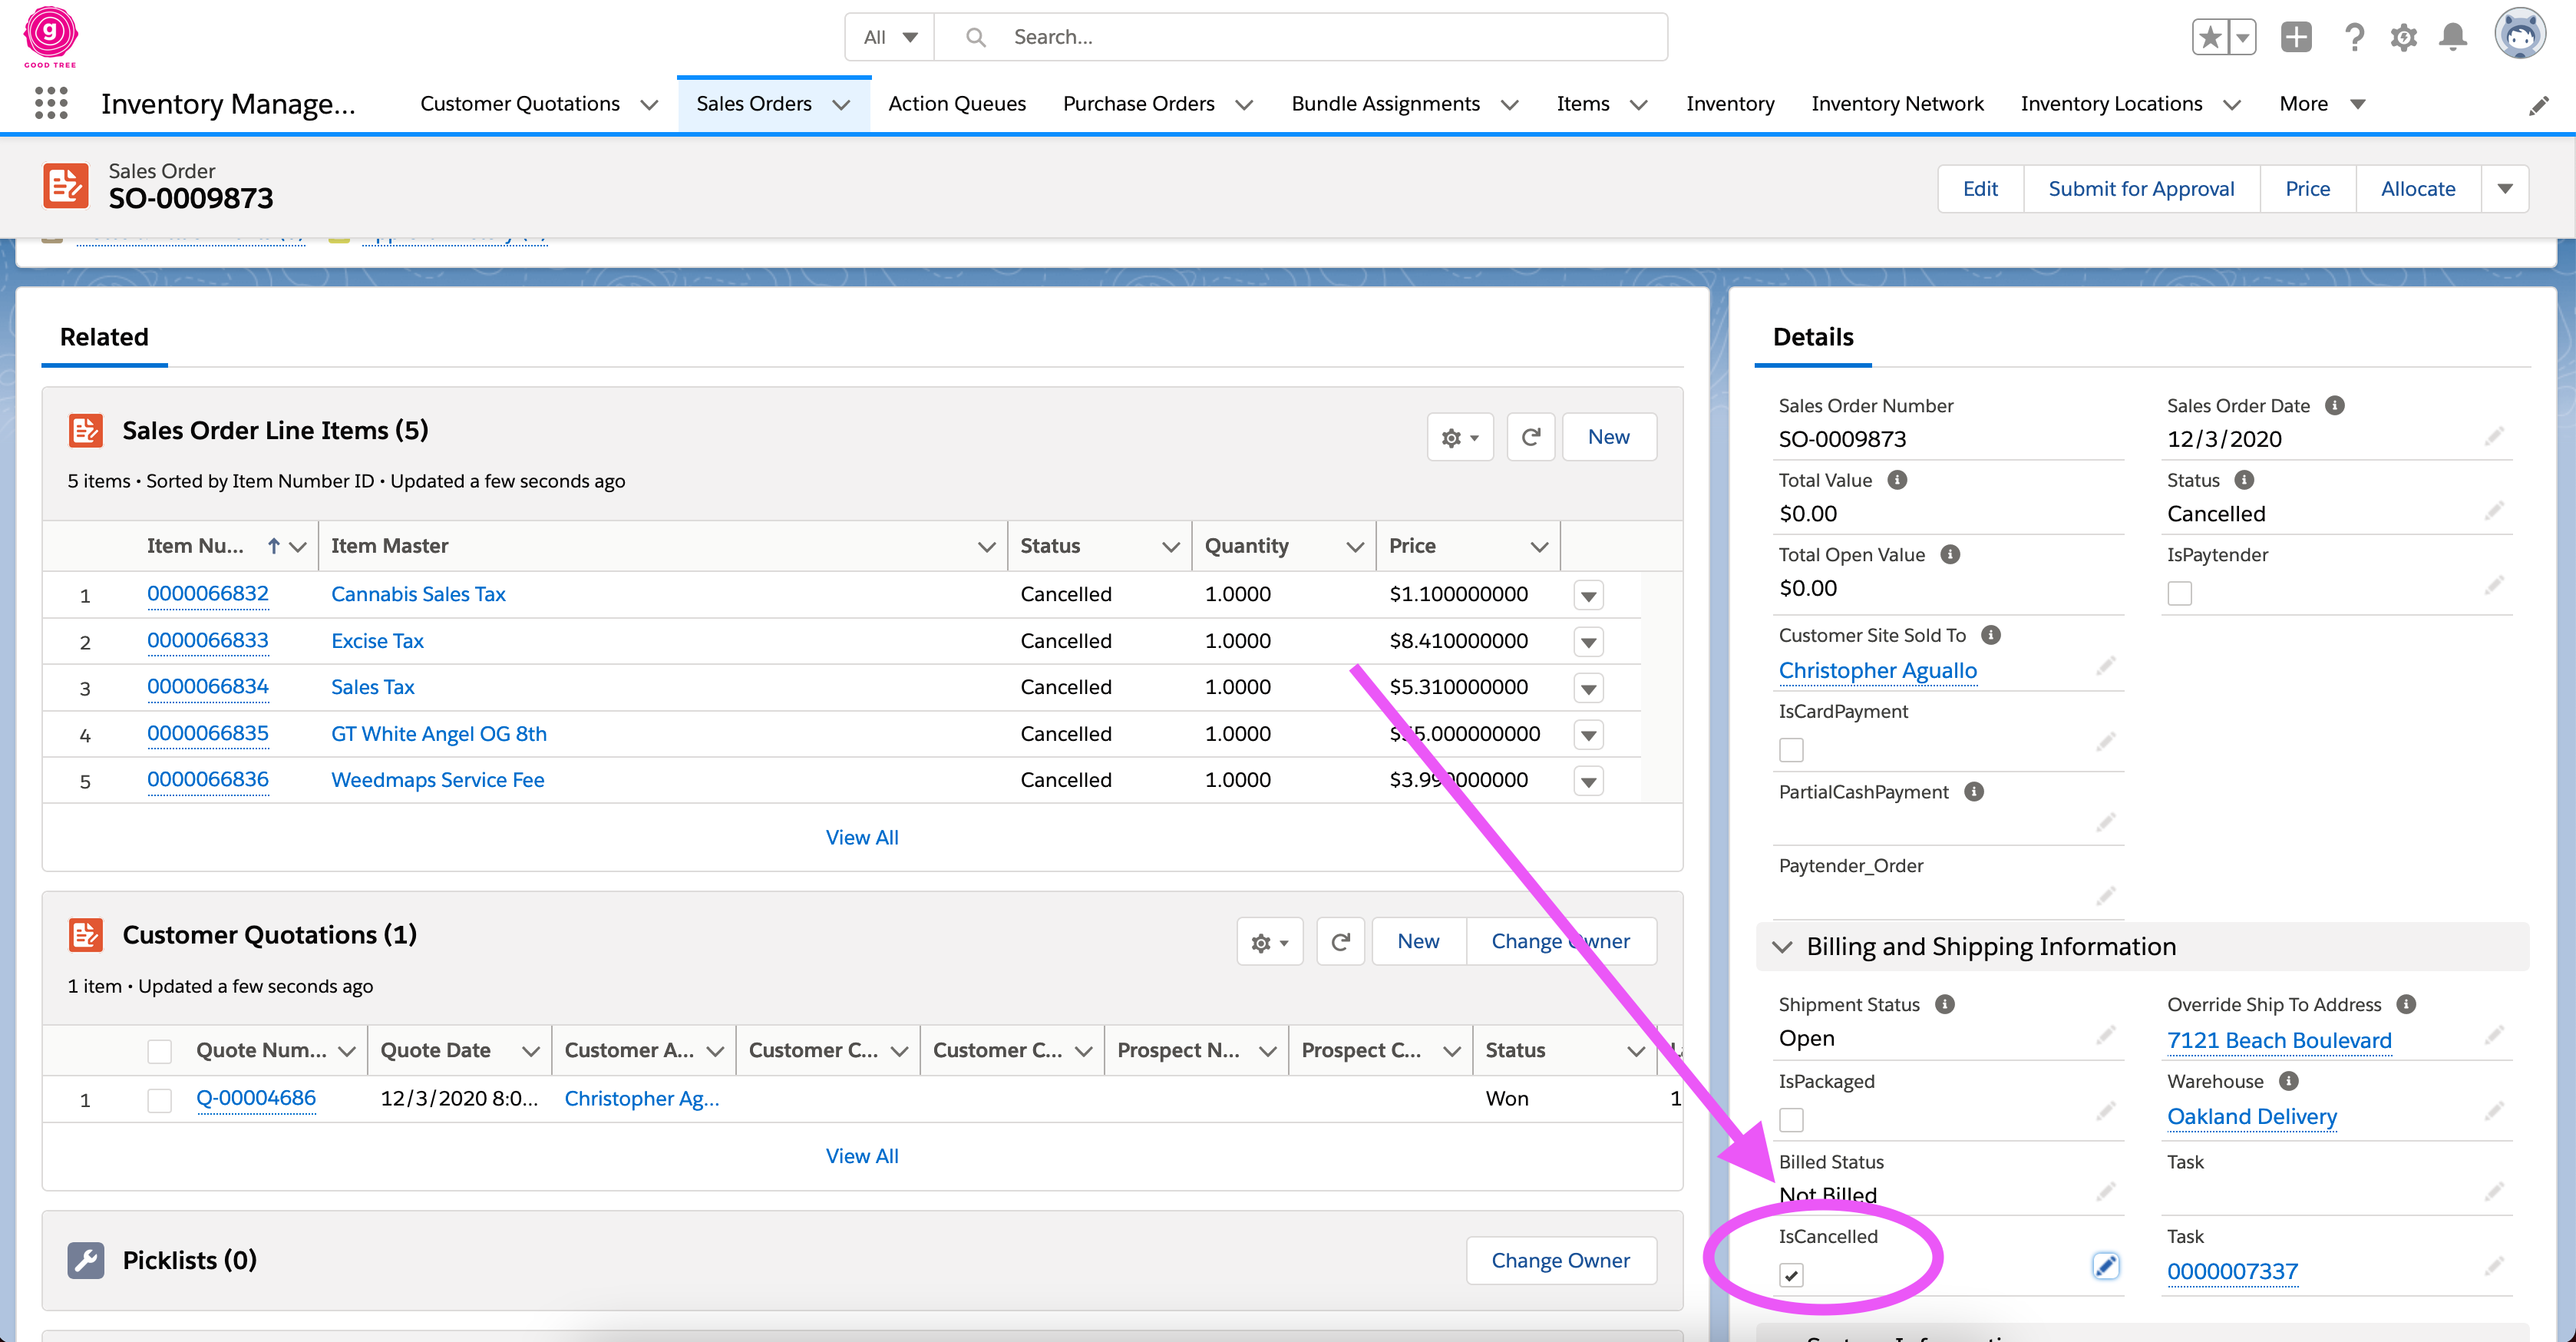
Cancelled Checkbox
 In general the Onfleet task object should never be edited directly, but it is important to understand how the data structures relate to the Sales Order workflow.
Here is summary of workflow:

Sales Workflow
2.3.6.1 SCENARIOS
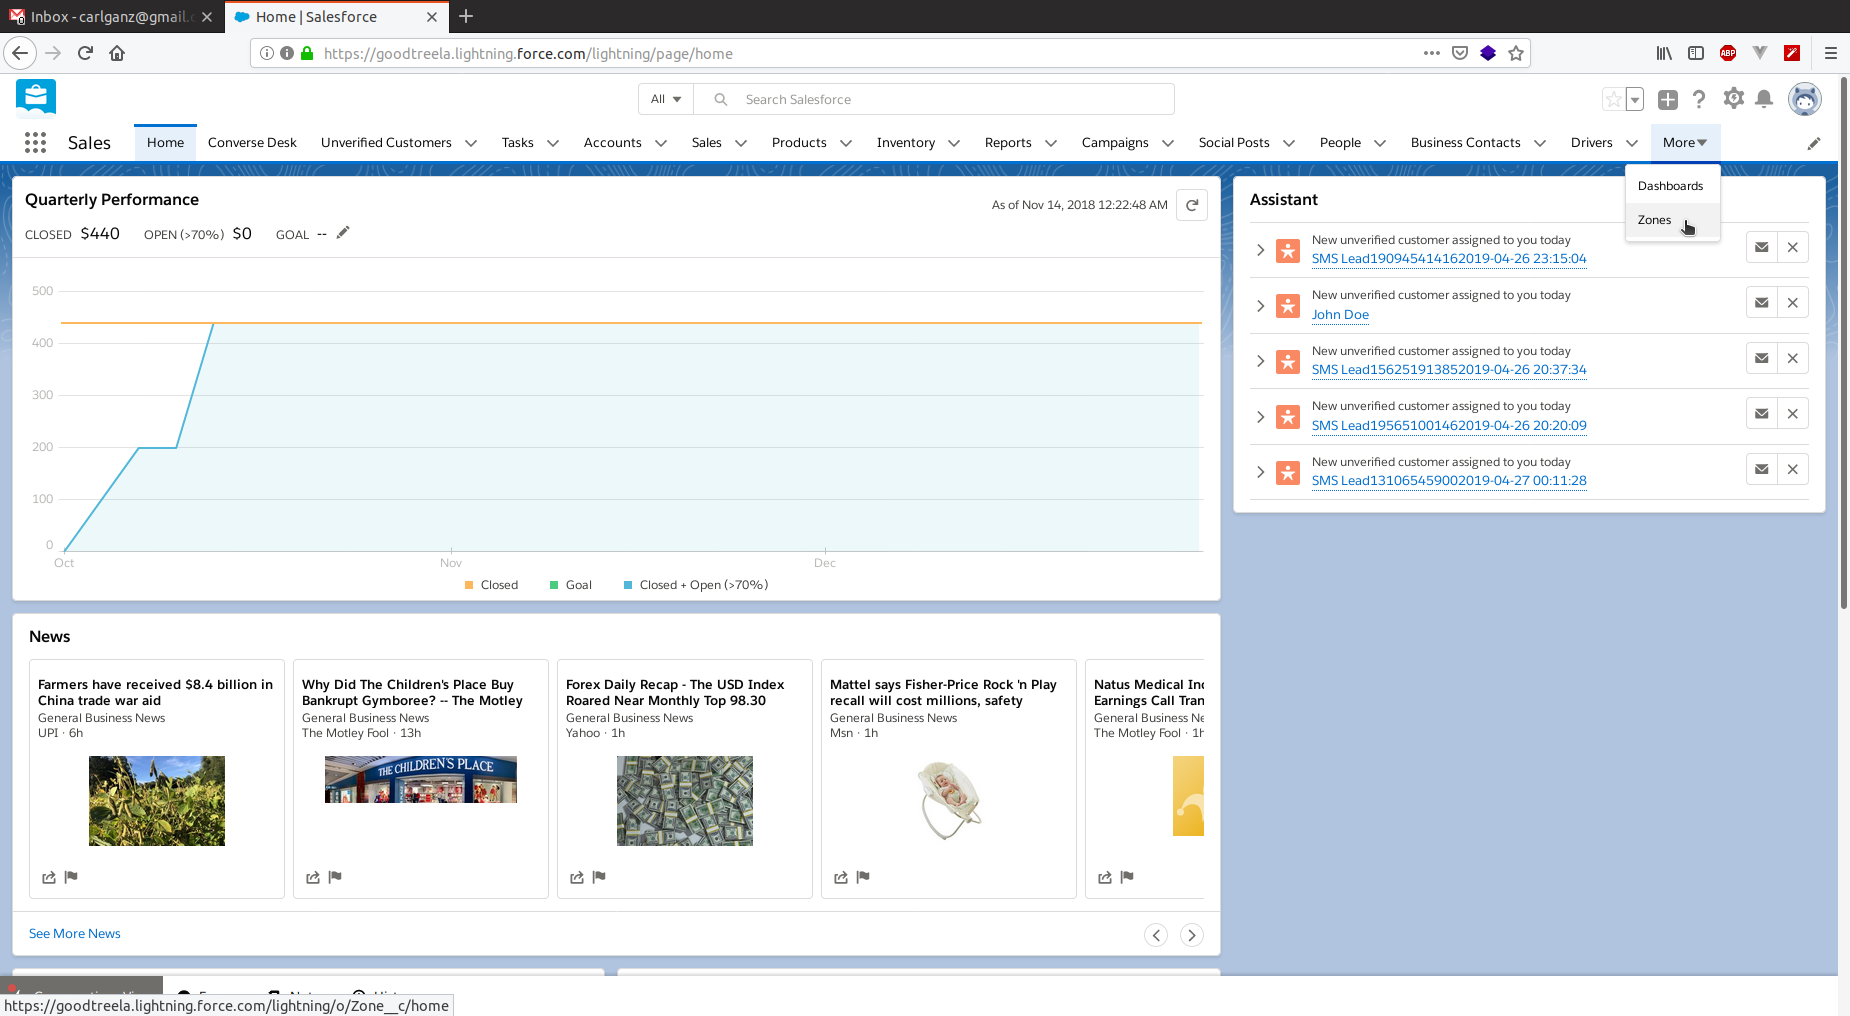
2.4 Twilio Flex
Describe customer communication flow (ie automated messages)
Logging in
Explain interface
Explain task based routing
Admin features
2.5 Weedmaps/Leafly
Will need some help documenting this
2.6 Get Good Tree eCommerce Website
Summarise customer workflow
Talk pain points dispatchers have to help aid
2.7 Common Problems
2.7.1 Didn’t drop on Onfleet
2.7.2 I get error preventing me from adding address to order. What do I do?
Sometimes when assigning a shipping address to an order, you will see an error message. The main reason this error occurs because the address being added is in a city that does not have an associated “Delivery Zone” in our system.
Steps to resolve:
- Speak with manager to confirm address is actually within our delivery range. If it is not, please kindly tell the customer we do not deliver to their area.
- If they are within the delivery range, you will need to add the zone.
2.7.2.1 How to add a Delivery Zone
 Select the “Zones” tab, and then the “New” button on the top right.
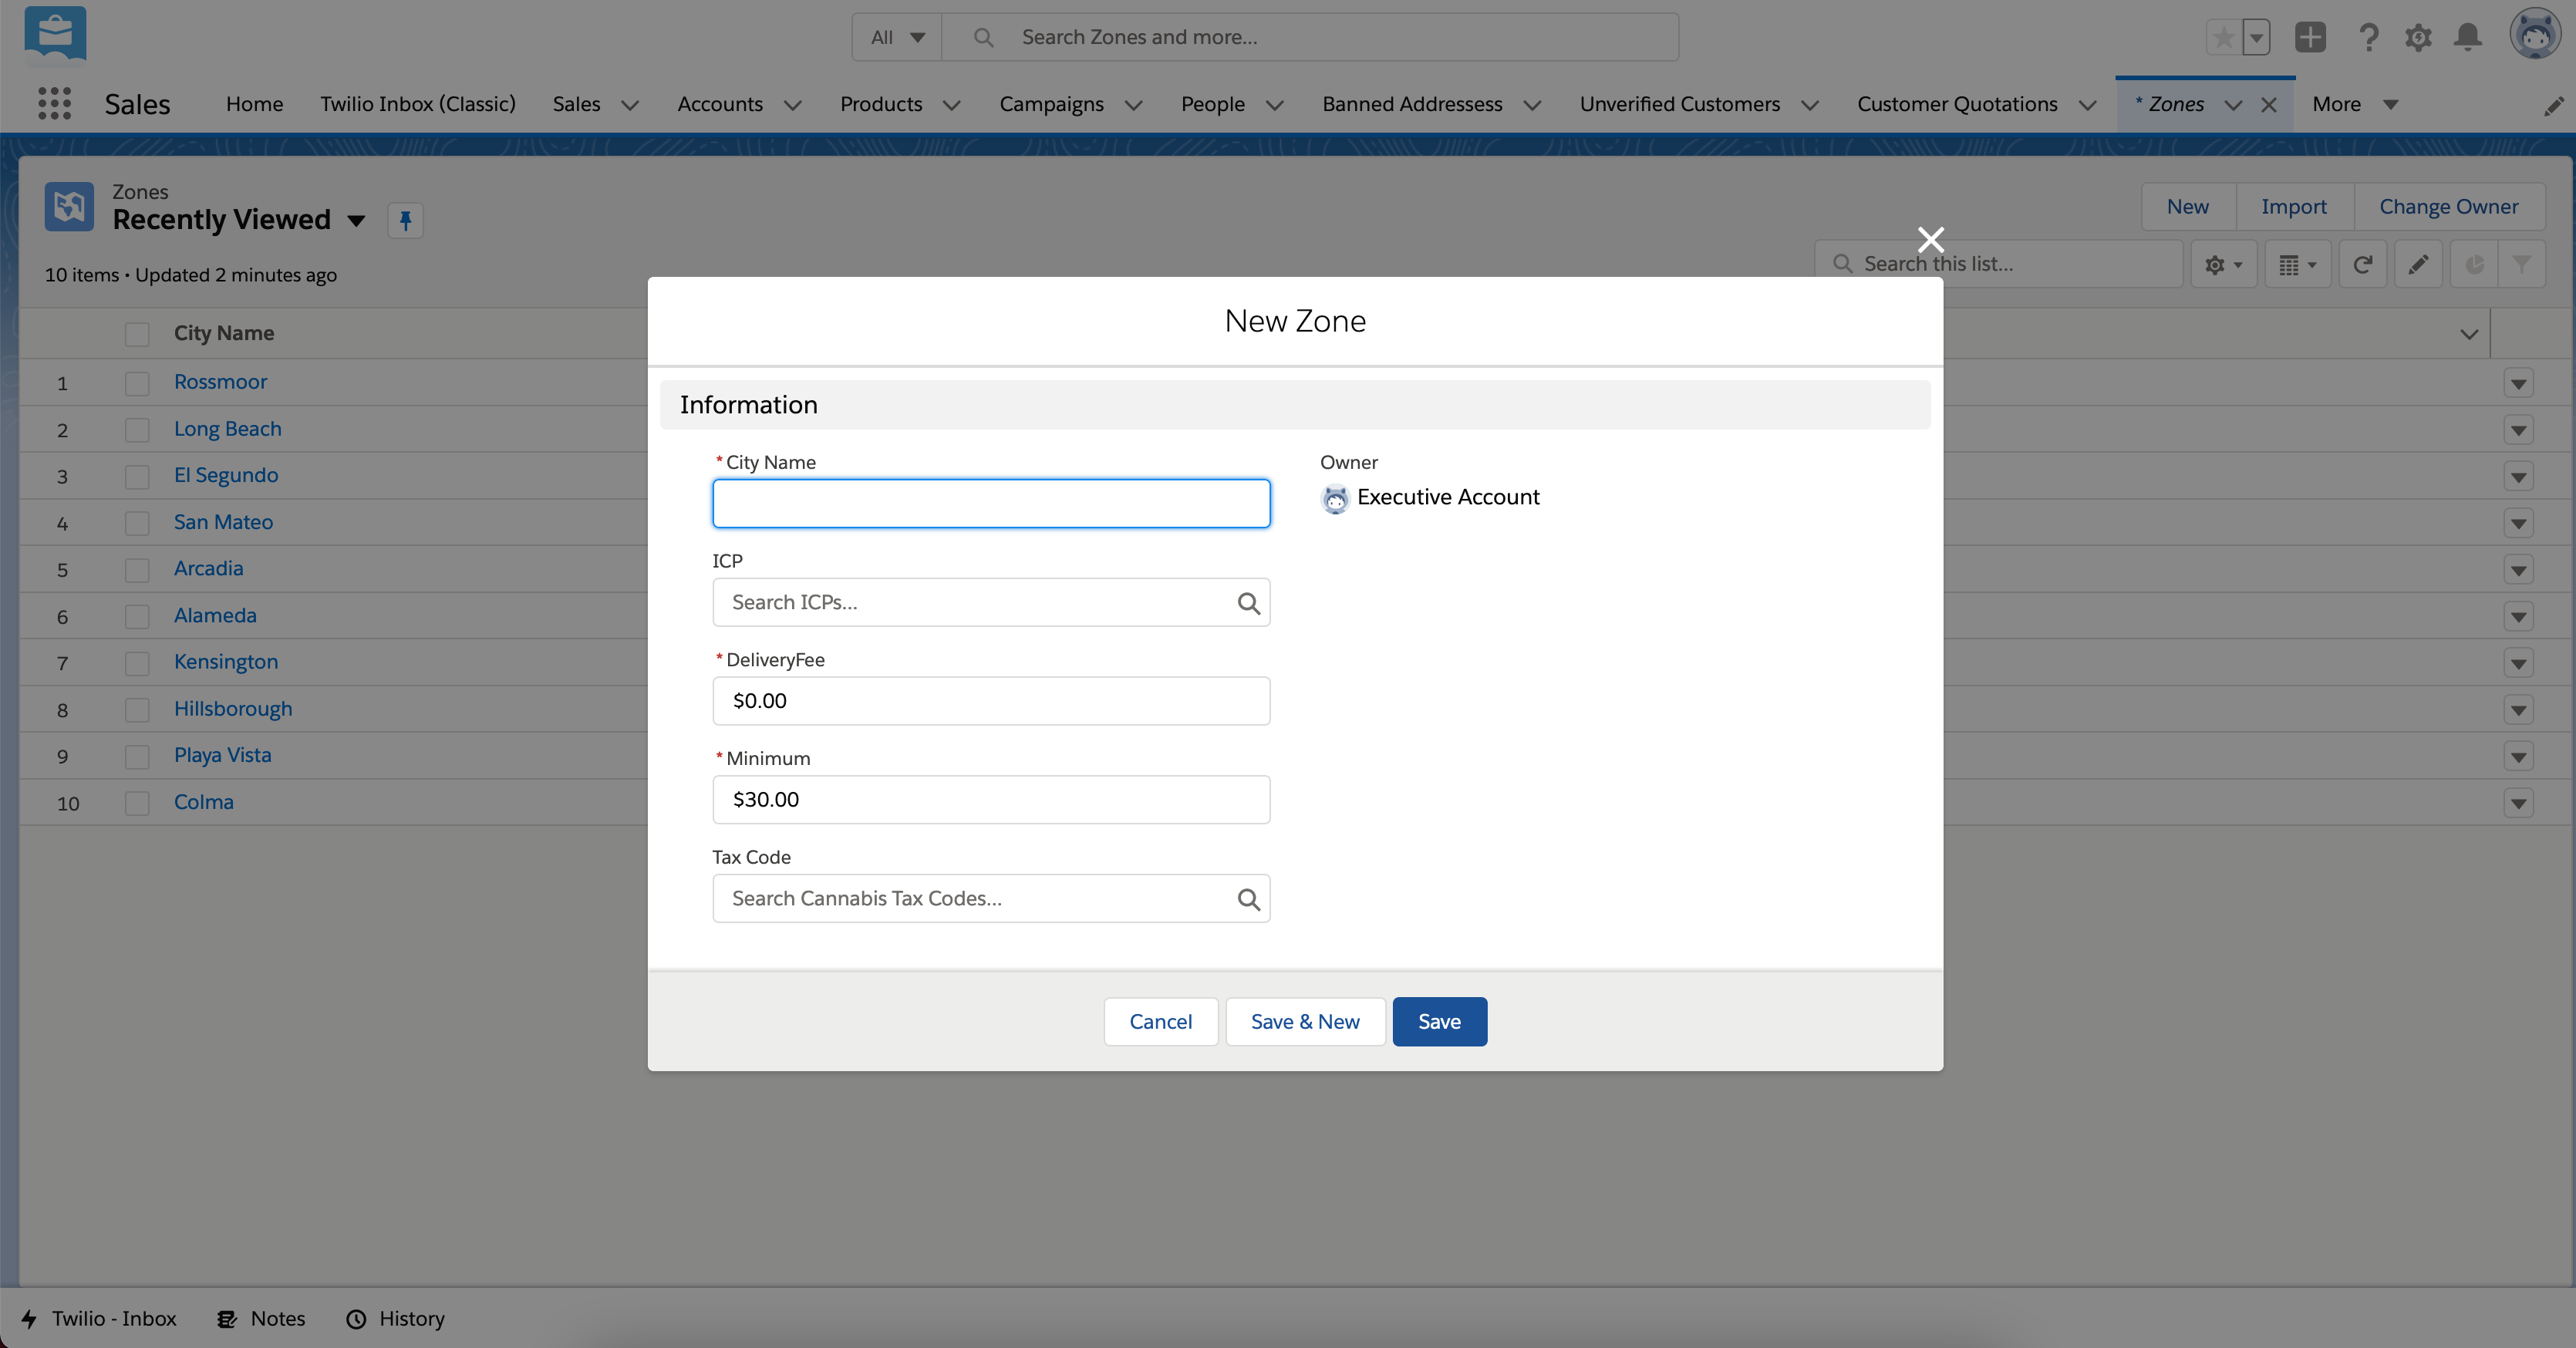
New Zone
You will be prompted to enter the necessary information.
Here is a table with the meaning of the “Zone” fields:
| Fields | Description | Required |
|---|---|---|
| City Name | The name of the city/delivery zone | Yes |
| Minimum | The minimum order amount to deliver to that zone | Yes |
| Fee | The delivery fee | Yes |
| ICP | The Good Tree Hub that fulfills the orders so if Bay Area select Good Tree Oakland, and if in SoCal select Good Tree LB | Yes |
| Tax Code | The Sales Tax rate object, you can usually find this just by searching the city name | Yes |
Once the zone is added you will be able to add the shipping address to the order.
2.7.3 The product I want to quote is not listed. What do I do?
This usually means there is no inventory for the item so it was deactivated, but it is possible the item was manually deactivated for some reason. Please contact a manager in this scenario, who can verify the items status.
2.7.4 The order didn’t drop on Onfleet
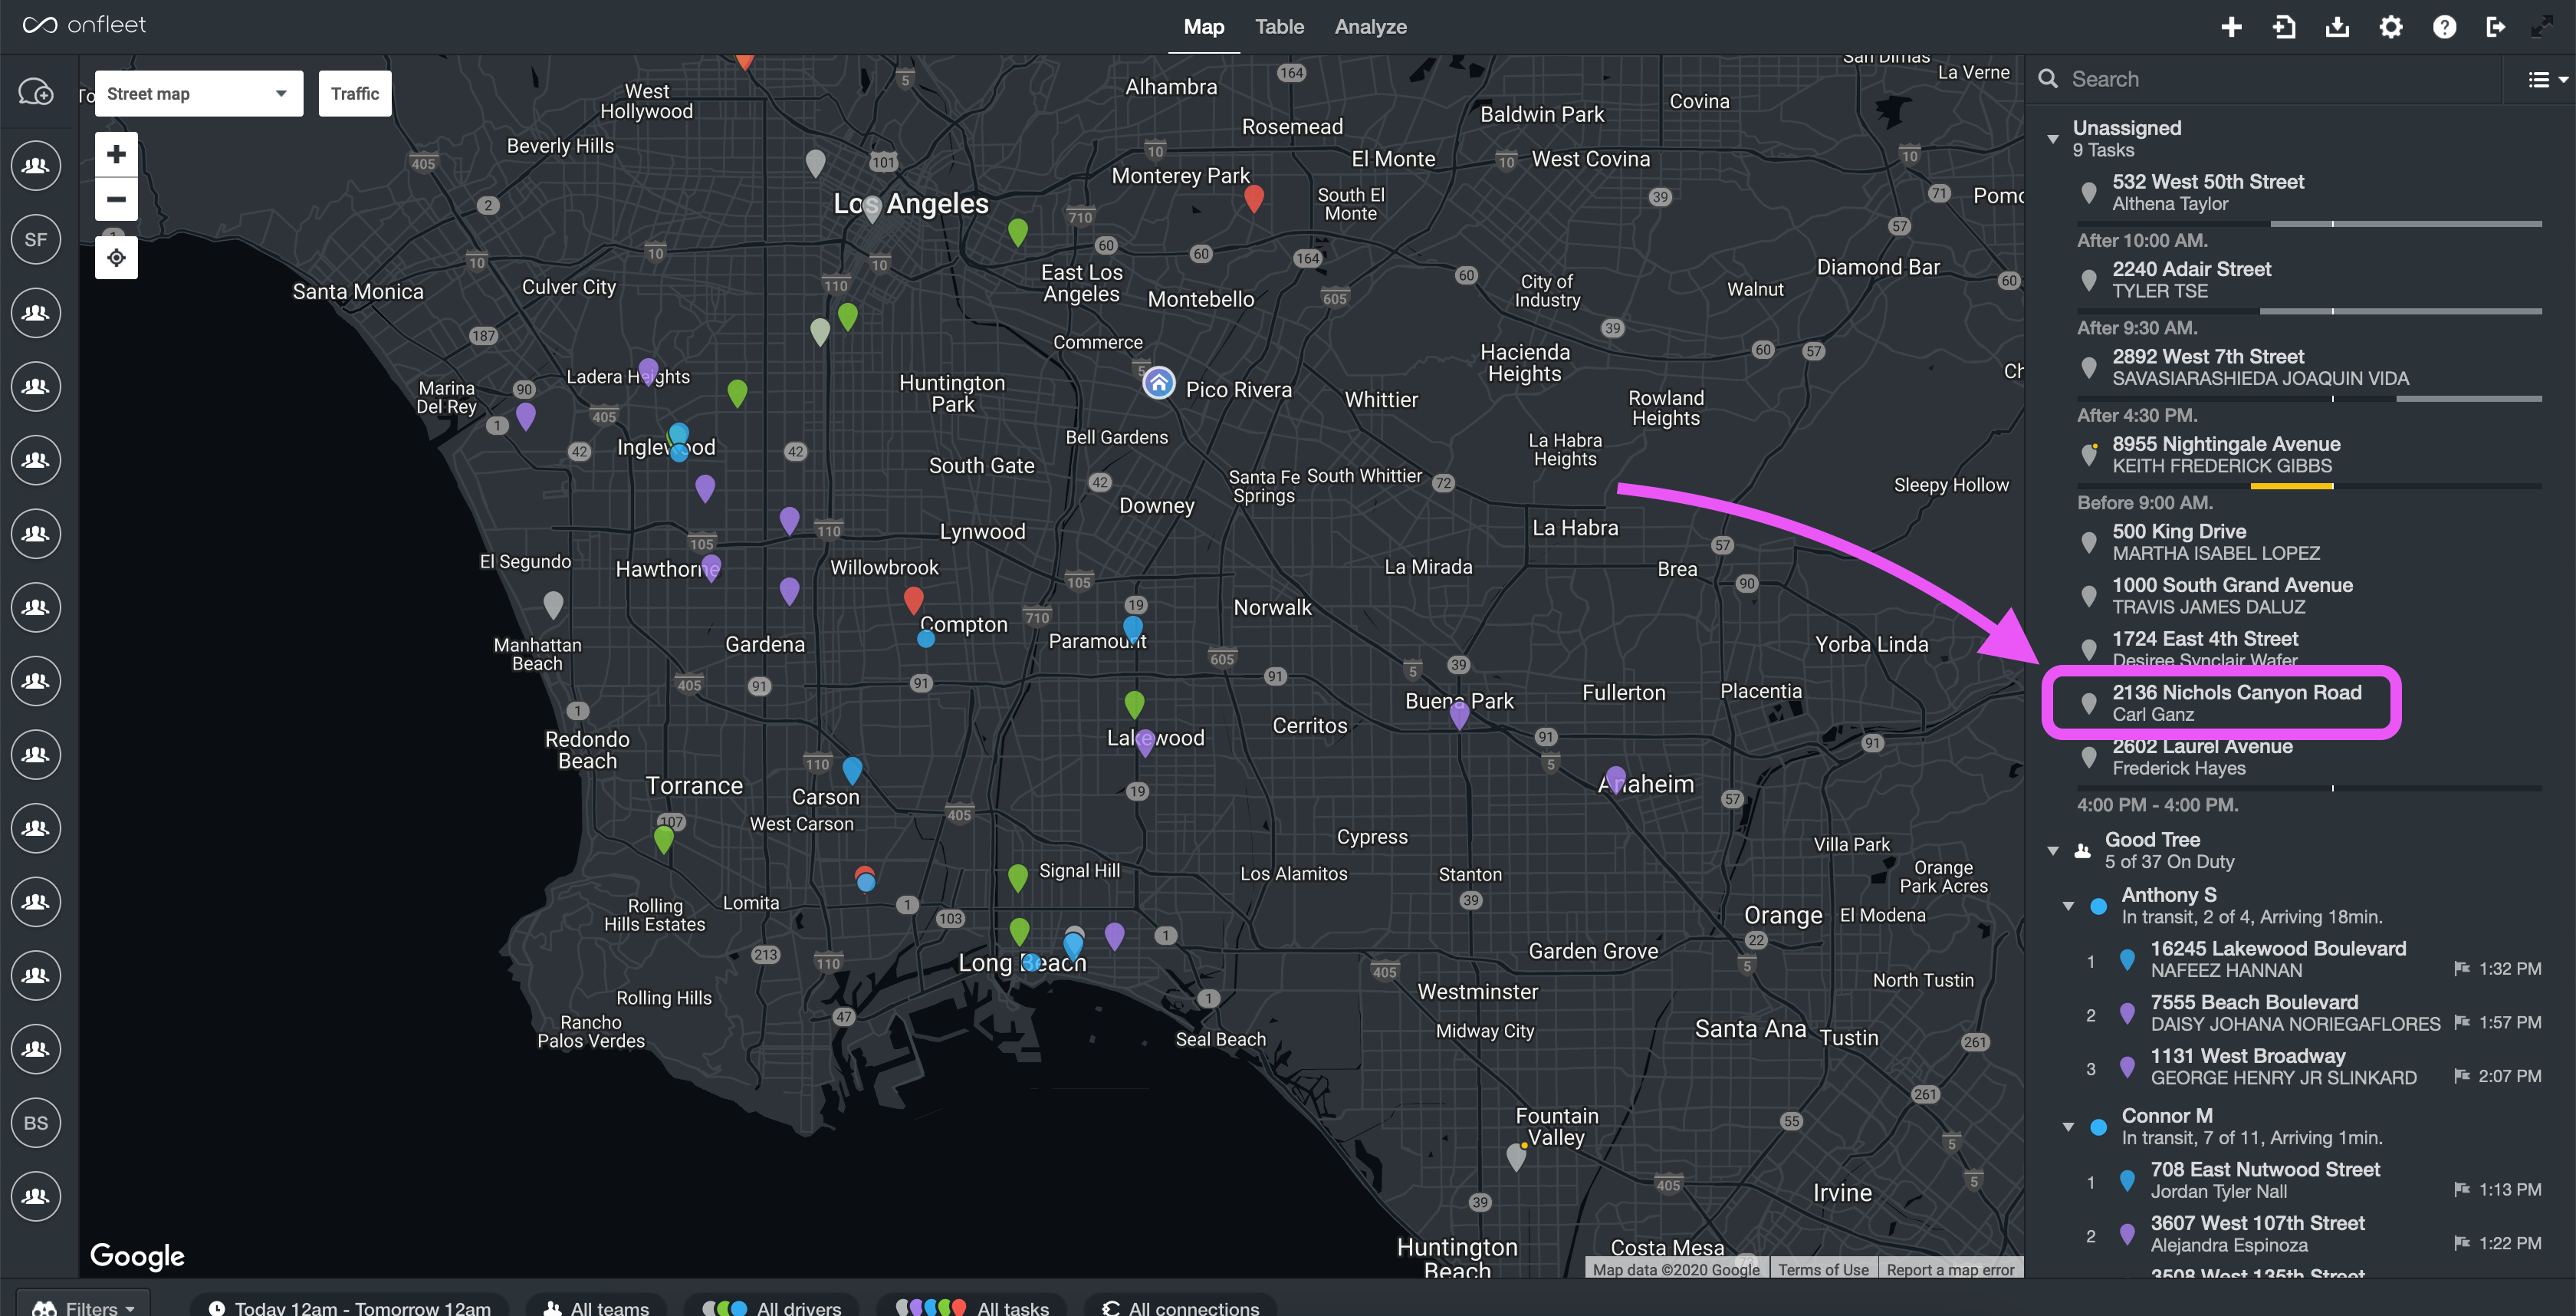
If an order doesn’t drop onto Onfleet you must manually create the Onfleet task.
Go to the Onfleet Dashboard and select the “+” button on top right.
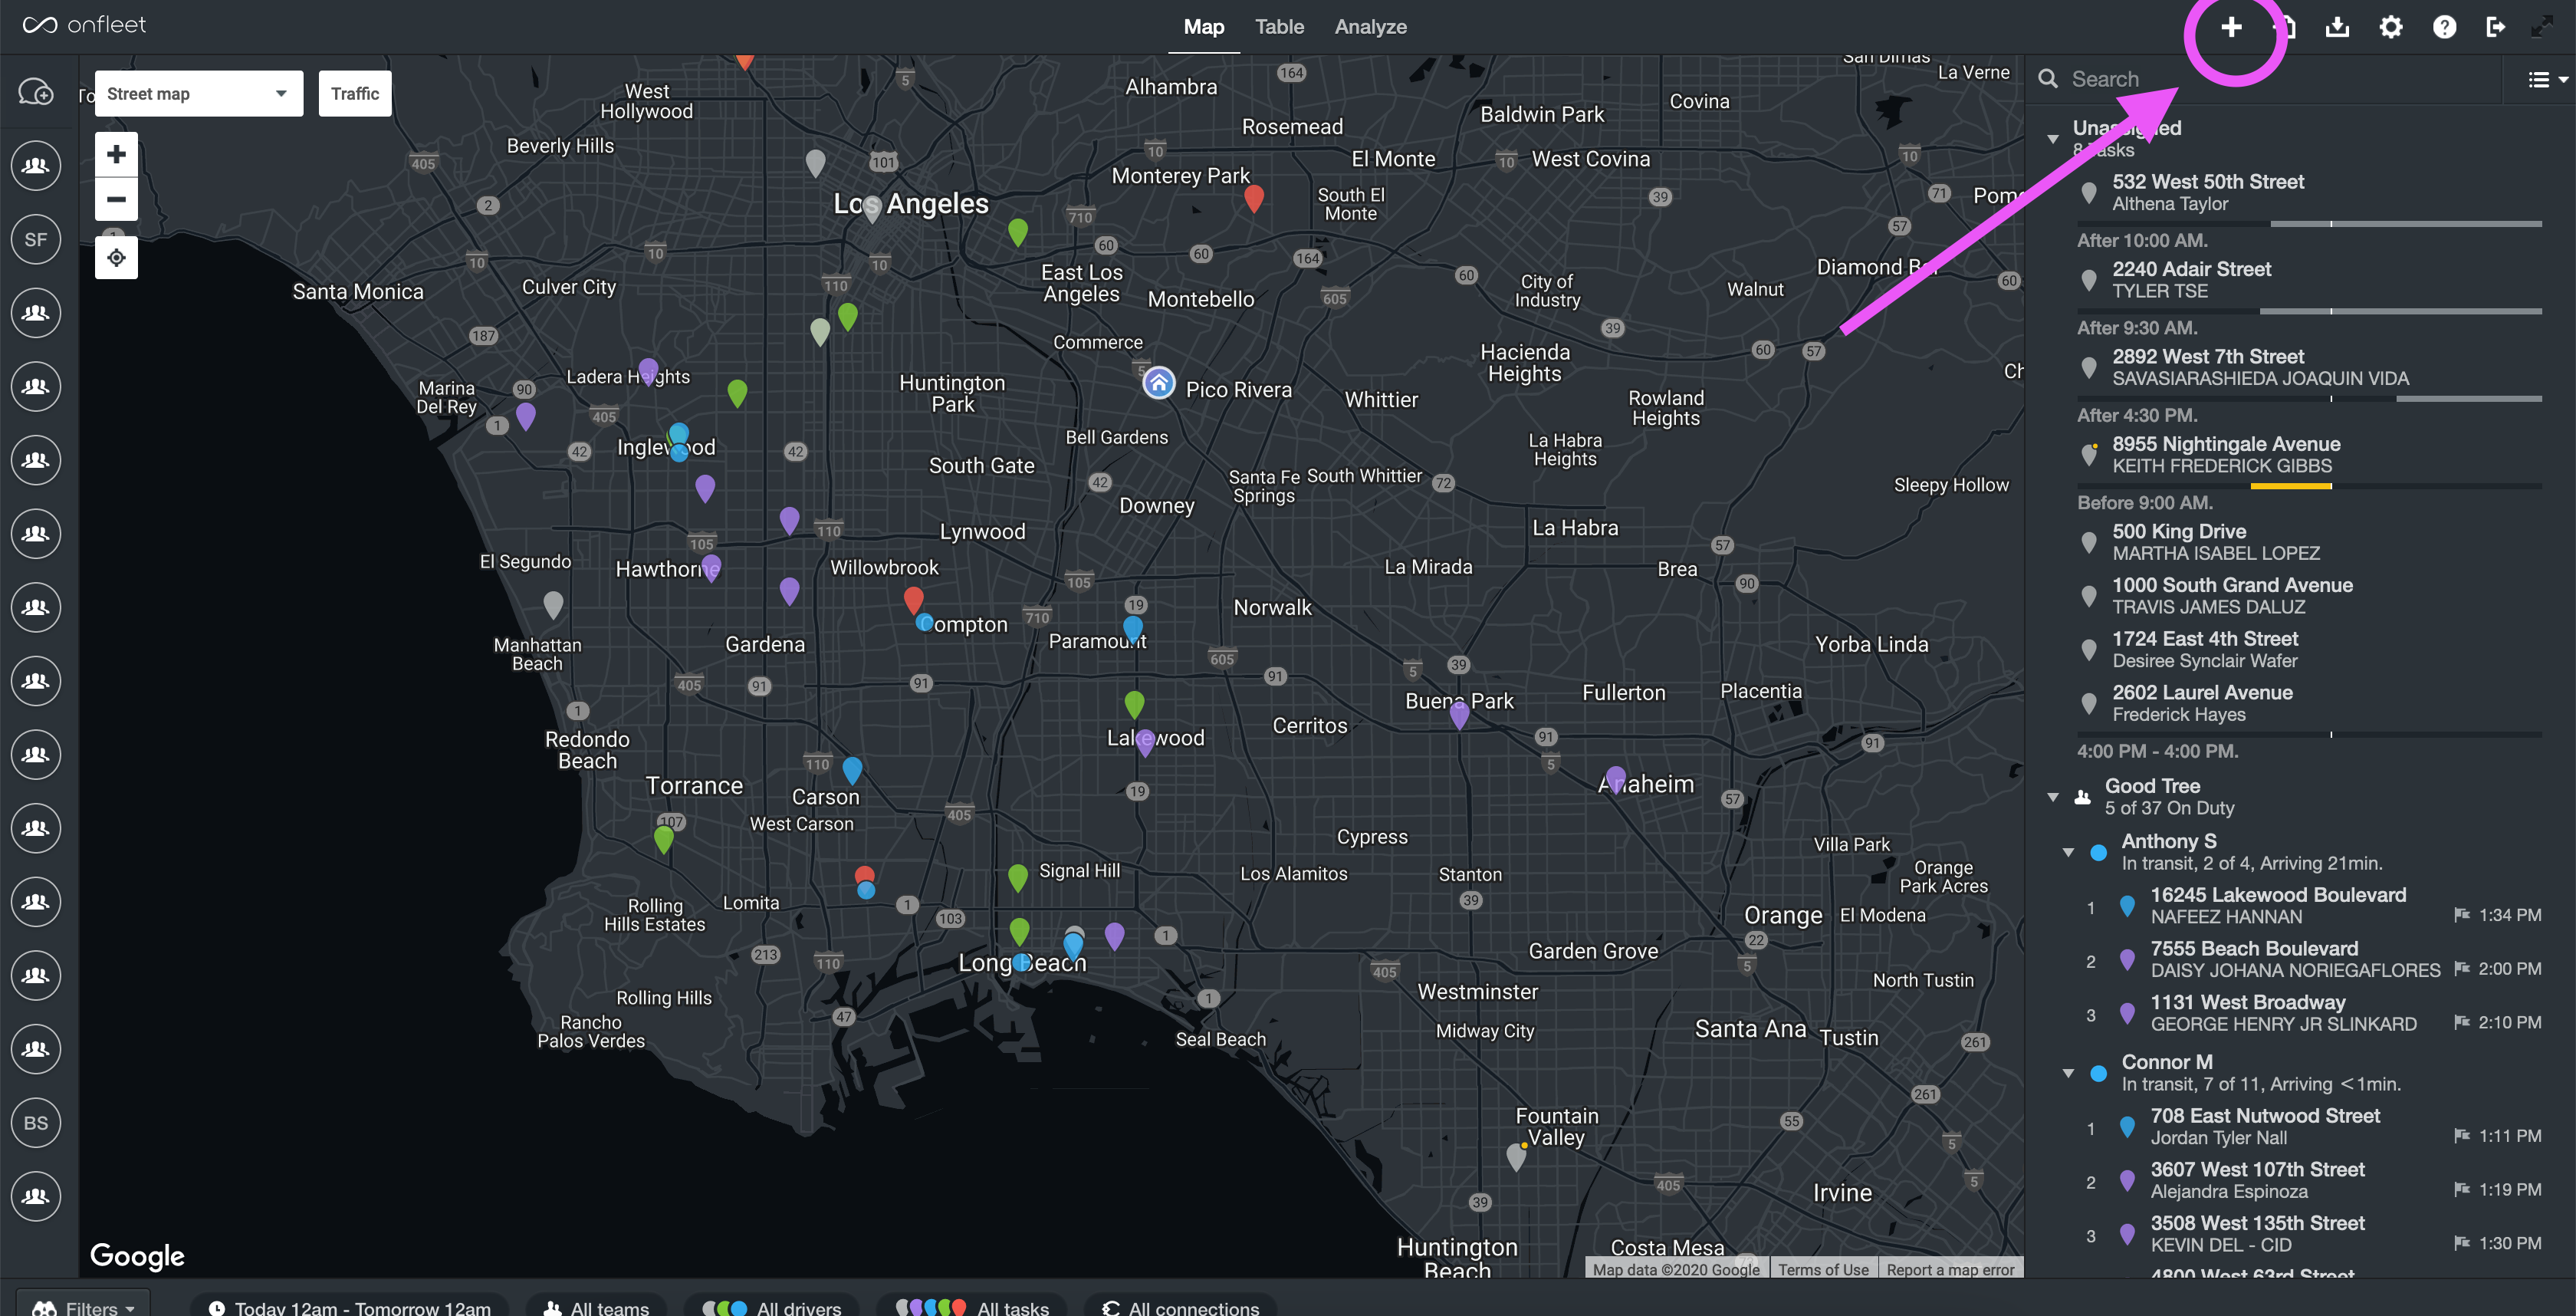
Onfleet Create Task Button
A popup will appear where you must enter the customer’s phone number, name, and delivery address.
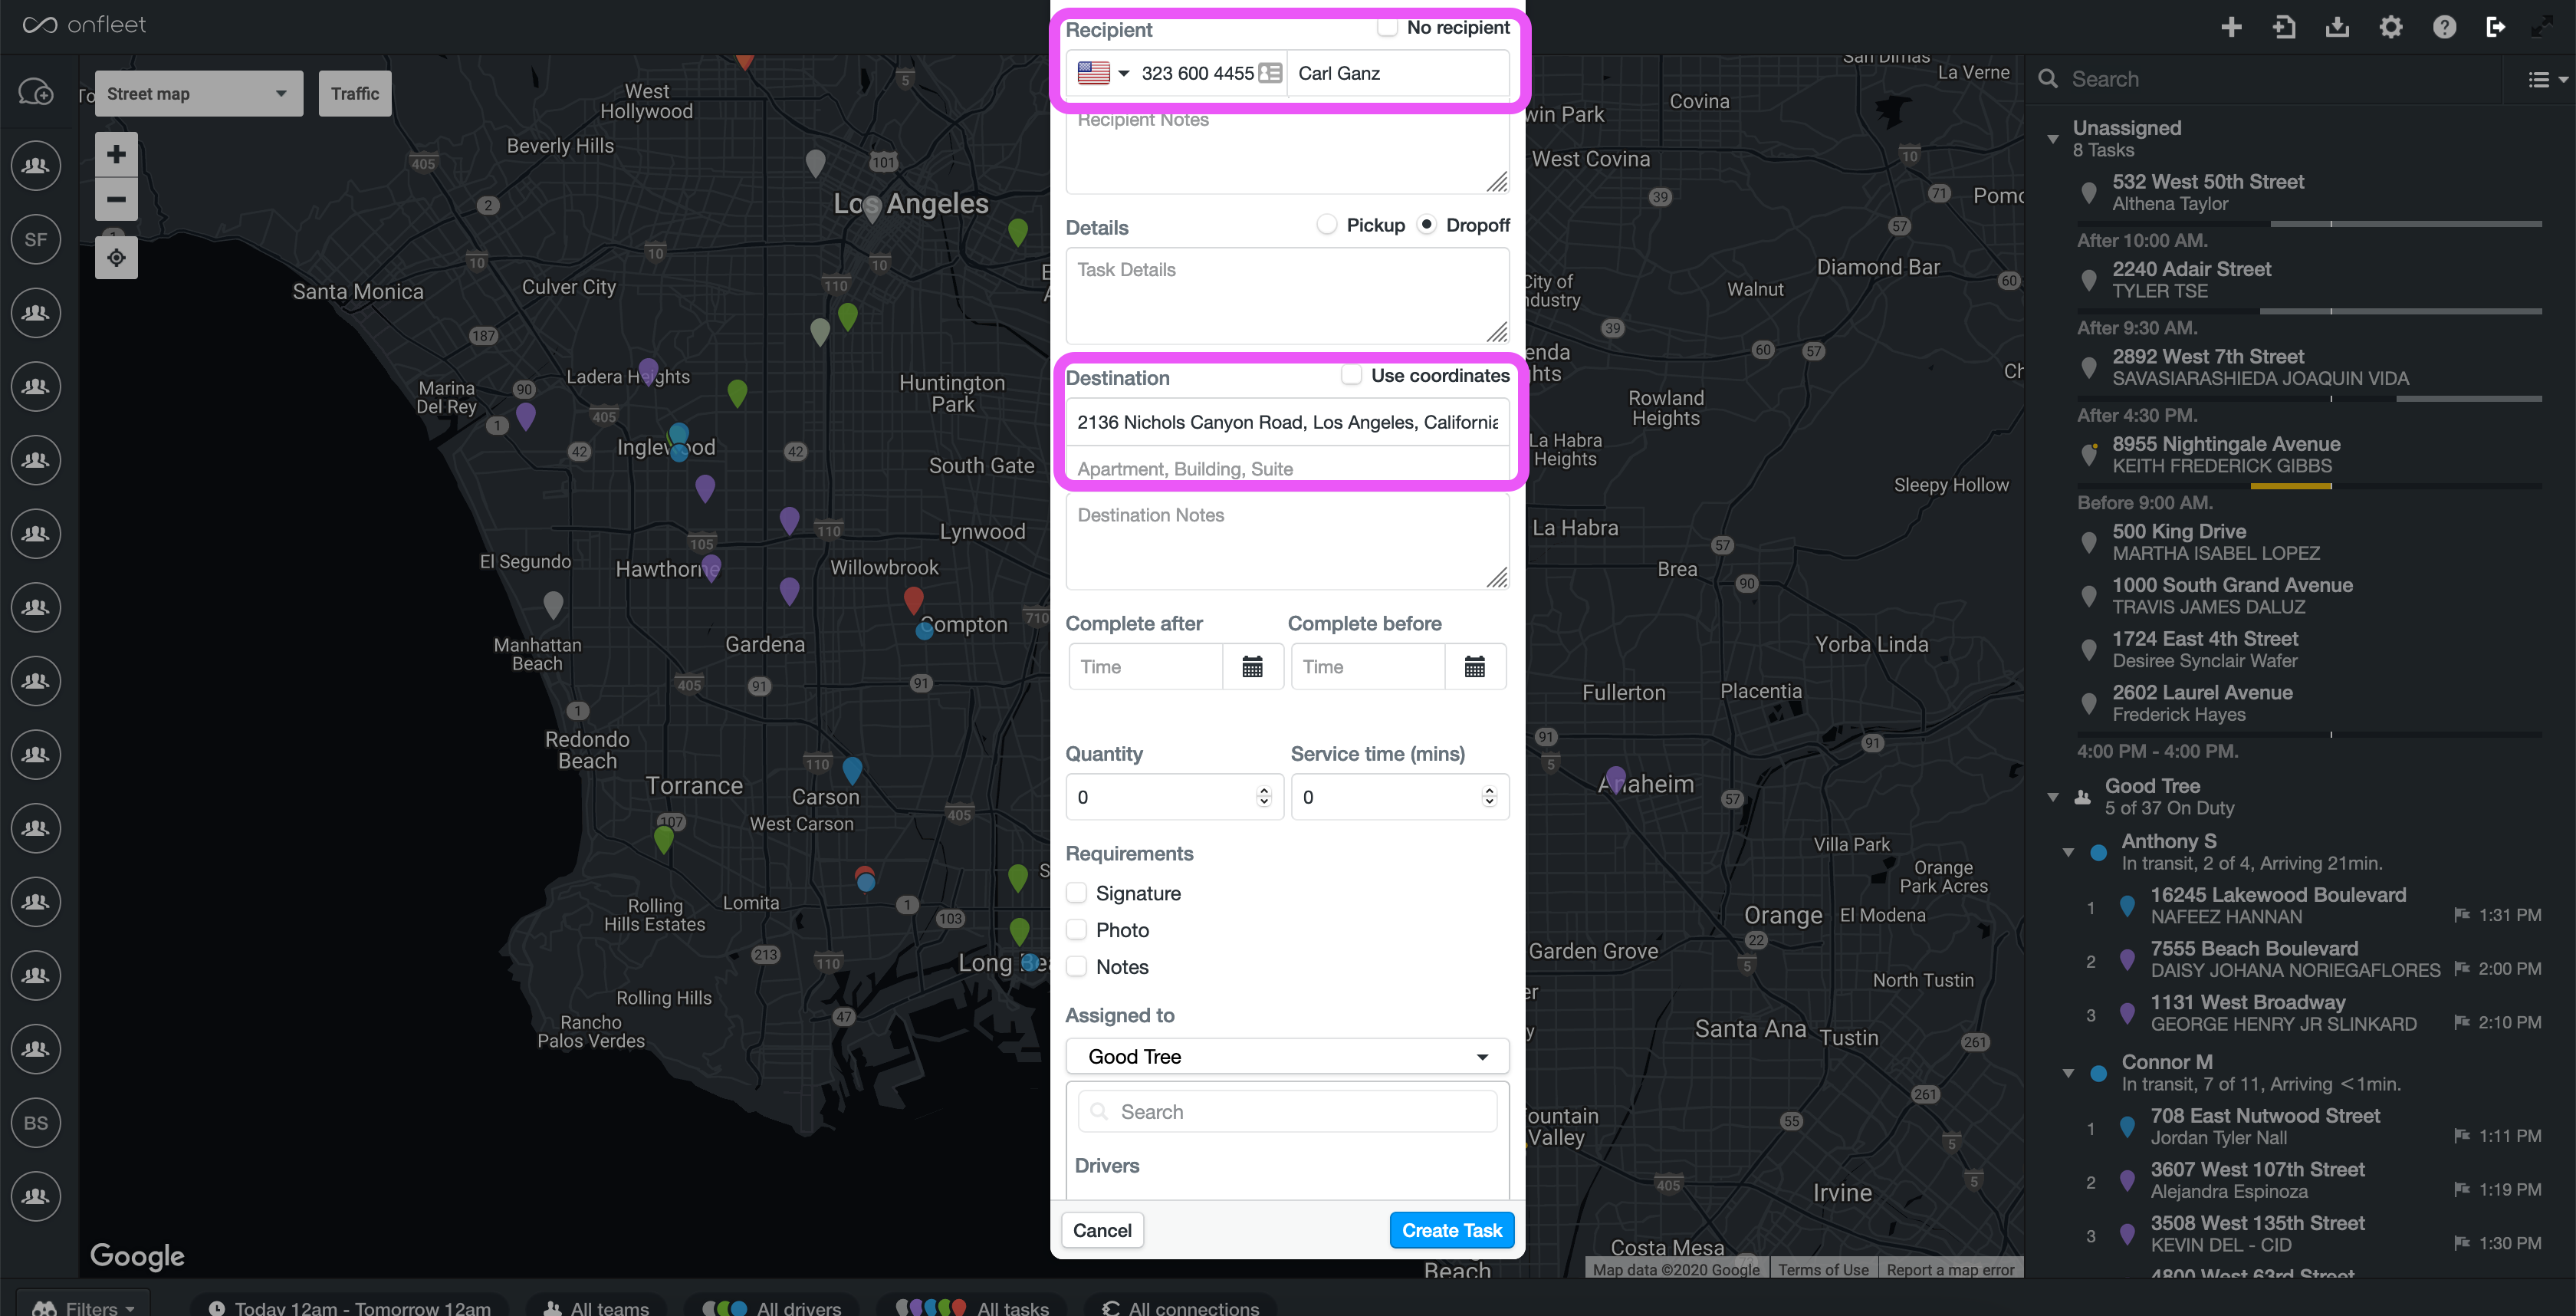
Onfleet Modal
Once the task is created you will be able to view it on the right. You will need to copy the ID number so double click the task on the right to get the task’s info page.
Onfleet Task Info
In the URL you will see a dynamically generated ID string that you will need to copy.
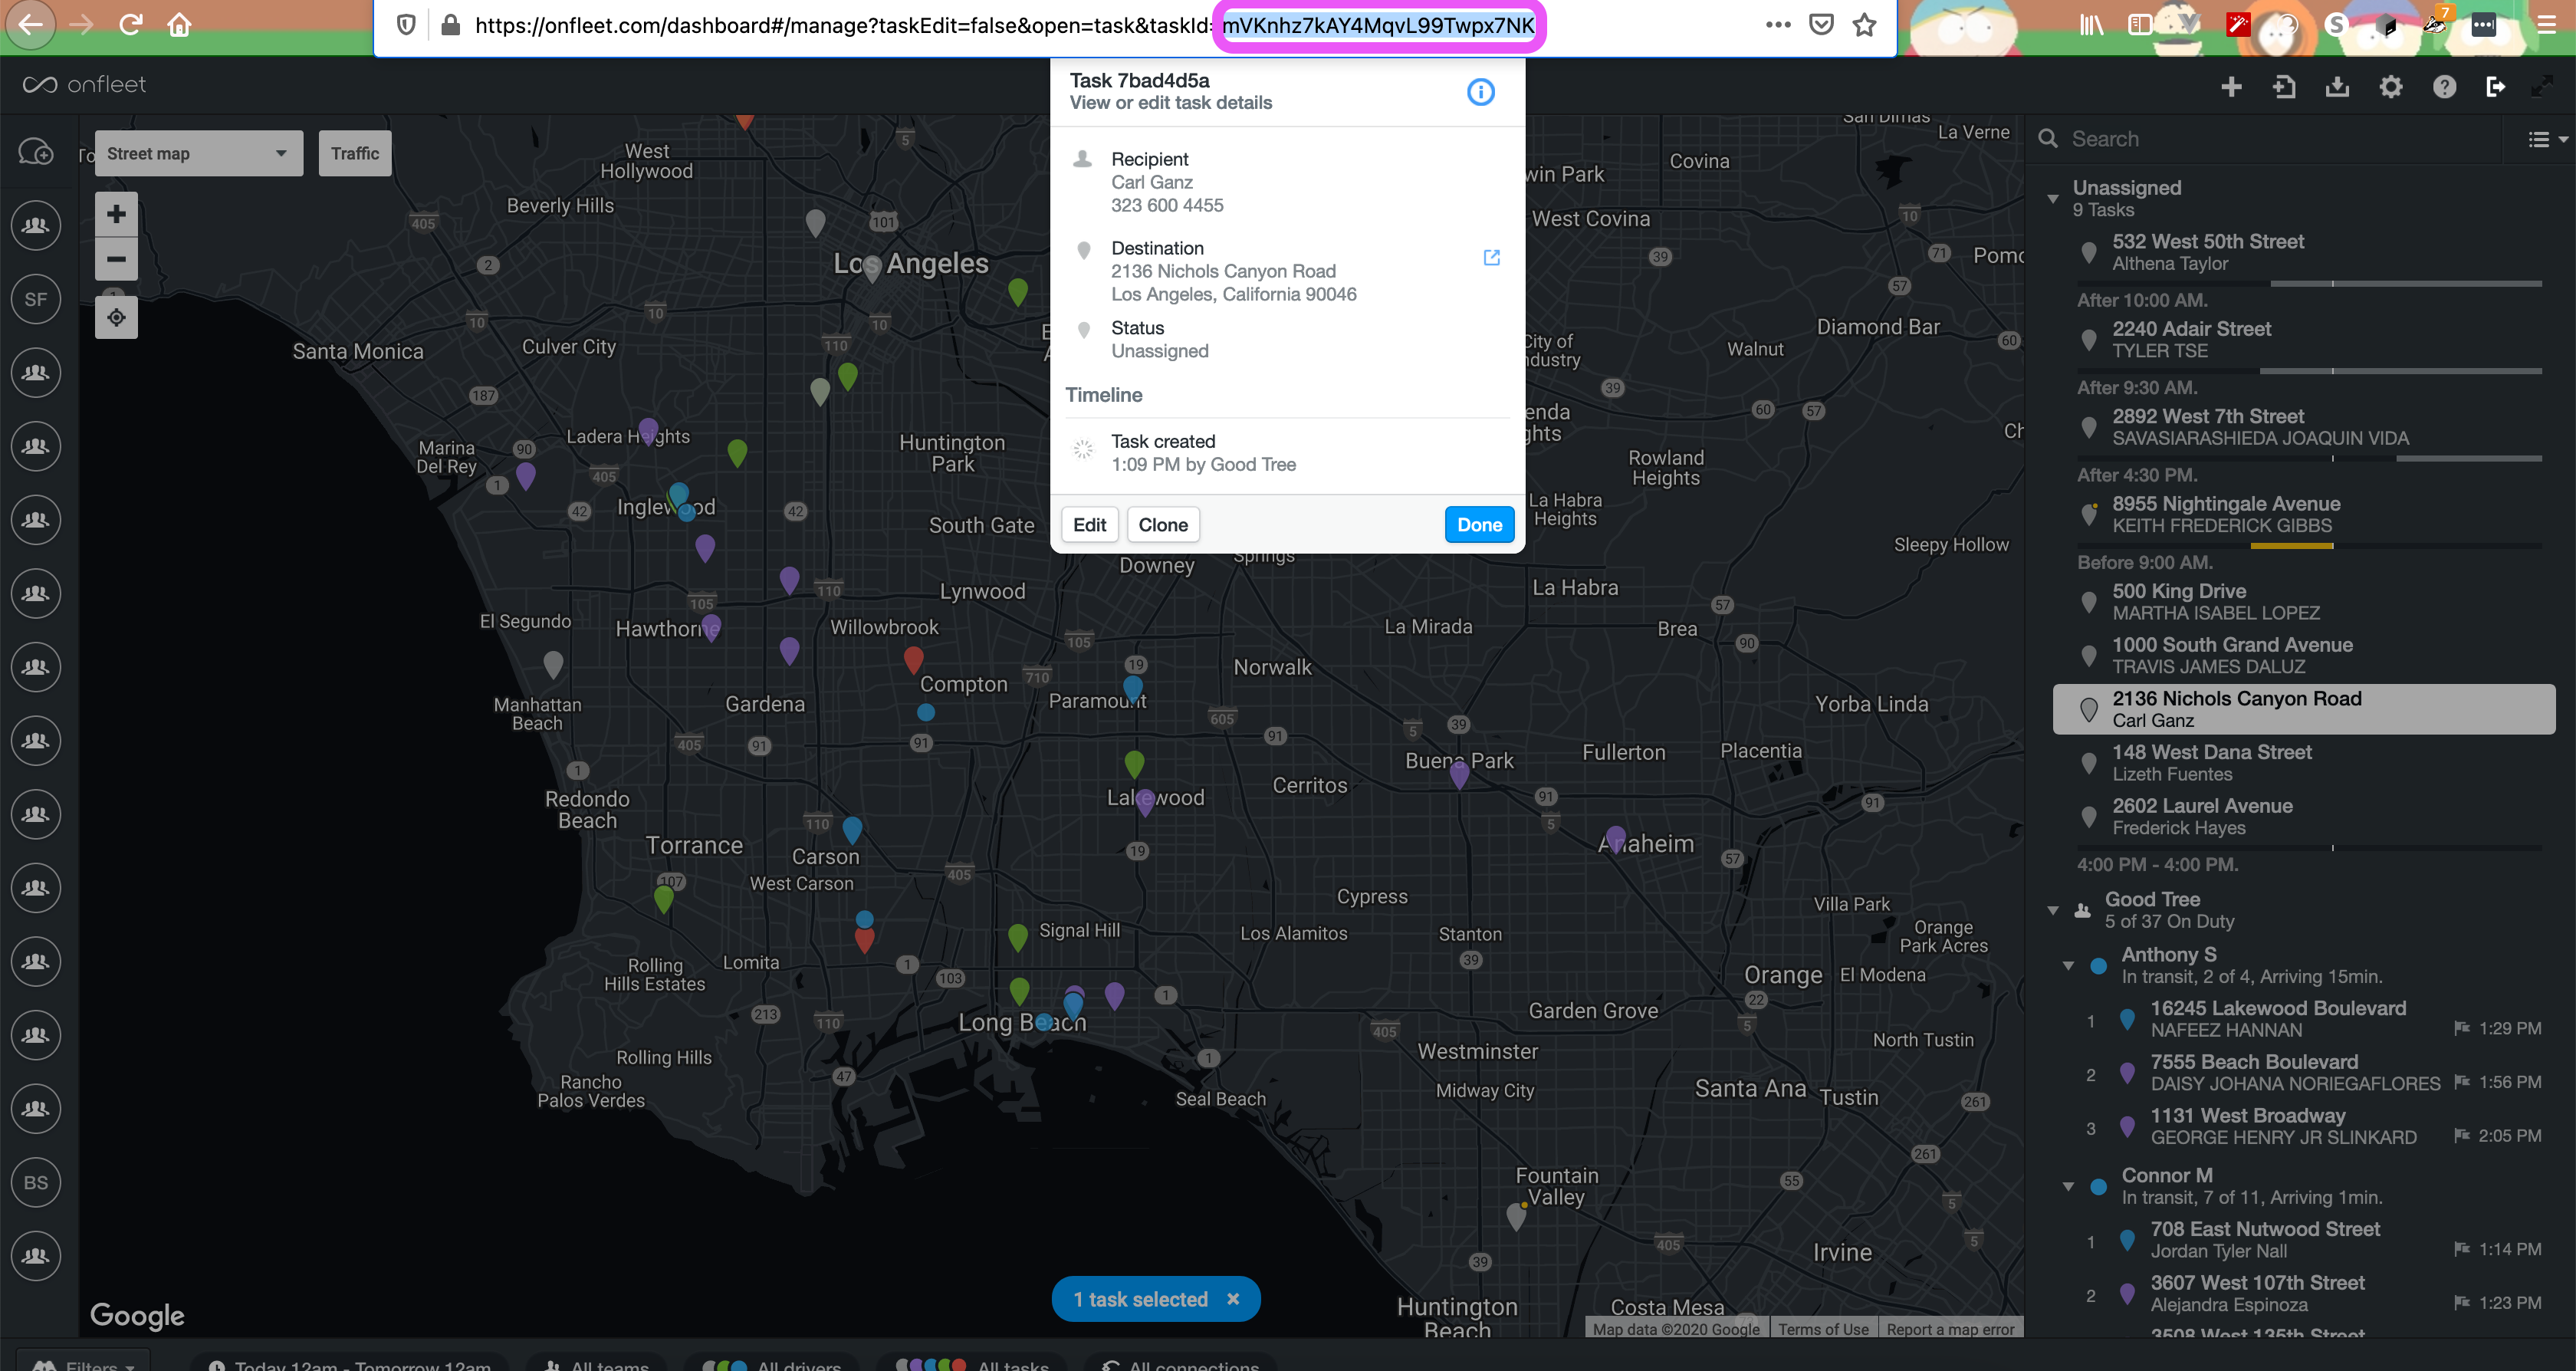
Onfleet Info Page
Once you have copied the ID string, go to the Sales Order page in Salesforce and select the Onfleet Task
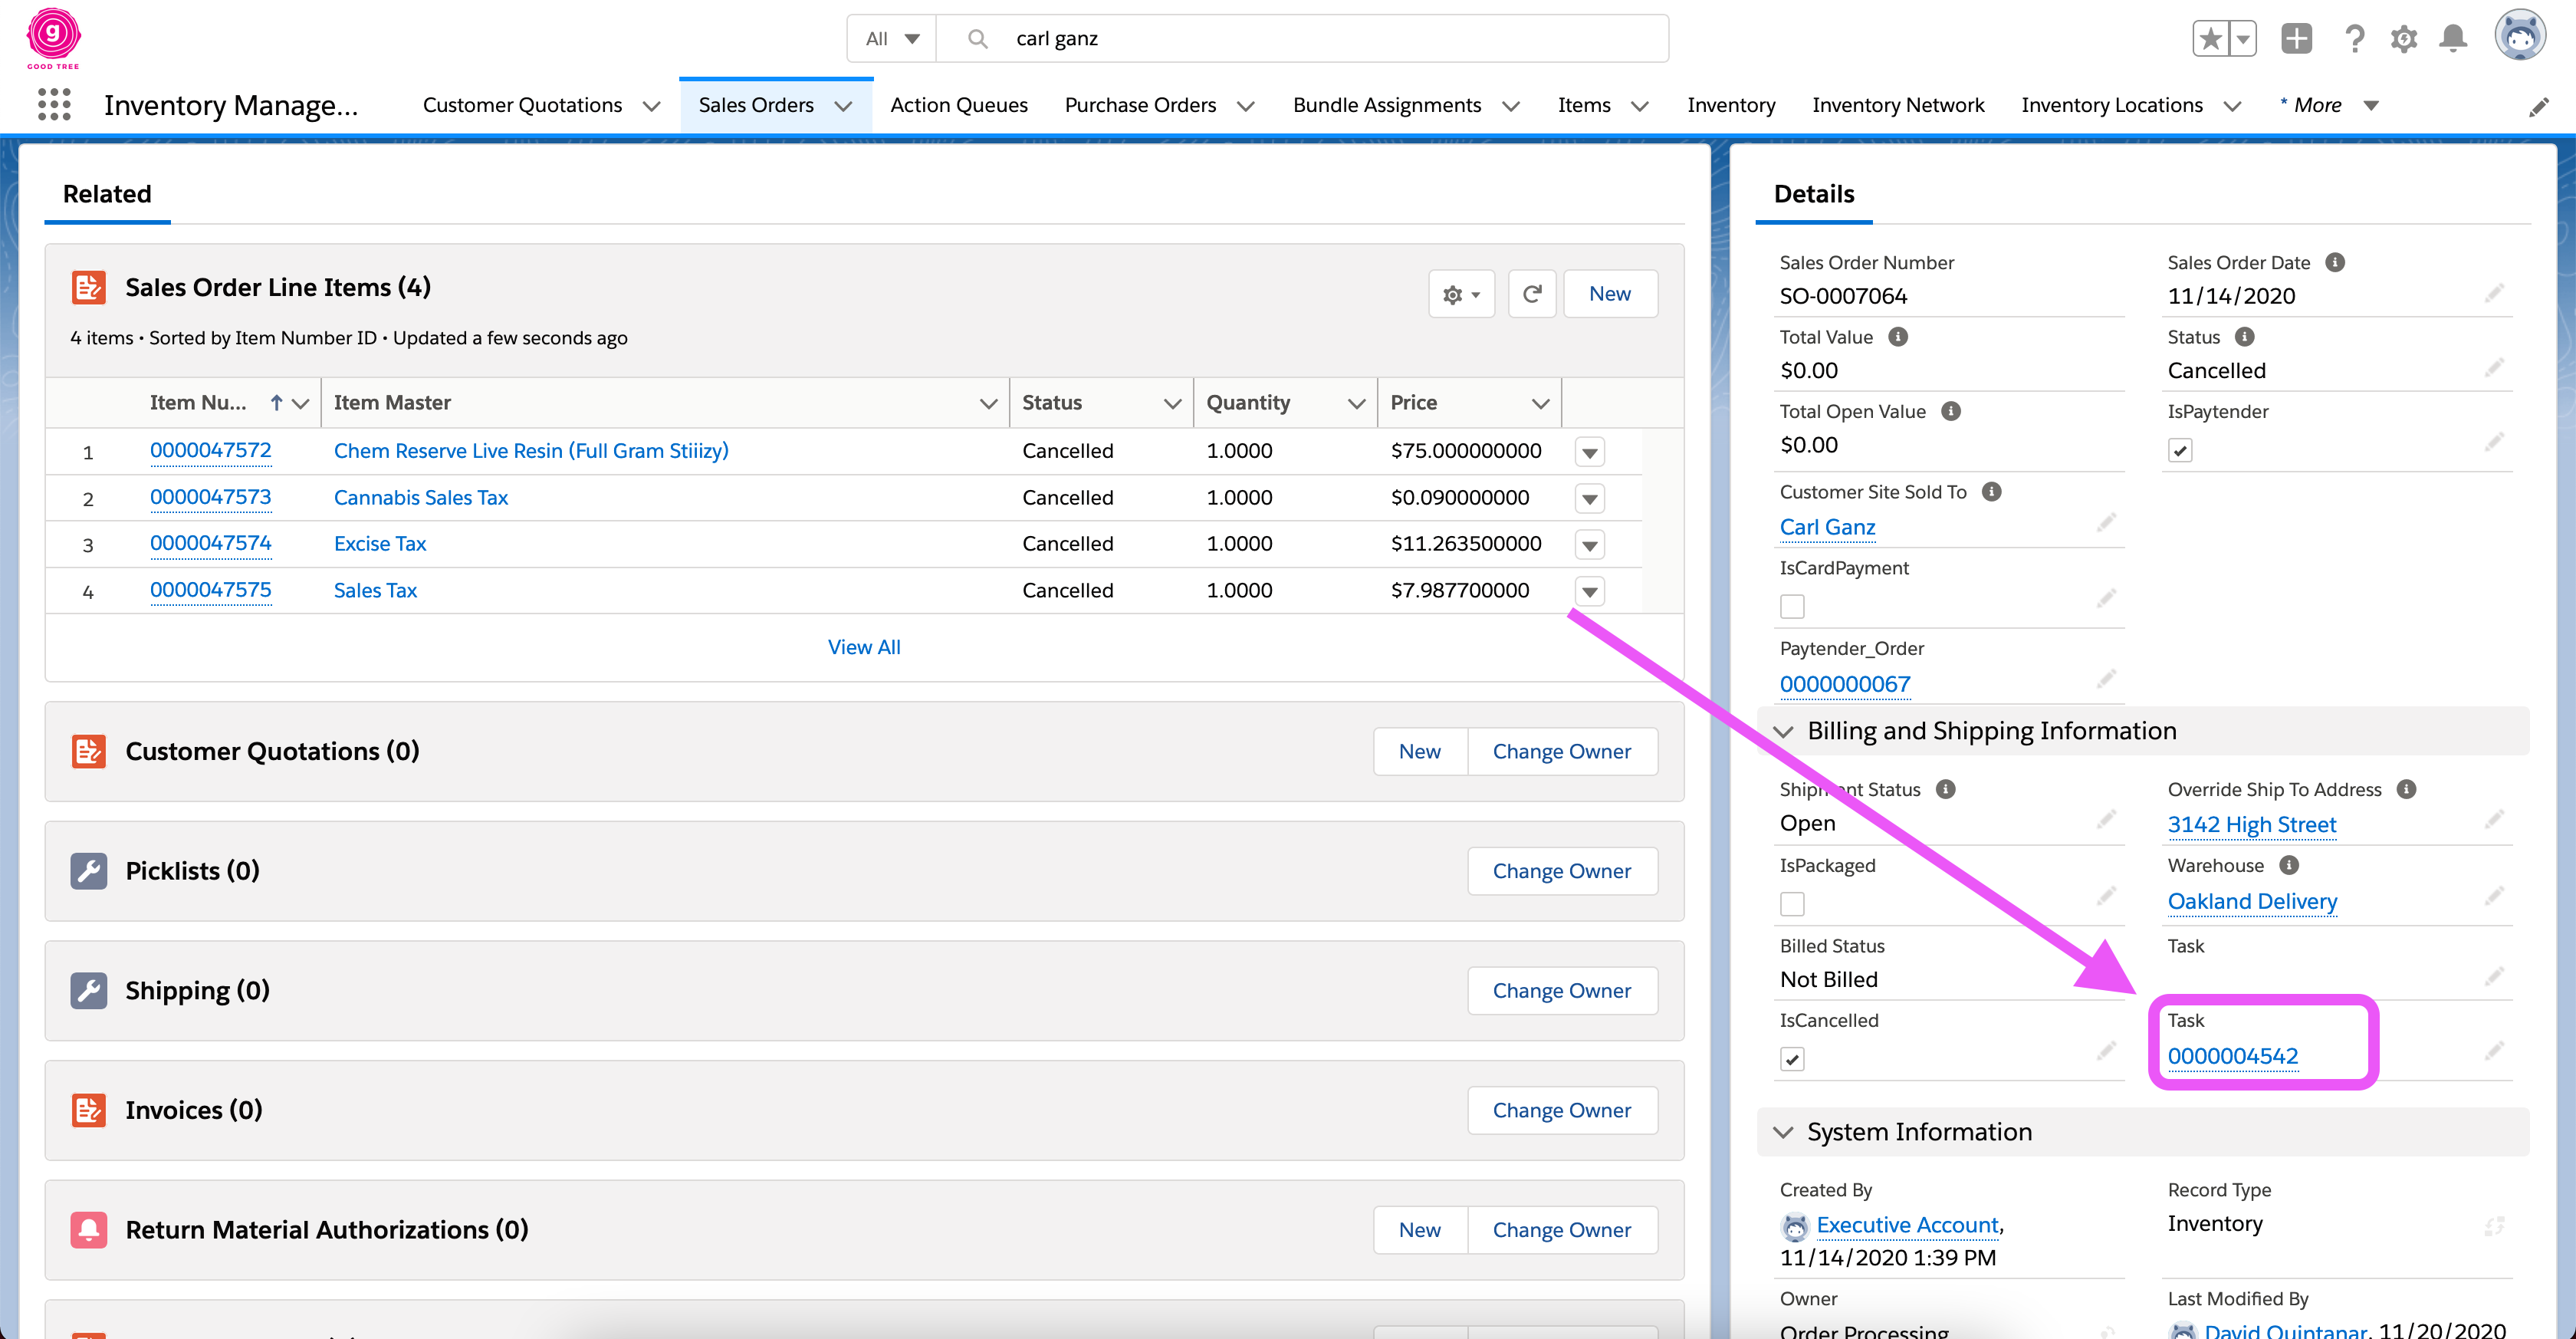
Onfleet Task in Salesforce
Towards the bottom of the Task page is a field named “ID”. Paste the value from Onfleet here and save. The Onfleet task and the Sales Order are now linked, and the Onfleet notes will automatically update.
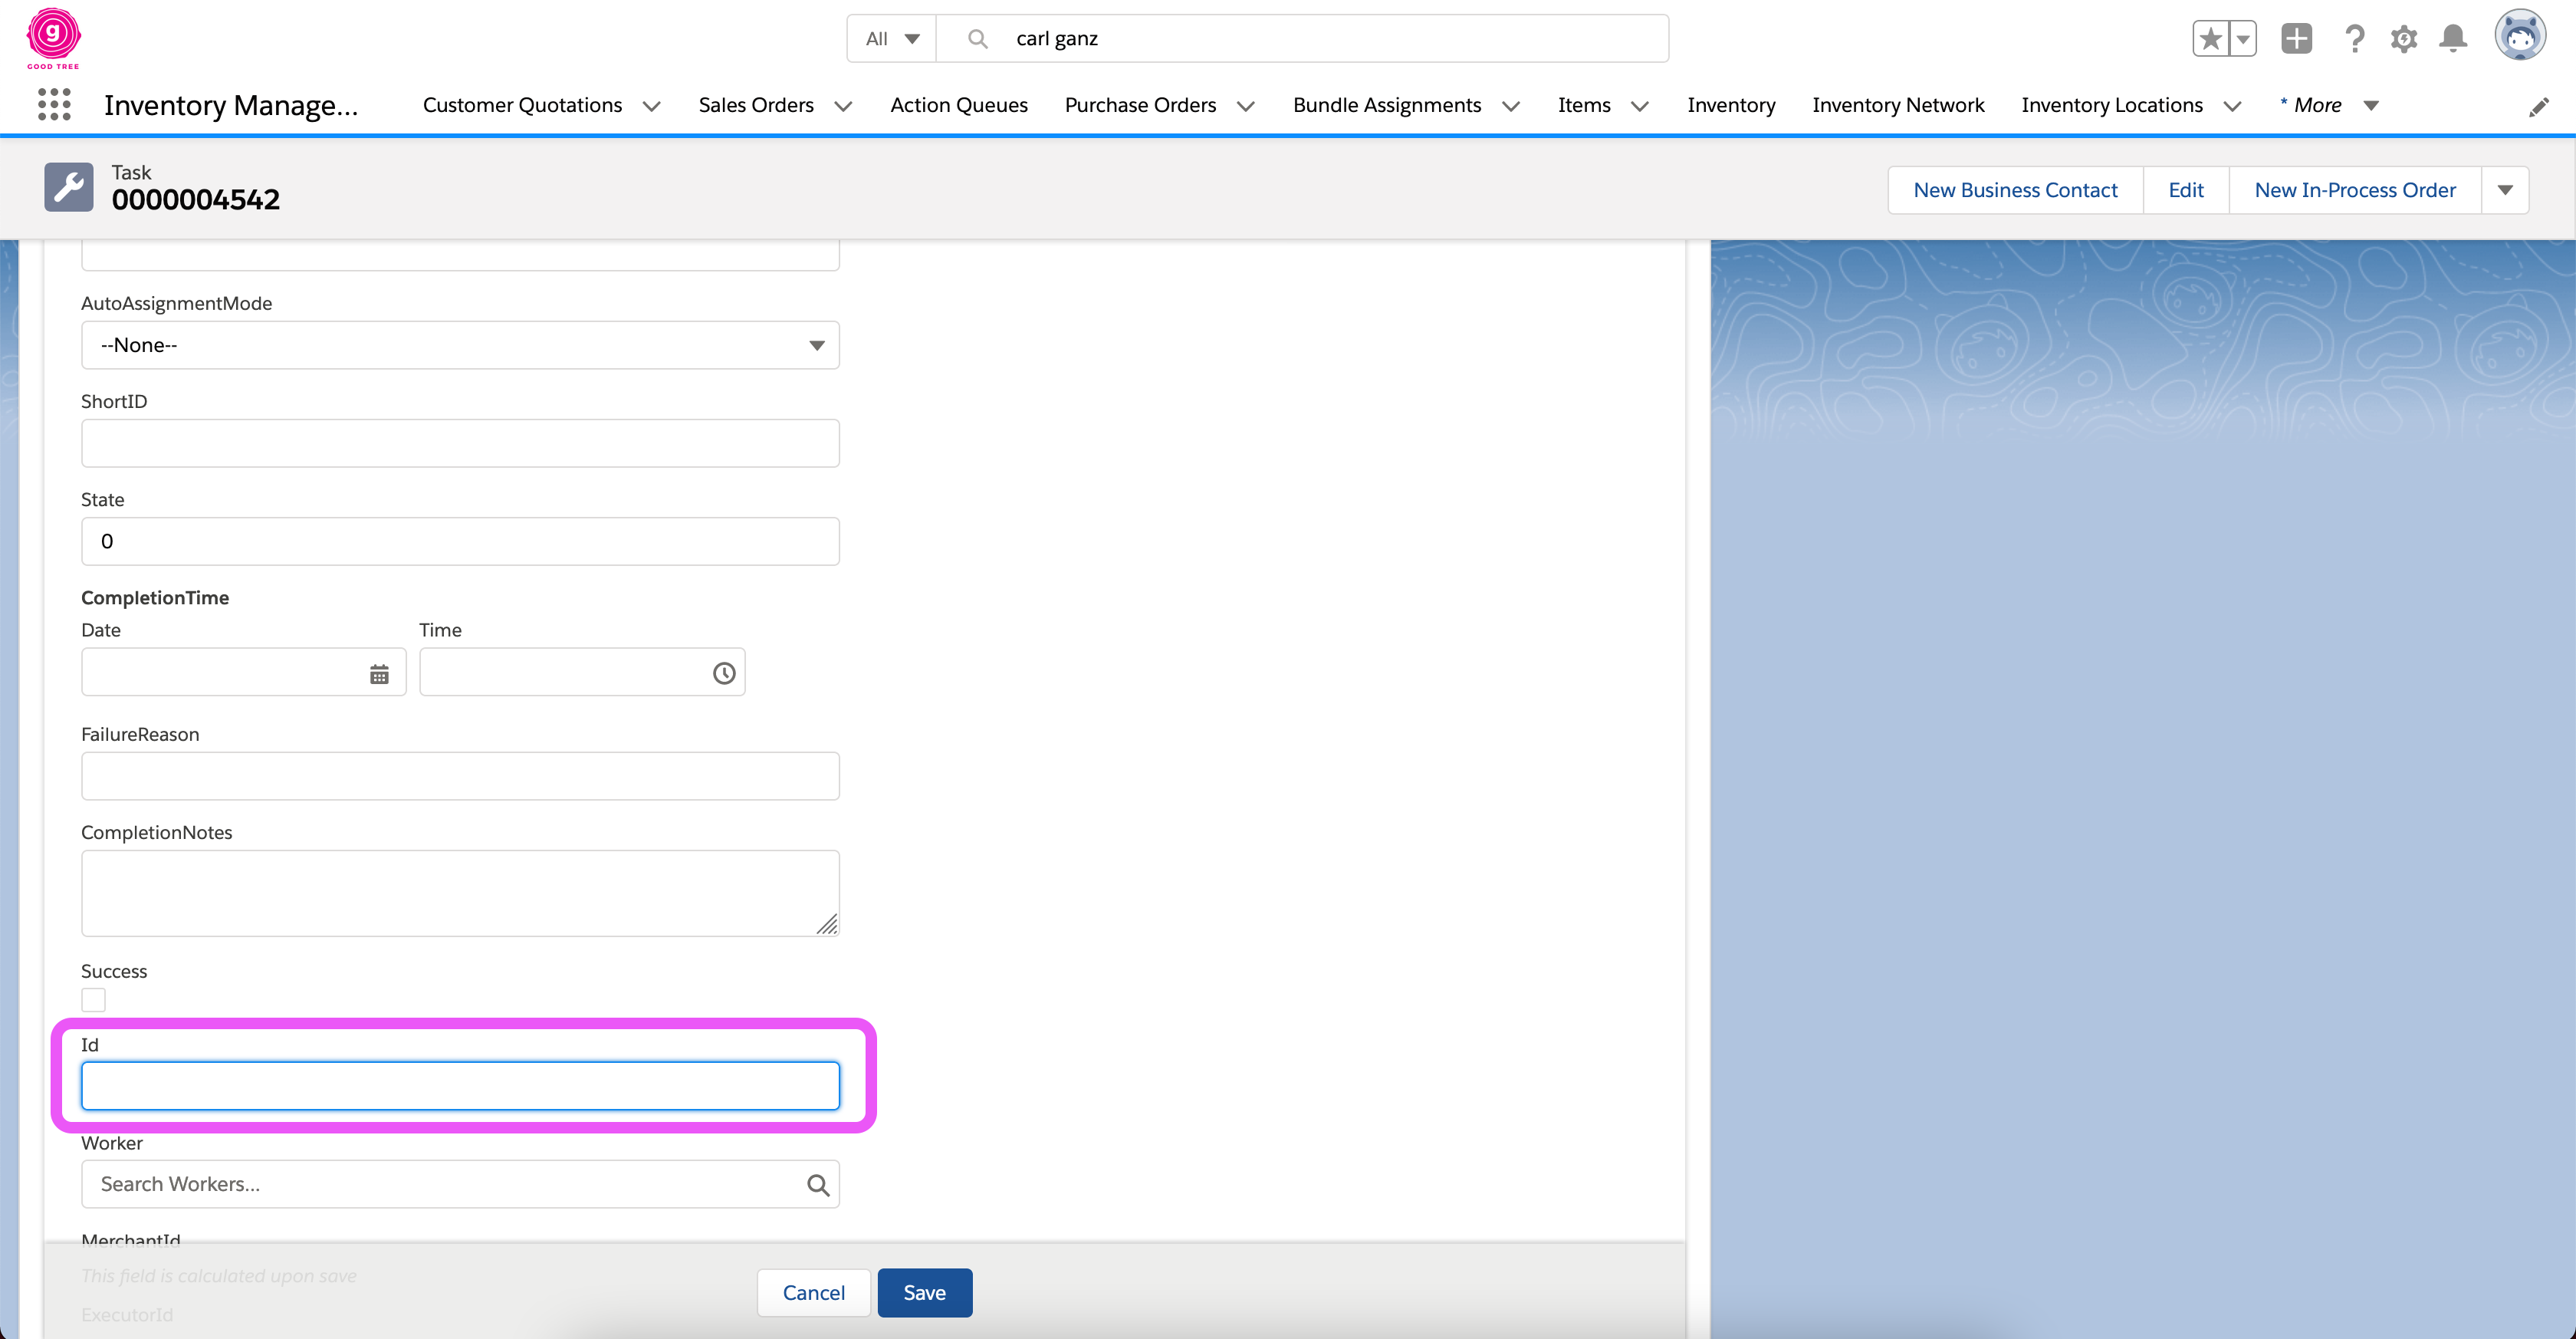
Task Page